UltraxBlade's #febuilder-help FAQ

How do I change chapter titles? I changed the chapter title, but it’s still showing the vanilla title in the chapter intro.

The vanilla chapter titles are stored and displayed as image files, so whatever you type as the “chapter name” in the Chapter Editor is not actually used for them by default. You could edit those images if you want to do something fancy… but if you don’t want to take forever and don’t mind using the vanilla chapter title font, there’s the Convert Chapter Titles to Text patch.

There are two versions of the patch. Version 1 will just display whatever you’ve set for “chapter title” in the Chapter Editor and only whatever you’ve set there, meaning if you want chapter numbers you have to include that there. Version 2/2.1 will also add in the chapter numbers, with an editor in the patches list where you can designate specific chapters to display something else in place of the numbers (ex. “Prologue” or “Final”).

How do I change the prologue to instead say chapter 1? I’m using chapter titles as text but it won’t show the number.

Chapter titles as text v2/2.1 has an editor where you set alternative displays instead of numbers for specific chapters. By default, it starts with entries for prologue and final. Find the patch’s editor in the patches list to change/remove these entries.

5 Likes

What do the different unit load commands do?

As you may have noticed, there are quite a few different unit load commands in the event editor, and they all do slightly different things. Most of these commands use one of three different load types: LOAD1, LOAD2, or LOAD3, which you’ll see in parentheses at the end of the command description.

LOAD1 commands are generally used for loading units who are actively involved in gameplay. It’s used for loading player units who join the party, and enemy/NPC units who start on the map. The primary LOAD1 command is “Load units and move. If player unit, join party (LOAD1+ENUN)”.

LOAD2 commands are generally used for loading specific units in cutscenes. Player units loaded with LOAD2 will not join the party (though of course, it won’t remove units who are already in the party), so it’s useful for when you need to show blue NPCs. The primary LOAD2 command is “Load units and move (LOAD2+ENUN)”.

LOAD3 is a bit different, and its name in FEBuilder, “load player units for cutscenes”, is a bit misleading. Like the other LOAD commands, LOAD3 takes in a unit group, but the units loaded will not actually be the ones shown in the Unit Placer. Instead, LOAD3 will load the first X units of the player’s current party, based on recent deployment order, in order of the slots in the Unit Placer list. This can be useful for cutscenes where you need to show a large group of the player’s units but don’t need to specify which ones in particular.

In most cases, you will use variants of LOAD1 and LOAD2 to load groups of specific units. If you are loading units to appear on the map in gameplay, or if you want units appearing in a cutscene to join the player’s party as new recruits, use LOAD1. If you are loading units purely for cutscene purposes, use LOAD2.

The one other load command to be aware of (which probably uses one of LOAD1 or LOAD2 internally, but I don’t know the specifics) is the “Load reinforcements” and “Load reinforcements (Hard mode only)” macros. These commands should be used in all cases where you load enemy reinforcements during a map. The big thing that sets them apart from the other load commands is that, as units load in with these macros, the camera will automatically pan to show where they’re loading. This may seem like a minor detail, but it’s extremely important to do for the player to be made aware of reinforcements showing up. If you’re thinking “haha I’ll not do that to make it a surprise”, no. Stop. Don’t. That is simply bad design. The reinforcements are visible information anyway, don’t make your game intentionally obstructive to the player’s ability to play.

How do I make the camera pan to show reinforcements as they appear?

See paragraph above.

How do I make a unit appear in map events even if they died?

There’s a table you can find in the patches list called the “IsSethLArachelMyrrhInnes Table”. Any unit included in this table will be loaded with LOAD2 even if dead. It got the name because those four units – Seth, L’Arachel, Myrrh, and Innes – are the units in vanilla FE8 who display this behavior.

(For dialogue-only scenes, nothing in the text engine checks the living status of the unit a portrait belongs to, so you don’t need to do anything special there unless you want a unit to not show up when dead, in which case you’d need a CHECK_ALIVE conditional and alternate text entries.)

4 Likes

FEBuilder got stuck on the wrong language, how do I change it back?

The buttons are still in the same place even if you can’t ready them, so follow along with these images.

  1. Open FEBuilder and open a ROM. If you’ve already done this before, you know which button to press even if you can’t read it, but if this is your first time you’ll want the second button on the launch screen, which will prompt you to choose the ROM file with your computer’s file explorer (which should already be in your language):

  2. On FEBuilder’s main menu, navigate to the Options window from the Settings dropdown. Settings is the last of the four menus at the top of the screen, above the top row of buttons, and Options is the first choice in it:

  3. In Options, go to the final tab, Function 3, where you’ll find the setting for FEBuilder’s display language as the first choice in the bottom section. Change it to your preferred language, then click the save button at the bottom:

  4. Close and reopen Builder for the change to take effect.

5 Likes

Is there a place to see all the commands I can use in text/dialogue?

Yes, right-click in the Text Editor and click “Script Notation”. It’ll bring up a searchable and categorized commands list much like the one for the Event Editor.


10 Likes

How do I create and edit Tile Changes on a map?

To create a new tile change, click “expand tile changes” and then “assign new tile change” in the Map Editor, above the tileset:


To edit it, you select the tile change you want to edit in the dropdown above the “expand tile changes” and “edit palette” buttons:

Once you’ve selected the tile change to edit, you’ll see the changed tiles shown on your map, with the rest of the map grayed out. You can move and resize the tile change by clicking “resize” above the map while the tile change is selected, and you can edit how the tiles change by placing tiles within the highlighted tile change area:

Warning: You should basically never click this button in this process without knowing what you’re doing:

4 Likes

The game’s triggering the wrong tile change.

First of all, be careful of overlapping tile changes. Make sure you’re not trying to trigger a tile change based on coordinates that overlap another one, use the ID-based tile change command instead.

Already checked that? Or it’s a village close vs destruction tile change showing the wrong one?

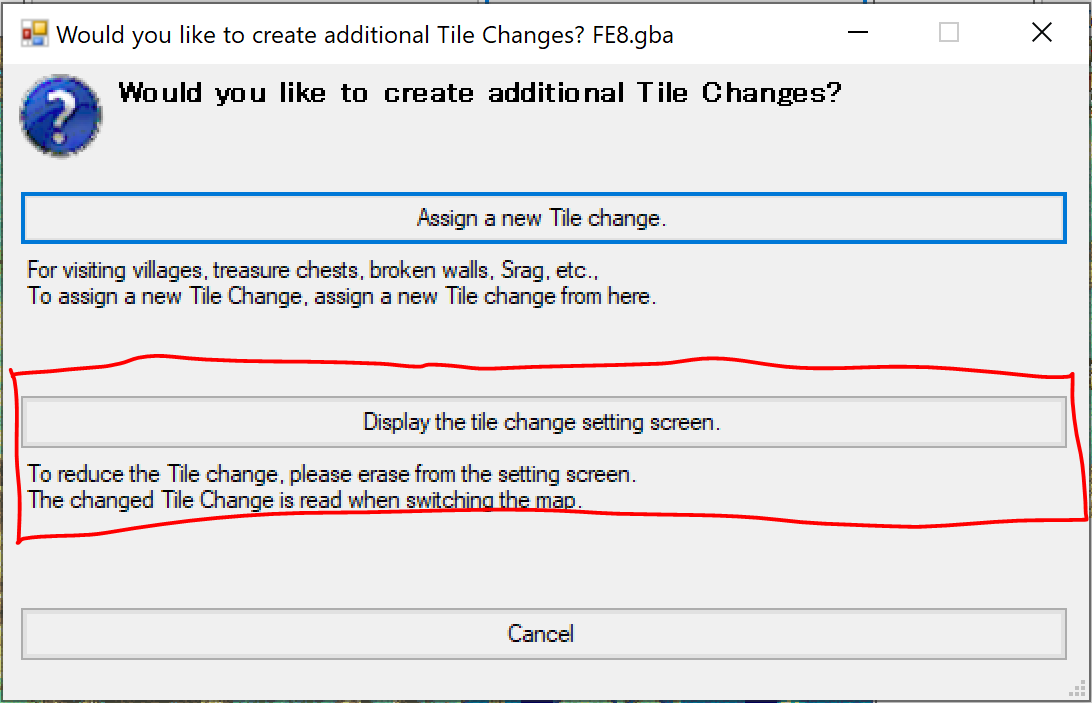
…Alright. Time to open up the dangerous menu. Click “Expand Tile Changes” in the Map Editor, then go here:


I do not like this editor. It is very easy to break things here. I strongly advise against using this editor to create or edit tile changes unless you know what you’re doing. Follow the steps in the post above for normal tile change editing instead. That said, for this, we’ll need it, so follow along carefully.

Open this editor from the map that’s giving you the issue. First, go through all the tile changes in the list for the chapter and make sure that their ID value matches their position in the list:

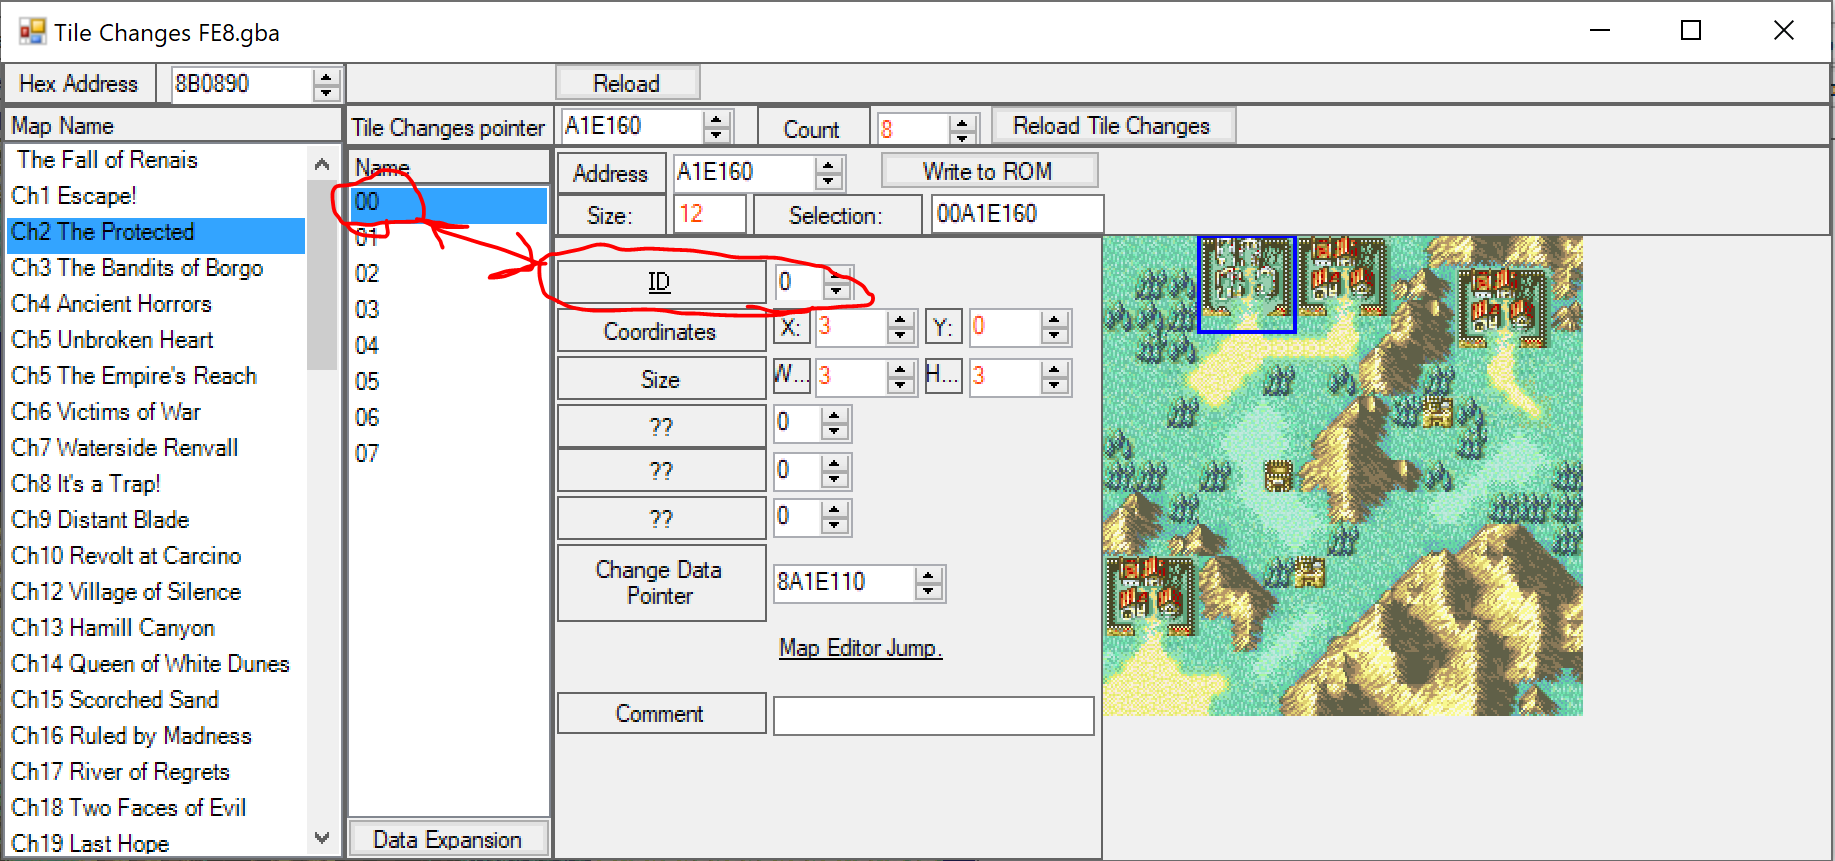
If the issue was a tile change command in an event triggering the wrong tile change, this is probably the issue, check if it’s fixed.

If the issue involved a village triggering the destruction tile change instead of the door close tile change, you’ll need to reorder the tile changes in the list. Village destruction tile changes need to be placed higher in the list than their village closed counterpart.

Reordering the tile change list will not automatically update the IDs to match. Once you reorder the list, make sure to check and fix the ID values accordinly, or issues will arise.

5 Likes

I have a chapter without preps, and there’s an issue. Turns won’t automatically end, the cursor is getting stuck off-screen and breaking the game, and I can see units in the stat screen who aren’t on the map.

These issues all come about as a result of having a no-preps chapter without the full party deployed. When a unit is not deployed in the preps screen, it is marked with the undeployed state. However, without the preps screen, the game doesn’t know to make units who aren’t on the map as undeployed. As a result, it thinks every unit in your party is deployed, even those that aren’t on the map, leading to all these issues – the turn isn’t ending because there are “deployed units” who haven’t moved, the cursor’s getting stuck off-screen because it’s trying to find a unit that isn’t on the map, etc.

The solution to this is simple, if a bit tedious: before the chapter starts, use the REMU command to temporarily remove each unit from the party that isn’t involved in that chapter. Then, at the end of the chapter, use its counterpart REVEAL to make them rejoin.

While I have not seen it firsthand, I’ve heard that large blocks of consecutive calls to vanilla REMU and REVEAL can sometimes cause issues, so it is advised to use the “silent” versions from this patch for this purpose. (Note that this is specifically meant for start- and end-of-chapter processing, the commands in this patch will not work if you need to REMU a unit on the map mid-chapter.)

Patch Name:AddEvent: Silently change the unit’s status flag @FE8U
Author / Source:7743

So, you’d have something like this in your start event:

And something like this in your end event:

If the lord is one of the units not involved in the chapter, you’ll also want an autocursor fix patch. There’s a version that makes autocursor just jump to the first deployed unit instead of the hardcoded lord, and a version that lets you specify who the autocursor jumps to on a per-chapter basis. I find the “first deployed unit” Autocursor Fix works for most use cases with less setup required, but the other version is more directly controllable for some edge cases.

Patch Name:Autocursor Fix @FE8U
Author / Source:credit Venno Venno's small ASM hacks and notes - #66 by Venno

Patch Name:Change to have multiple main characters selected by auto cursor 20200302(Install) @FE8U
Author / Source:7743

I have a unit who left the party rejoin after preps. I can’t see them in the unit list, and the game ended my turn before moving them!

If a player unit existed during preps but not deployed in preps, the preps screen will mark them as undeployed. This includes units removed from the party with REMU – they’re not actually gone from your party, they’re just hidden. When the unit rejoins, they still have the undeployed state, so the game won’t count them when checking if all your units have moved. Luckily, there’s an easy fix: remove the undeployed state when they rejoin. This is done with the UNCR command, added by this patch:

Patch Name:Add Event: Set Unit State Conditions (UNCM) @FE8U
Author / Source:Tequila Teq's Minor Assembly Shenanigans - #80 by Tequila

Example:

7 Likes

How do I edit the stats of characters?

Character Editor

Select the unit you want to edit and set their base stats and growth rates:

Note that these base stats are added to the base stats of their class. The Stat Calculator field can show you a unit’s average stats at a given level using the class base stats of their “Support Class” (set in the top-right), so if you set the level to view as their starting level, it will show you their base stats.

How do I edit the stats of classes?

Class Editor

Select the class you want to edit in the list and set its base stats, max stats, and enemy growths (see here for an explanation of how enemy stats work):

How do I edit the stats of weapons?

Item Editor

Select the weapon you want to edit in the list and change its stats:

2 Likes

How do I edit maps?

Select the chapter you want to edit in the list on the main screen, then go to the Map Editor:

Click a tile in the tileset on the left, then click on your map on the right to place it:

To change the tileset you’re using to a different one in the ROM, click the “Tileset Palette” dropdown:

To change the size of your map, click Resize, then input how much to change it by. Note that you can add or remove space from the top, bottom, left, or right. To shrink, set a negative number for the change:


Some people prefer doing their map editing in programs outside of FEBuilder. I won’t go into those here, but if you use one of them, you can insert the resulting map configuration file by clicking Import From File. Note that this must be an insertable tile map configuration, such as a .tmx file, that matches the tileset, not just an image of the map.

How do I edit player/enemy unit placements on maps?

Unit Placer: (Alternatively, click on one of the units shown on the map)

In the Unit Placer, you can find all the unit groups that exist in the chapter. Select the one you want to edit, and you can see all the units in that group and edit their level, class, allegiance, starting inventory, and placement. (Units who are already in the player’s party will use their current level, class, and inventory instead.) Note that you can move units around on the map by simply clicking on them on the map, then clicking where you want them to go – you don’t have to enter the coordinates manually.

To add new units to a group, click Data Expansion, and expand the list to the total number of units you want. This can also be used to remove units, by “expanding” to a size smaller than you currently have. A new unit group defined here will not automatically appear in the chapter. You must then load it in an Event. See here for a discussion of loading enemy reinforcements, and here for more in-depth details on how the different unit load commands work and which you should use when.

Note: Units can be set to move as they appear, instead of simply manifesting on their starting square. To do this, and to edit units already set to do this, there’s a list of coordinate positions at the bottom of the Unit Placer. The bottom coordinate in the list is the one they end at. Select the entry in the coordinate list you want to edit before moving the unit on the map. You can add new entries in this movement specification by selecting a row in the coordinate list and hitting enter, and delete them by selecting a row and hitting delete/backspace.

How do I make an enemy drop an item?

To make a unit drop or not drop the last item in their inventory, click where it says “Item Drop”.

How do I set the player’s starting position with the preps screen?

The player’s available positions during preps are determined by the size and placements of the unit group labeled Player Placement in the Unit Placer. For this purpose, it does not actually matter what units are specified in this group, only how many and where – you’ll notice the vanilla game likes to just spam duplicates of Seth. Force-deployed units will be forced in the positions of the first units in the list.

How do I change which units are force-deployed?

Forced Deployment editor, under Advanced Editors.

Each entry in the list contains a unit, a route specification (“tutorial mode” is pre-routesplit), and a chapter specification. Setting the chapter ID to FF means the unit will be forced in ALL chapters so long as you’re in the specified route. Setting the route to FF=Unconditional means the unit will be forced in the specified chapter regardless of route.

Ex. This unit is forced in every pre-routesplit chapter:

While this unit is forced only in Chapter 4:

To add more entries to the list, click Data Expansion, and expand the list to the total number of entries you want. This can also be used to remove entries, by “expanding” to a size smaller than you currently have.

5 Likes

Where do I edit events?

Events are what control cutscenes, reinforcements, recruitments, getting items in villages, and so much more. This post will cover how to get to and use the event editors in FEBuilder. The intricacies of how to actually write events is covered in various other posts in this FAQ – there’s a whole “Eventing” section in the first post’s table of contents – and in more dedicated guides like this one: FE8 EA Eventing Guide

To edit a chapter’s start and end events, those that run at the start and end of the chapter, select the chapter you want to edit on the main screen, then click where it says “Start Event” or “End Event” on the right side:

To find and properly edit all other events, click where it says Event above that:

This editor has multiple categories, which you can select from the dropdown at the top. The most commonly-used are:

  • Turn Conditions, or turn-based events, which play at the start of a specified phase on a specified turn
  • Talk Conditions, or talk events, the events triggered by talking to a unit (ex. recruiting an enemy)
  • Map Objects, which encompass things like chests, doors, villages, and sieze points
  • Always Conditions, which include range events (area triggers), events triggered by specific Flags turning on, and events that just run after every single action (usually conditionals of some sort).

What basically all of these will have in common is a pointer to the event you want to trigger. You can click where it says “Event” to open that event in the event editor.

There will also be a field for a Completion Flag. See here for an explanation of Flags and Completion Flags.

Beyond that, there will be fields specific to the event category – the turn(s) the turn-based event runs on, the unit who initiates the talk and who they talk to, the type of map object, the corners of the range event’s area, etc.

To add more entries to one of the lists, click Data Expansion, and expand the list to the total number of entries you want. This can also be used to remove entries, by “expanding” to a size smaller than you currently have. When creating a new entry, or if you set the event pointer to 0, you should see a “New Event” button appear next to the event pointer, allowing you to create a new event from scratch. When you do so, FEBuilder will prompt you with a set of relevant starting templates for common use cases, in addition to the “create an empty event” option.

In the Event Editor itself, you’ll see all the commands making up the event. Double-click on a line to open the editor for that line, in which you can change its parameters, insert a new command after it, or replace it with a different command. To choose the command to replace it with or insert, click the Command button to open the commands list. There’s also a Template button to open a list of multi-command templates you can insert for common use cases.

The command list is well-categorized and searchable. You can select categories to only show commands in that category. While your cursor is hovering over a command, you’ll see a description of that command at the bottom of the screen. Double-click on a command to select it and be sent back the the Event Editor.

How do I make reinforcements appear?

Reinforcements are loaded by Events, most commonly Turn-Based Events at the start of player phase on a given turn. When creating a new Turn-Based Event, there are default templates for loading reinforcements:

The basic template for loading enemy reinforcements is quite simple:
image

Double-click on that Load Reinforcements command to open the editing window, then double-click where it says “please set the unit to be read” to be taken to the Unit Placer.

In the Unit Placer, double-click on the unit group you want to load as reinforcements. If you want to load a new unit group, click “Alloc New Space” below the list of unit groups, then double-click on the resulting NEW entry.

Once the unit group is selected, you can go back to the Unit Placer to edit it. You can jump straight to the relevant group from the Event Editor by clicking where it shows the preview of the units while editing the load command:

4 Likes

How do I change a character’s portrait? How do I import custom portraits?

In the Character Editor, click on the character’s portrait to open the portrait editor:

You can import a new portrait here by clicking the import button at the bottom. Make sure to adjust the eye and mouth positions appropriately after import.

To select a different portrait in the list to use, you can double-click on an entry in the portraits list after opening the portrait editor from that character’s character editor, or you can set the ID of the portrait to use in the Character Editor (the ID is the position in the portraits list).

How do I set a character’s personal battle animation color palette?

In the Character Editor, click “Jump to Unit Palette” to open the unit palette assignment editor.

On the bottom half of the screen, you put the IDs of the classes to use. In the corresponding slots on the top half of the screen, you put the IDs of the palettes to use. Click the label next to any of the top half’s palette slots to be taken to the actual palette editor, where you can edit the colors of the palette and expand space for new palettes.


3 Likes

How do I change a class’s map sprites?

In the Class Editor, click on the map sprite of the class to get to the standing map sprites editor.

Here, you can import new standing map sprites.

To select a different standing sprite in the list to use, you can double-click on an entry in the standing sprites list after opening the standing sprites editor from that class’s class editor, or you can set the ID of the standing sprite to use in the Class Editor (the ID is the position in the standing sprites list).

Now, we’re not done. There’s also the moving sprite. In the standing sprites editor, click “jump to moving map anims” in the bottom-right:

Much like in the standing sprites editor, you can import new moving sprites here. However, unlike standing sprites, moving sprites are not assigned by ID, and in fact, jumping to this editor may have taken you to the wrong one! Classes use the moving sprite that has the same position in the moving sprites list as the class has in the classes list. If the standing sprite you’re using is shared by multiple classes, jumping to the moving sprites editor from it will just have taken you to the first class that uses that standing sprite, not necessarily the one you came from.

When you import a moving map sprite, you may also need to change the AP, the animation processing data. Most sprites use AP 1-1, but some vanilla sprites, and sprites that are edits of those sprites, use different APs to allow special formatting to break the normal size boundaries (ex. Swordmaster reaching its sword up in the hover anim). If a sprite looks weird in-game, you may have the wrong AP – look in the dropdown for one that matches the class the sprite is based on.

This class is showing the wrong sprite when moving, when hovering over it, and in the stat screen.

Unlike standing sprites, moving sprites are not assigned by ID, and in fact, jumping to the moving sprites editor may have taken you to the wrong one! Classes use the moving sprite that has the same position in the moving sprites list as the class has in the classes list. If the standing sprite you’re using is shared by multiple classes, jumping to the moving sprites editor from it will just have taken you to the first class that uses that standing sprite, not necessarily the one you came from.

4 Likes

How do weapon rank gains on promotion work?

You may have noticed that, when setting the base weapon ranks of characters and classes, you set them with numbers on a scale from 1 to 255, with 1=E, 31=D, 71=C, 121=B, 181=A, and 251=S. These are actually base values for weapon experience, or WEXP, with those numbers I just listed being the default cutoffs for how much WEXP you need to reach each rank.

WEXP gains on promotion are determined by the difference between your promoted class’s WEXP bases and your unpromoted class’s WEXP bases. If the unpromoted class doesn’t have access to a weapon type the promoted class has, then this just straightforwardly gives you the base value of the promoted class, as the unpromoted class’s base is 0. But for weapon types you already have, it takes the difference in class bases – if you promote from a class with base 31=D swords into a class with base 121=B swords, you gain 90 sword WEXP.

This unit is suddenly skipping to S rank in a weapon type on promotion, and I know I didn’t set the promotion weapon rank gains that high.

This is an issue that can occur when a unit has less WEXP than their unpromoted class base. Since player units can have personal WEXP bases that override class WEXP bases, it is possible for a unit to, say, start with E rank where their class’s base rank is D. If they still have E rank when they go to promote, this causes errors, presumably because it tries to subtract the class base from their current WEXP value and underflows. Make sure your units always have at least as much base WEXP as their class base – or rather, that your class WEXP bases are always lower than the WEXP bases of your units (aside from being nonzero, class WEXP bases only really matter for promotion purposes, after all – generic autoleveled enemies will automatically gain enough WEXP to use the weapons they load in with so long as those weapon types can be used by their class).

6 Likes

My force-deployed units are showing up in the wrong positions.

So, the thing is, forced deployment doesn’t actually check which unit is where in the unit placer. It just checks which are the first X player placement slots, where X is the number of forced units, and then puts the forced units into those first few slots based on their current deployment order in the party.

If you have multiple force-deployed units, and the player could have undeployed some of them in previous maps or recruited them in a variable order, it’s possible for their order to have changed. (Example: units A, B, and C join in that order, but then the player benches B for a chapter while using A and C, so now their deployment order is A, C, B instead of A, B, C.)

There is a solution to this. In the chapter start event, before preps, probably during a fade-to-black so the player doesn’t see, load all the forced units, change their allegiance to red, then change them all back to blue in the order you want them to load.


In this example from my hack, I force the units into the order Elys, Alexander, Ashley, Lily

This will momentarily remove them from the party, and then add them back at the end of the current deployment order in whatever order their allegiance changes back. Forced deployment will then grab them in that order and move them to the top. By doing this, the forced units always end up in the same order relative to each other, so they always end up in the same consistent positions.

10 Likes

How do I add new weapon types?

Short answer: you can’t.

More complicated answer, but one that says “it’s kind of possible”:

The game only has space in its save memory to save weapon experience for 8 weapon types per unit. As such, adding a ninth weapon type with its weapon rank completely independent from the others would take a monumental ASM effort in restructuring the entire save data and modifying everything that checks for your weapon ranks. It might be more doable if you were willing to sacrifice another part of the save data, such as one of the support point slots, but would still take some ASM work to make the “check if you have the required rank” functions account for it. Alternative structures for associating WEXP to weapon ranks have been proposed that would theoretically enable more weapon types so long as no one unit has too many, but at the time of writing this none of those ideas have actually been implemented to my knowledge.

Making a new “weapon type” that doesn’t have ranks is easy, you just treat the item as something like dragonstone or monster weapon and use weapon locks to restrict it to certain units/classes.

But if you truly want to make a new weapon type with WEXP and ranks, you’ll either need to replace one of the existing types entirely, or make it share rank with one of the existing types. There are patches that let you redefine the weapon triangle on a per-type and/or per-item basis, so that’s not a concern.

With regard to replacing, the one big complication is that if you use SkillSys Strength/Magic Split, you’ll need to reconfigure it if you want to replace a magic weapon type with a physical weapon type, which means configuring and running a Custom Build.

Making two types share a rank, for example making daggers a subtype of swords, is probably the method with the least need to mess with ASM and Custom Build stuff, but involves some mildly tedious weapon lock management to restrict classes to one of the other – you’d have to apply a lock on all swords to only be usable by the intended sword-using classes, and likewise for all daggers. See here for a discussion of weapon locks.

6 Likes

Why can’t I target this newly-recruited unit with the Shove skill?

Since the Shove skill is able to shove non-player units, it has a check built-in to prevent shoving stationary units, so you can’t shove bosses off of thrones and the like. This check works based on the AI settings of the targeted unit. However, when a unit is recruited to the player’s army, their AI settings are not automatically cleared in their data, and the Shove skill doesn’t check for allegiance before checking AI. This can result in a recruited unit being unable to be shoved if they have certain AI settings before recruitment. This can be fixed by having their recruitment event also change their AI in addition to changing their allegiance.

In the SkillSys version of Shove, the check is based on AI4 being the “no retreat/boss AI/nullify movement” setting. Since the vanilla change AI event command doesn’t work for AI4, you’ll need to use the commands added by the Set Unit Status patch to change it to 0.

In the standalone non-SkillSys version of Shove, the check is instead based on AI2 being the “do not move” setting. You can use the vanilla change AI event command to set their AI2 setting to 0.

11 Likes

Thanks to FEBuilder creator 7743, the issue with deleting text entries corrupting data has now been addressed if you update to the latest version of FEBuilder.

5 Likes

Dispelling a myth about promoted enemy autoleveling.

You may have heard at some point that promoted enemies use the growths of their base class, or “menu class” in FEBuilder, for the extra autolevels they gain for being promoted. This is blatantly and provably false, both in the vanilla game and with SkillSys, regardless of what anything in FEBuilder says about it.

3 Likes

What is Class Relative Power? Why do Trainees, Thieves, Bishops, Valkyries, Assassins, and Rogues gain more EXP than other units?

Relative Power, or Class Power, is a field you may have seen in the Class Editor. This value affects EXP gain. The short version is that lower Class Power means higher EXP gain, and the baseline most classes use is 3. Classes with Class Power lower than 3 gain more EXP, classes with Class Power higher than 3 gain less EXP. On the flip side, enemies with lower Class Power grant less EXP when killed than other enemies. The Class Power of your base class also matters if you’re promoted.

Now, here’s the detailed version of how it works:

Property Calculation
Experience from doing damage = [31 + (enemy’s Level + 20 if enemy is promoted) – (Level + 20 if promoted)] / Class Power
Experience from doing no damage = 1
Experience from defeating (base) = [(enemy’s Level x enemy’s Class Power) + 20 x enemy’s base class’s Class Power if promoted] – { [(Level x Class Power) + 20 x base class’s Class Power if promoted] / Mode coefficient }
Experience from defeating enemy = [Experience from doing damage + (Experience from defeating (base) + 20 + Boss bonus + Thief bonus, take as 0 if negative)] x Silencer bonus

These are the vanilla FE8 EXP formulas for combat. It’s a lot, so allow me to highlight the main part here:

(enemy’s Level x enemy’s Class Power) + 20 x enemy’s base class’s Class Power if promoted] – [(Level x Class Power) + 20 x base class’s Class Power if promoted]

When you defeat an enemy, the EXP formula compares your levels – you get more EXP if the enemy is above your level, less EXP if it’s below your level. But when comparing levels for this, it multiplies both combatants’ levels by their respective Class Powers.

So, if an unpromoted level 5 unit kills an unpromoted level 7 enemy and both are in classes with Class Power = 3, you gain 7x3-5x3 = 21-15 = 6 additional EXP from this part of the formula, while if you were level 7 and the enemy was level 5, you would gain 5x3-7x3 = 15-21 = 6 less EXP. (I’m assuming Mode Coefficient has been disabled, both for simplicity and because you disabled Mode Coefficient, RIGHT???)

Now, what if your Class Power is less than 3? Let’s say it’s 2. Now, you get 7x3-5x2 = 21-10 = 11 more exp when the enemy is level 7 and you’re level 5, instead of 6. Meanwhile, when the enemy is level 5 and you’re level 7, it’s 5x3-7x2 = 15-14 = 1 additional EXP, instead of 6 less.

Now, when a unit is promoted, there’s an additional complication here. Some sites, such as the Serenes Forest page I initially copied the formulas from, simply list this as a “Class Bonus B”, but it’s actually 20 times the Class Power of what FEBuilder labels as the promoted class’s “menu class”, which is usually its base class, representing 20 levels in that class before promotion. The “menu class” was used to determine promotions in FE6 and FE7, but FE8 instead uses its promotion branches system. However, the “menu class” is still used here in the EXP formula to determine the base class.

In most cases, both the “menu class” and the promoted class will have Class Power 3. However, if the “menu class” has a lower Class Power, the promoted class will gain boosted EXP even if its own Class Power is 3. Consider two level 5 promoted units, both of which have Class Power 3 in their current class, but your unit has a “menu class” with Class Power 2 while the enemy has a “menu class” with Class Power 3. The result becomes (5x3+20x3)-(5x3+20x2) = 75 - 55 = 20 additional EXP gained.

Now, that’s for the base kill EXP. There’s one other place in the formula that Class Power affects, which is the EXP for just dealing damage – which, if you look at the formulas above, is also added to kill EXP. This does not care about your “menu class” Class Power or the enemy’s Class Power, only that of your current class, and it has the effect of dividing the whole value by your Class Power. In the case of both units being of equal level, this becomes the 31/3 = 10 chip EXP you’re used to seeing. But if Class Power were only 1, you’d be getting a full 31 EXP from dealing chip damage. Sound familiar? That’s because FE8’s trainee classes achieve their boosted EXP gain by having class power 1 instead of 3!

Now you know the full details of how Relative Class Power affects EXP gain. Now, here’s the list of player classes this affects in vanilla:

Classes with lower than 3 Class Power

  • Tier 0 Journeyman (1)
  • Tier 0 Recruit (1)
  • Tier 0 Pupil (1)
  • Priest (2)
  • Cleric (2)
  • Troubadour (2)
  • Thief (2)

Promoted Classes with Class Power 3 but a Menu Class with lower than 3 Class Power

  • Bishop (from Priest/Cleric)
  • Valkyrie (from Troubadour)
  • Assassin (from Thief)
  • Rogue (from Thief)

Some of the civilian classes may also have lower Class Power, and Entombed actually does as well to slightly counterbalance the massive +40 bonus EXP they give.

You may notice that I’ve said nothing about staff use EXP here, and that’s because staff use EXP is unaffected by Class Power. Priest, Cleric, and Troubadour only have lower Class Power to make them grant less EXP when killed, and to boost the EXP gain of their promotions.

Since “menu class” affects nothing else in FE8, you are free to change the “menu class” of these promoted classes to make their EXP gain and EXP rewards the same as other promoted classes if you so desire.

6 Likes

How do I make a portrait from the Character Creator work in-game?

First of all, if you’re going to use the Character Creator, make sure you’re using version 3, which can be found here. Older versions had so many issues, between the awful colors they output, the lack of color control, and exporting at the wrong size, that it’s not worth the effort to clean up portraits made with them. Character Creator version 3 can be found here:

While working in the CC, here are a few things to keep in mind:

  • Pick colors from the “FE Palettes” tab, especially for skin tones. These are predefined color sets by an actual community artist. The other methods of generating colors use the old CC’s procedural algorithm, and while you can use your judgment with it for things like armor and hair, it sucks at skin tones.
  • Leave the outline at its default (RGB 56/32/64). This is FE8’s standard outline color, and matches the “black” used for text and text box outlines. It looks much more vibrant than using actual pure black. Colors in the “FE Palettes” tab are designed to work with it.
  • Beware the color limitation, you can have no more than 16 different colors in a GBAFE portrait and that counts the outline and background colors. The CCv3 shows an active count of how many colors you’ve got, but it doesn’t account for the background, so if you’re using its display to track that the number to target is 15 or less.
  • Do not press the “anti-alias” button. The CCv3 programmer’s attempt to anti-alias the hairline algorithmically just results in banding (bad), and it’s much harder to clean up properly if you export with it than if you export without it. Reference how the hair meets the face in vanilla portraits, and ask the #spritans channel in the FEU Discord server for more advice if needed.
  • Export as 96x96. Older versions of the CC exported at double scale, and while that functionality still exists as the regular “export” button, “export as 96x96” was added in v3 to allow for proper pixel-scale export.

Once you’ve finished the base portrait in the CC, you will still need to clean it up and format it for insertion.

How do I format a portrait for insertion?

First of all, make sure the portrait has no more than 16 different colors in it, counting the background and the outline.

The background color can be anything so long as it is not used elsewhere in the portrait, but you’ll notice if you export a vanilla portrait from FEBuilder or if you look at any portrait in the Repo that they mostly all use a standard shade of green.

Now, when inserting the portrait, you can’t just insert the portrait by itself, you need to add blink frames, mouth movement frames, and a minimug. For example, here’s Ephraim’s vanilla portrait:
Ephraim

And here’s a commonly-used template that shows what goes where. (This template also shows the hackbox, an area of the portrait space that gets cut off.)
qcErxRh

The top row of mouth frames is smiling, bottom row is normal, and the one on the far right directly below the eye frames is for the statscreen. The upper eye frame is the halfway-closed “midblink”, the lower one is fully closed. Each frame is 32 pixels wide and 16 pixels tall. They’re overlaid onto the face by shifting in increments of 8 pixels, so make sure you select an area of the face that’s a multiple of 8 pixels from the edges of the portrait.

If you’re splicing, whether by hand or with the Character Creator, you can usually export the vanilla portrait you used the mouth/eyes/face of and copy how the eyes and mouth move there.

The minimug must fit within a 32 pixel by 32 pixel space. Here’s a shortcut method for making it, courtesy of Feier:
image

Once you’ve done all of these things, your portrait is ready for insertion!

4 Likes