[GUIDE/DOC] ASM Hacking in C (with EA)

??? How does one do ASM hacking in C? Aren’t those two different languages?

Well yes and no because while yes indeed those are two different languages that aren’t source-compatible, C translates to ASM and that’s the important bit.

This guide is all about revolutionizing hacking, smearing my knowledge all over your face and making Cam proud.

I’m kidding (except for the making Cam proud part). In this guide we’ll go over the following:

  • How to generate both binary (object files) & verbose assembly from C files using Makefiles (as I said, we’re making Cam proud)
  • How to link your binary (again, object files) to the game ROM using EA/lyn.
  • Various ways of linking the game to your C (making headers, linking to “reference objects” and/or abusing EA definitions)
  • How to mix ASM & C for complex hooks & hacks
  • Some more Makefile shenanigans

This guide is not about teaching C. I’m fairly certain that the rest of the internet has that covered. (Just search for “C Tutorial” on DuckDuckGo).

This guide assumes you are familiar with GBA assembly and the ways we use it in the context of GBAFE hacking. I suggest you read Tequila’s amazing guide to exactly that if you aren’t.

Getting Started

Quick introduction to object files

You know what an elf is? No, not the fantasy race. I meant the file format. If you do, you either are an experienced computer scientist (and you might not need to read any of this), or you read my lyn thread where I tried to explain what those were and got confused because I failed to do so.

ELF (Executable Linkable Format) is a file format. It is one of a number of formats that can be used to encode object files, and the one we are going to be using here. For the sake of me being stupid, I sometimes refer files that follow that format as “an elf” (or even worse, “elves”).

To put it in a very simple way, object files are annotated binary dumps. The “annotations” are things like symbols (putting names on locations within the dump), relocations (defining where references to outside symbols are within the dump), sometimes debug information, and sometimes more information helping linkers do their job.

If you have been ASM Hacking before, possibly using an utility script called something like “Assemble ARM.bat”, you already indirectly messed with object files. What a typical “Assemble ARM.bat” does is call the assembler (as) which generates an object file, and then call an utility (objcopy) to extract the binary part from it (ignoring all that potentially useful annotation stuff).

This works well enough for assembly: We have absolute control on the layout of the binary file, so we can just know where stuff is (relative to the beginning/end of it). For example, when we need to call the first (and often only) routine contained in the binary, we just use the address of where we inserted it.

But when we want to start messing with higher level languages, we loose that control, so we have to make use of other means know where things are. Those means being brought to us through those object files (and those precious annotations).

Note: Using object files isn’t restricted to C hacking, you can also make use of them with regular ASM, as some hackers do, or even use object files for just data, as you can do with songs.

(Re)Installing devkitPro/devkitARM

Note: the devkitPro tool installation process has changed a lot since I first wrote and posted this. I would rewrite this to fit the new process but I can’t get it to work on Windows and I’m not quite in the mood of messing up my install on Linux. So hopefully you can get enough information on the web on how to install the thing.

For Windows, see the installer.

For everything, see the devkitPro pacman stuff.

Compiling for the GBA

Before working on your new crazy battle animation system that revolutionizes hacking, we’ll start simple.

We are going to write a simple piece of C code and compile it to GBA ASM. But we want to do it properly, while monitoring each of our steps carefully.

Code

Find yourself a folder somewhere in which you will be doing all of this, and create a new empty text file with the .c extension. Don’t try anything fancy with the name (and avoid spaces), something like test.c should do. Paste the following in it:

/*!
 * Sums an arbitrary range of ints stored contiguously in memory.
 *
 * @param begin pointer to the first element of the range
 * @param end pointer to past the last element of the range
 * @return the sum of all int values in the given range
 */
int sum_range(const int* begin, const int* end) {
    int result = 0;

    while (begin != end)
        result = result + *begin++;

    return result;
}

As I said, I’m not here to teach C. Hopefully the code and doc should speak as to what this does. The focus here is to make this work in the context of a ROM hack.

Compilation

Compile your file with the following command:

PATH=${DEVKITARM}/bin:${PATH} && arm-none-eabi-gcc -mcpu=arm7tdmi -mthumb -mthumb-interwork -Wall -Os -mtune=arm7tdmi -S <myfile>.c -o <myfile>.asm -fverbose-asm

Actually don’t do that. That would be messy and ugly. Instead: let’s keep our promises of making Cam proud, and use Makefiles.

Makefiles are relatively simple things: they are files that define how to make other files via rules. Those files are interpreted by a program called make (in our case, it’s specifically the GNU make variant).

DevkitARM for the GBA comes bundled with a bunch of useful bits of makefiles to include in ours (in addition to actual templates for making fully custom homebrew ROMs but we aren’t here for that), so we will gladly borrow one of them ($(DEVKITARM)/base_tools) and include it in ours. It will define all the locations of the DevkitARM developement tools, which includes the ones we are interested in (most notably the C compiler via $(CC) and the assembler via $(AS))

Here’s what we’ll start off with:

.SUFFIXES:
.PHONY:

# Making sure devkitARM exists and is set up.
ifeq ($(strip $(DEVKITARM)),)
	$(error "Please set DEVKITARM in your environment. export DEVKITARM=<path to>devkitARM")
endif

# Including devkitARM tool definitions
include $(DEVKITARM)/base_tools

# setting up compilation flags
ARCH   := -mcpu=arm7tdmi -mthumb -mthumb-interwork
CFLAGS := $(ARCH) -Wall -Os -mtune=arm7tdmi

# C to ASM rule
%.asm: %.c
	$(CC) $(CFLAGS) -S $< -o $@ -fverbose-asm

# C to OBJ rule
%.o: %.c
	$(CC) $(CFLAGS) -c $< -o $@

In your folder, next to your .c file, create a new text file called Makefile (no extension!) and paste all of the above in it.

Important Note: the characters before the $(CC) stuff (the recipes) are not a bunch of spaces, but rather tab characters (on your keyboard it’s probably on the far left over the caps lock key). If when copy-pasting you get spaces instead of tabs, replace them. This also applies to other snippets of makefiles I’ll give you later.

This makefile defines how to make two things: .asm files from .c files, and .o files from .c files. It isn’t very “complete” yet, and I’m voluntarily omitting details on what this means (that’s what the “Advanced Makefile Shenanigans” section is for), but it will do for now.

Now to run the actual make program.

Windows

Make sure msys is in your path! A quick way of checking your path is by opening the command line (dw that won’t be the last time) and type echo %PATH%.

Anyway, in explorer, Shift+Right Click on the folder your files are in, and select “Open command window here” (easier than to open cmd and manually cd to it).

In the command window, simply type make <myfile>.asm, where <myfile> is the name of your .c file, without the .c.

It should output something like arm-none-eabi-gcc -mcpu=arm7tdmi -mthumb -mthumb-interwork -Wall -Os -mtune=arm7tdmi -S <myfile>.c -o <myfile>.asm -fverbose-asm, and be done. Then you should have a new <myfile>.asm file. yay!

To build an object file instead of an asm file, type make <myfile>.o instead.

Linux/other unix

Open terminal, goto folder, type make <myfile>.asm (where <myfile> is the name of your .c file, without the .c) or make <myfile>.o. Same as for Windows, expect you don’t need no msys since you already have the whole unix thing natively.

The Generated ASM

Let’s open <myfile>.asm and Woah what a mess. There’s a lot of useless junk. I have like 45 lines of just it listing me all the compiler flags that were enabled… Let’s just ignore all that and get to the actually interesting thing.

If I ignore all the superfluous things and aerate (?) a bit, I get this:

sum_range:
	movs  r3, r0

@ <myfile>.c:9: int result = 0;
	movs  r0, #0

.L2:
@ <myfile>.c:11: while (begin != end)
	cmp   r1, r3
	bne   .L3

@ <myfile>.c:15: }
	bx    lr

.L3:
@ <myfile>.c:12: result = result + *begin++;
	ldmia r3!, {r2}
	adds  r0, r0, r2
	b     .L2

(I say “I” because you may get a slightly different output, since you may not be using the same version of gcc as I do, and the output may differ)

Well what do we have here? That’s good old assembly! Pretty well optimized asm at that. In fact you may have noticed it in the CFLAGS Makefile variable that I set the -Os gcc option, so the generated asm should be fairly optimally small. If you’d rather use -O2/-O3 or something else, feel free to do so! (maybe even try them all out and compare the outputs).

Anyway, the generated asm looks like it does what the C function we wrote before also does. Neat. That was the plan. You can even see what line of C corresponds to which bit of asm (that would be thanks to -fverbose-asm), which is useful for debugging (especially since we don’t have access to source-level debugging with EA as of now).

So we learned how to get ASM from C. Now it’s time to try and put that to use.

Hacking the game

Ok so that’s the tricky part. Before this, we were kinda doing our thing in our corner and messing around with tools. But now it is time to jump back into the fantastic mess of a world that is ROM Hacking.

As far as I know, those are the common methods of linking an object file to a GBA ROM:

  • Dumping the binary from the object and inserting it directly (the good old “Assemble ARM.bat” method I already went on, again, no way of knowing how the binary is layed out, so pretty limited). This method has the advantage over the other two methods of being extremely simple (as we’ll see when we get to it).

  • By Setting up complex linker scripts that basically build the ROM either from split parts of the original and your own hooks and things or by other hacky means. I don’t have much knowledge about that method, but @MisakaMikoto has posted some interesting resources on that in the replies below.

    • Once the FE8 Decompilation Project comes to the point where everything is relocatable, this method (or something very similar to it) will suddenly become much more better yes.
  • Using Event Assembler & lyn. Event Assembler has already proven itself as a powerful yet accessible tool for ROM Hacking, and lyn is the interface EA has to object files. (It’s probably obvious that, as both the developer of lyn and one of the maintainers of EA I might be just a bit biased towards this method lol). That’s what we are going to be doing in this guide.

Dumping the binary

Before getting to the interesting part, let’s get that method out of the way. It’s not a very good idea to use it for C hacking imo, but since it’s so easy I may as well demonstrate it anyway.

# OBJ to DMP rule
%.dmp: %.o
	$(OBJCOPY) -S $< -O binary $@

Add that to the end of your Makefile, and then all you need to do is make <myfile>.dmp, and then you can insert this wherever.

(Note how this shows that you can chain rules in makefiles, since here it has to do file.c => file.o => file.dmp, and can do all that in one make call).

Note that the sample code I gave you above does work with this method, since the generated ASM is the first (and only) thing in the binary.

By using Event Assembler & lyn

NOTE: From now on, I’ll be assuming you are hacking FE8, since for testing I’ll be messing with event slots (because those are just the best thing ever). The actual addresses will be for FE8U, so you’ll have to find it yourself for FE8J (or FE8E).

Ok so, to put it simply, lyn takes an object file and makes EA code from it.

Let’s take the the object file from before (<myfile>.o, remember?).

$ ./lyn <myfile>.o

We get this:

PUSH
ORG (CURRENTOFFSET+$1); sum_range:
POP
SHORT $0003 $2000 $4299 $D100 $4770 $CB04 $1880 $E7F9

What is that? Well, we see sum_range, which is interesting, since it’s the name of our function… But it’s defined at CURRENTOFFSET+$1+1? Well that’s because of the thumb bit. Indeed since our function was written in thumb, the symbol that refers to it also holds the thumb bit (this also means that we don’t have to add it when refering to the symbol elsewhere, which can be confusing since that is what we used to do with binary dumping).

So the symbol (label) to our function exists within EA? That’s already better than what we had with the dump method, where only the binary was left.

Speaking of binary, what’s those numbers? Well everyone probably guessed it’s the actual assembled assembly. You can check: each short correspond to an opcode (Unrelated Note: instead of using add r3, r0, #0 to encode mov r3, r0, which is what as would do, gcc uses lsl r3, r0, #0. Funky stuff!).

Let’s test our thing! To do that we’ll simply use the context of an ASMC event since that’s easy to write. But first we need an ASMC-able function. Let’s add that to the end of our .c file.

static int* const sEventSlot = (int* const) (0x030004B8);

/*!
 * Sums event slots 1 through 4 and stores the result in slot C.
 */
void asmc_sum_slots(void) {
    sEventSlot[0xC] = sum_range(
        &sEventSlot[1],
        &sEventSlot[5]
    );
}

This will call sum_range for the values in Event Slot 1 to 5 (5 excluded, so [Slot1] + [Slot2] + [Slot3] + [Slot4]), and store the result in Event Slot C.

We’ll use these test events:

    SVAL 1 1
    SVAL 2 2
    SVAL 3 3
    SVAL 4 4
    ASMC asmc_sum_slots // call asmc
    SADD 0x0C3          // r3 = sC + s0
    GIVEITEMTOMAIN 0    // give mone

    // NoFade
    // ENDA

We should be getting 1 + 2 + 3 + 4 = 10 gold at the end of it.

Anyway, here’s the lyn output:

PUSH
ORG (CURRENTOFFSET+$1); sum_range:
ORG (CURRENTOFFSET+$10); asmc_sum_slots:
POP
SHORT $0003 $2000 $4299 $D100 $4770 $CB04 $1880 $E7F9 $B510 $4904 $4804 $F7FF $FFF3 $4B04 $6018 $BC10 $BC01 $4700
BYTE $CC $04 $00 $03 $BC $04 $00 $03 $E8 $04 $00 $03

Note that both functions have corresponding symbols, the usefulness of having linking is already showing itself.

Anyway, put the test event somewhere in a chapter (with easy access, we really don’t need to make our life harder), put the lyn output somewhere outside of chapter events, assemble & run to see the result.

Yay! It worked! Or at least I’ll assume it did for you, since it did for me. I indeed got 10 gold from the event.

So that’s it I guess! You made a C hack. From now on, I’ll be going over more isolated topics, which will cover some more advanced parts & tricks that can be useful when hacking in C.

lyn in the makefile

I’m a bit less hurried about this one, since this one requires a bit more setup. Indeed since lyn is probably not in your path, you either have to put lyn in one of the folders in your path (I’d recommend against that personally), add a folder with lyn in it to your path from the makefile (so the modified path is only in effect during make invocation), or directly reference lyn from the full path to the binary (better done through a make variable). We’ll do the latter.

In your makefile, put the following somewhere before the rules (say, after include $(DEVKITARM)/base_tools):

# defining path of lyn
LYN := $(abspath .)/Tools/lyn

Then, in the folder where the makefile is in, make a subfolder called Tools, and put the lyn binary in it (and make sure it’s called lyn or lyn.exe (depending on your system)).

Now for the actual rule, add this at the end of the makefile:

# OBJ to EVENT rule
%.lyn.event: %.o
	$(LYN) $< > $@

Now you can make <myfile>.lyn.event, and you’ll get that sweet lyn output in, you guessed it, <myfile>.lyn.event.

I’m choosing to generate files under the “double” extension .lyn.event to differenciate generated events from hand-written events. This is the same reason I’m using .asm instead of .s for asm generated from .c.

7 Likes

Advanced “linking”

In the previous (first) example, I taught you how to make the game call your C (by exposing C functions through EA and then doing the same thing as you’d do with asm). But how do we do the opposite? How do we call the already existing parts of the game with C?

The game was almost definitely written in C (crazy, I know). This doesn’t really mean too much to us; but it does mean that each function follow standard ARM calling conventions. In other words, we don’t need to do anything crazy to interface our code with the game’s functions (we just need to let the compiler and/or lyn/EA know where those functions are).

In this chapter, I’ll use the simple example of the “GetGameTime” function (This is just the name I gave it, there’s no “official” name to it), located in FE8U at 0x08000D28, that returns the game time (in frames) and takes no arguments. Its signature is the following:

int GetGameTime(void);

Declaring pointers in the source

If you did some ASM Hacking before (you probably did), you may have done the following: you defined the address of a game routine you wanted to call, loaded that and "bl to bx"ed to it (or ".short 0xF800"ed to it). And you totally can do a similar thing in C too! I even kinda did that in the example when writing to event slots. Those were simple int pointers, but you can do the same thing with function pointers, look:

static const int(*GetGameTime)() = (int(*)()) (0x08000D29); // note the thumb bit here.

static int* const sEventSlot = (int* const) (0x030004B8);

/*!
 * Gets game time (in frames) and stores it to event slot C.
 */
void asmc_get_time(void) {
	sEventSlot[0xC] = GetGameTime();
}

I want to show you that this indeed works. Let’s look at the asm (The comments are my addition, so that things were a bit more clear):

asmc_get_time:
	push {r4, lr}

	ldr  r3, .L2   @ =0x08000D29
	bl   .L4       @ bx r3

	ldr  r3, .L2+4 @ =0x030004B8+0xC*sizeof(int)
	str  r0, [r3]

	pop  {r4}
	pop  {r0}
	bx   r0
.L3:
	.align 2
.L2:
	.word 134221097 @ 0x08000D29
	.word 50332904  @ 0x030004B8+0xC*sizeof(int)
	.code 16
	.align 1
.L4:
	bx   r3

Yup, that’s your good old bl to bx trick.

Note: As it was noted in replies below, you can also achieve this by using raw expressions or #defines instead of static constants, but the general concept is the same.

Ok so that works, we’re done now. Right? Well sure you can go ahead and do it that way if you want I, won’t judge (Ok maybe I will just a teeny tiny bit).

I’ll ask you this: What if @7743 wants to port your hack to FE8J (or FE8E lol). Since you basically “hardcoded” the game’s addresses in your source you need to edit all of that to support FE8J. This means you end up with two different code bases that you have to update, which is kind of eh (imagine doing this for hack with 5-6 files of a couple hundred lines each).

Of course this can be mitigated by using a header for all the declaration of the game functions there, and using ifdef guards to allow to support for mutiple games, which you can also totally do and I won’t judge you (or, again, maybe I will). In my opinion this starts to get messy and I think we can do something more elegant.

Creating a “library” for interfacing with the game

Note: for the sake of this guide, I will demonstrate making a new library and reference from scratch. For “real” hacking I use and provide a fairly big existing library and reference that I recommend you use too after you understand how it works.

So here’s the deal: we are going to decouple the declaration of what the game provides us (including the signature of functions), and the definition of where it is.

The declaration part, you probably guessed it, we are going to put that in a good old C header file. Let’s call it, gbafe.h. It would contain function declarations, of course, but also maybe eventually structure definitions for data from the game (like say, the unit struct) and object declarations (such as the active unit pointer). From that all we need to do in our source file is to #include it and use it.

Here’s the header file containing “GetGameTime” and “gEventSlot” declarations:

#ifndef GBAFE_H
#define GBAFE_H

extern int gEventSlot[];

int GetGameTime(void);

#endif // GBAFE_H

Note about why I went from sEventSlot to gEventSlot: s stands for static and g stands for global. It’s a relatively common naming convention in the world of C programming (I think, at least the decomp uses it).

Ok so I guess now I need to explain a bit more about symbols and how C names translate to them. See the gEventSlot declaration? It will generate a (undefined) gEventSlot symbol. The value of that symbol is expected to be the address of the object it represents.

This is why I decided to declare gEventSlot as an array and not a pointer, because if I declared a pointer, It would expect as value the address of a pointer, but the address I want to give it is the address of the event slot value array (0x030004B8), and the data there isn’t a pointer, but the value of slot 0 (which so happens to be 0 most of the time, not really a useful pointer).

Here’s the C file we’ll use:

#include "gbafe.h"

/*!
 * Gets game time (in frames) and stores it to event slot C.
 */
void asmc_get_time(void) {
    gEventSlot[0xC] = GetGameTime();
}

Generated ASM:

asmc_get_time:
	push  {r4, lr}
	bl    GetGameTime
	ldr   r3, .L2
	str   r0, [r3, #48]
	pop   {r4}
	pop   {r0}
	bx    r0
.L2:
	.word gEventSlot

Notice that the generated code only uses a standard bl, which may cause problems (mainly because the main game code isn’t usually within “bl-range” of our inserted hacks), so how do we make it a safer bl to bx?

Note: if you are using lyn, it is even more important to transform bls into bl to bxes, since lyn can’t relocate (that’s the term for when a reference in an object file (aka a relocation) is being resolved properly) relative references (such as a bl) to external symbols. This comes from the simple fact the lyn doesn’t know where the object it links will be (since that’s for EA to decide).

So, there’s two ways we can do that: either during linking, or during compilation.

long calls during linking

lyn comes with the -longcalls option, This tells lyn that when it finds itself in a situation where it can’t properly relocate a symbol because the relocation isn’t absolute (for example: when relocating a bl), it is allowed to add extra code (a “veneer”) to “make” it absolute. Example:

  • Without -longcalls:
PUSH
ORG (CURRENTOFFSET+$1); asmc_get_time:
POP
SHORT $B510
SHORT ((((GetGameTime-4-CURRENTOFFSET)>>12)&$7FF)|$F000) ((((GetGameTime-4-CURRENTOFFSET)>>1)&$7FF)|$F800)
SHORT $4B02 $6318 $BC10 $BC01 $4700
POIN gEventSlot
  • With -longcalls:
PUSH
ORG (CURRENTOFFSET+$1); asmc_get_time:
POP
{
PUSH
ORG (CURRENTOFFSET+$15); _LP_GetGameTime:
POP
SHORT $B510
SHORT ((((_LP_GetGameTime-4-CURRENTOFFSET)>>12)&$7FF)|$F000) ((((_LP_GetGameTime-4-CURRENTOFFSET)>>1)&$7FF)|$F800)
SHORT $4B02 $6318 $BC10 $BC01 $4700
POIN gEventSlot
SHORT $4778 $46C0
WORD $E59FC000 $E12FFF1C
POIN GetGameTime
}

Whoah that’s a lot of new stuff. In realtity that’s only 16 extra bytes (2 SHORTS, 2 WORDS, 4 BYTES at the very end of the thing). But there’s also a new symbol, _LP_GetGameTime that probably shouldn’t be here because it should know how to optimize it away so that’s a bug for me to fix but in this particular case it’s useful for getting my point accross, that replaces the regular GetGameTime, and this time it is properly defined and it even doesn’t pollute the global EA namespace since it’s enclosed in curly brackets.

The extra 16 bytes at the end are a piece of asm that “transforms” the bl into a bl to bx. It’s different to a regular bl to bx because the setup (loading of the target address) here is done after the bl.

Anyway, since the call is transformed, lyn could relocate the GetGameTime symbol (if it knew where it was, but we’ll get to that). Even better: we aren’t limited by the potential limitation of the range of the bl instruction (±4MB). Mission accomplished… But I think we can be better.

long calls during compilation

There’s multiple ways to go on this:

  • We could use the compiler and target-specific function attributes in our header to specifiy we want to long call:

    int GetGameTime(void) __attribute__ ((long_call));
    

    That’s honestly only really okay for quick testing: if we start adding other signatures it can get tedious really fast (not to mention pretty ugly).

  • We could use the compiler and target-specific #pragma long_calls:

    #pragma long_calls
    
    int GetGameTime(void);
    
    // as many other function declaration as you want
    
    #pragma long_calls_off
    

    This long_calls pragma applies the long_call attribute automatically to all function declarations encountered until the next long_calls_off pragma. This is fine and I’ve been using this method for the last year now (this what was originally recommended in this guide too), but I feel like the next and last one may actually be the slightly better way.

  • We could use the compiler and target-specific program option -mlong-calls, which makes all references to outside code a “long call”. This may be a bit unnecessary for function calls accross our own files (that would probably be inserted close together aka within bl-range), but this allows us to move the details related to the limitations of our setup outside of the source itself which I feel may be preferable.

    We can just add -mlong-calls to the definition of the CFLAGS variable in our makefile.

In all three cases we get this ASM:

asmc_get_time:
	push  {r4, lr}

	ldr   r3, .L2
	bl    .L4

	ldr   r3, .L2+4
	str   r0, [r3, #48]

	pop   {r4}
	pop   {r0}
	bx    r0

.L2:
	.word GetGameTime
	.word gEventSlot

.L4:
	bx    r3

A good old bl to bx. Wonderful. And it does look better than what lyn did, which makes sense since we tackled the problem at an earlier point in the compilation process.

Ok so now comes the definition part. I’ll show you two ways to handling that: through a “reference object” (my recommendation), and through EA (for the lazy ones).

Definition through a “reference object”

In this method, we define the symbols we need in an external object file: the “reference object”. This file and only this file (in theory) is game-specific, since this is the only file where we will have actuall addresses in it.

This source file will not be a C file, but a good old ASM file. We won’t be putting any actual ASM in it though, we will rather be abusing assembler directives to generate an object file containing the symbol definitions we need.

Here’s mine:

.macro SET_FUNC name, value
	.global \name
	.type   \name, %function
	.set    \name, \value
.endm

.macro SET_DATA name, value
	.global \name
	.type   \name, %object
	.set    \name, \value
.endm

SET_DATA gEventSlot,  (0x030004B8)

SET_FUNC GetGameTime, (0x08000D28+1)

Note that I’m defining through helper macros I also defined. For now it seems kinda redundant but later when we start to add dozens of extra functions and/or references to data, you’ll thank me.

Anyway, I called it fe8u.s (I’m willingly choosing a different extension to the one for generated asm from C files, as it allows me to differentiate between generated asm and hand-written asm (gets useful when writing clean rules in the makefile later)).

Hey! We don’t even have a rule for making object files from asm in our makefile (this probably means that I’m doing a good job), so let’s remedy this. Add this to your makefile:

# ASM to OBJ
%.o: %.s
	$(AS) $(ARCH) $< -o $@

Now we can make fe8u.o (we can also make fe8u.lyn.event, but this will just generate a blank file, as there isn’t any data nor local symbols defined in it, and lyn doesn’t expose absolute symbols).

Ok so now what? We have a nice object file with our symbols defined in it, and a nice header with our symbols declared… but how do we use all that?

The awnser is: we need to link the object file generated from that C file with fe8u.o. When we do that, the symbols referenced by the C object will be sustitued by their definition from the fe8u.o object. To do that, we simply pass them both to lyn:

$ ./lyn <myfile>.o fe8u.o

It gives me this:

PUSH
ORG (CURRENTOFFSET+$1); asmc_get_time:
POP
SHORT $B510 $4B04 $F000 $F80A $4B03 $6318 $BC10 $BC01 $4700 $46C0
BYTE $29 $0D $00 $08 $B8 $04 $00 $03
SHORT $4718 $46C0

Sweet. We linked our objects together.

(Makefile) Automatically making & linking the reference object

I’m going to assume we need that reference object for all of our lyn links. That way we can take the rule for making .lyn.event files and modify it accordingly:

# OBJ to EVENT rule
%.lyn.event: %.o fe8u.o
	$(LYN) $< fe8u.o > $@

If you aren’t familiar with makefiles: I added a second dependency to the pattern rule for generating .lyn.event from .o files. This means that each time you require a .lyn.event, it will first make sure that both the corresponing .o file and the fe8u.o file are up to date (aka younger than their own dependencies).

This story about makefiles & up-to-dateness will come again later when we will learn how to generate dependency definitions for our C files (that are including other files, on which the source depends on).

Anyway, this simple change makes sure that the reference is built before building the .lyn.event file.

Also the lyn call was changed to include the reference too.

You could also define a Make variable that holds the reference object to link against. For example:

# reference object
LYNREF := fe8u.o

And the rule then becomes

# OBJ to EVENT rule
%.lyn.event: %.o $(LYNREF)
	$(LYN) $< $(LYNREF) > $@

Definition through EA

When lyn can’t relocated something, it doesn’t fail. Instead it just writes the name of the targetted symbol in place, letting EA handle it and probably fail in its place.

But we can also take this to our advantage. If we get our object and lyn it, we get this:

PUSH
ORG (CURRENTOFFSET+$1); asmc_get_time:
POP
SHORT $B510 $4B04 $F000 $F80A $4B03 $6318 $BC10 $BC01 $4700 $46C0
POIN GetGameTime gEventSlot
SHORT $4718 $46C0

Direct reference to the missing symbols can be seen. So what do we do? Well, we #define them!

#define GetGameTime "(0x08000D28+1)"
#define gEventSlot  "(0x030004B8)"

ez. Know that since EA 11.1 (the version in which I did stuff shh that’s a secret) (Note: this is not yet part of ColorzCore), A feature exists that allows us to do the following:

GetGameTime = 0x08000D28+1
gEventSlot  = 0x030004B8

Anyway, done. Put that anywhere (if you used #define, it needs to be brefore the lyn output), and the lyn output will assemble and link correctly. Hurray!

This is obviously easier than to go through all the hassle of making another object file and linking it via a lyn call and all, and also way more clean that the brute way of defining const function pointers. I’m guessing most people reading this (that’s probably not a lot of people) will choose to use this method over the other two.

The issue I find with this method is in the hack distribution side of things. I think making the smallest (in event file size/EA computation needs), easiest to install (#include and be done), and less polluting (as in: polluting the EA global namespace with useless junk) hacks is a priority (coming from me and my MSG Helpers & Ultra-Flexible Heroes Movement Hacks, this would probably sound somewhat inconsistent to some people).

It also would suck if one day you decide to not use EA anymore.

But still, I think the less EA does, and the more processing you can have done before the “EA” phase, the better it is (EA does already enough as is).

Integrating ASM & C

Ok, so you already know how to call C from Events (ASMC, see our first example) and probably have an idea of how to call C with EA Extensions/Hack Installation.txt Macros (jumpToHack, callHack_rx, …), since it’s basically the same in a different context.

Here we are going to see how to integrate your C code & regular “raw” ASM. This will be probably most useful when setting up more elaborate hooks and you need to setup some very precise ASM injections that you just can’t have the C compiler generate elegantly.

Calling C from ASM

The solution is pretty simple really, just write some ASM, and somewhere in it you bl or bl to bx to the C function, as if its name was a simple label in your ASM:

.thumb

some_asm:
	push {r0-r3}

	@ let's say we are setting up arguments for our function
	mov r0, r2
	mov r1, r3

	ldr r3, =some_c_function
	bl BXR3

	pop {r0-r3}

	@ let's assume this is the hooked-into routine's old code that we replaced
	nop
	nop
	nop

	ldr r3, =#0x800DEAD @ return location
BXR3:
	bx r3

Then, instead of throwing that into “Assemble ARM.bat”, just make an object file, and then we get it through lyn. We get this:

SHORT $B40F $1C10 $1C19 $4B04 $F000 $F805 $BC0F $46C0 $46C0 $46C0 $4B01 $4718
POIN some_c_function
BYTE $AD $DE $00 $08

Hey, some_c_function got referenced in EA! This works, we can now get our C function through lyn too and we have something like this:

PUSH
ORG (CURRENTOFFSET+$1); some_c_function:
POP
SHORT $Whatever $46C0

If we put those together we get something that assembles correctly and everything is nice yay.

Calling ASM from C

So in this part, we are going back to messing with ASM a bit more. The C compiler already generates pretty “open” (as in: easily interfacable) object files, but this isn’t necessarily the case for ASM.

For C or, to be more specific, the linker to know how to call your asm, you need to expose the symbol pointing to the part of your asm you want to call (and also it needs the symbol to be of “function” type, so that it knows you’re not accidentally calling data as a routine)

So here’s the two assembler directives we are going to use:

.global <name>
.type   <name>, %function

If you paid attention earlier (when I told you about making object files containing information about the game), you’ll notice that those are the same directives I used then.

.global <name> exposes the symbol to the outside (in other words, external object files can “see” it).

.type <name>, %function marks the symbol as being of “function” type, so that the outside knows that this symbol can be the target of a function call.

Here’s some example ASM:

.thumb

.global get_magic_number
.type   get_magic_number, %function

get_magic_number:
	mov r0, #42
	bx  lr

Now, our C file:

#include "gbafe.h"

int get_magic_number(void);

void asmc_get_magic_number(void) {
	gEventSlot[0xC] = get_magic_number();
}

Assemble/compile and lyn both, #include them and it should work!

Calling conventions

I wrote another fairly big document on this subject, so I’ll just go over the important details here.

C function signatures hold the information neccessary for the C compiler to know how to handle the called function’s parameters & return value. Simple parameters & return values are pretty simple to understand: each parameter corresponds to a register (up to r3), and the return value to r0 after the function call.

There are some ambiguous cases though, and we can tell they’re ambiguous since beginner ASM hackers have different ways of tackling them.

The first (obvious) one is the case where you have more than 4 parameters. Basic logic would dictate you continue onto r4, r5 and so on… But then what happens when you reach r11? You can’t use r12 since it can be used to redirect the call (see the aforementionned doc for details), and after that its the stack pointer…

The stack! Yes that’s exactly where extra arguments are going to be. In fact, convention doesn’t wait until r11 for that, after r3 (fourth parameter), the arguments are stored at [sp+00], [sp+04], etc.

So a function with the following signature

void some_function(int a, int b, int c, int x, int y);

Will have the following parameter map:

  • r0 = int a
  • r1 = int b
  • r2 = int c
  • r3 = int x
  • [sp+00] = int y

Second case: we have a parameter that can’t fit in a register (or any word in general). That one is kinda simple: we split the parameter in mutiple parts, and each part is its own parameter. It is the called function’s responsability to interpret the different parts correctly.

For example:

struct xyz { short x, y, z; }
void some_function(struct xyz positionInThreeDee, int b);

Will have the following parameter map:

  • r0 = positionInThreeDee part 1 (xyz.x & xyz.y)
  • r1 = positionInThreeDee part 2 (xyz.z & padding)
  • r2 = int b

Third case: we have a return value that can’t fit in a register and isn’t either a long long, a double, a long double, or a complex (in those cases, the return value is split using the same rules as parameters, and can use registers r0 through r3).

In this case, an extra parameter is prepended (added before all the others) to the list: it’s a pointer holding the address of where to write the return value. The function also still returns that address.

For example:

struct BigStruct some_function(int a);

Will have the following parameter map:

  • r0 = struct BigStruct* (somewhere to write the return value)
  • r1 = int a

There’s probably other corner case scenarios I forgot to mention here. If you have any doubt: I recommend you write a test function, compile it to asm and analyse the result for yourself. Or read the doc.

9 Likes

Advanced Makefile shenanigans

Note: I do plan on writing an even more in-depth guide on using makefiles for hacking with EA in the future (I’m really only waiting for the EA features such a setup needs to work to get into release!ColorzCore). This will still only focus on C stuff.

Ok so here we are going to be messing with the Makefile a bit. To be clear about the state of it before this part, Here’s what it should look like (that’s assuming you did everything I told you you could with the makefile):

.SUFFIXES:
.PHONY:

# making sure devkitARM exists and is set up
ifeq ($(strip $(DEVKITARM)),)
	$(error "Please set DEVKITARM in your environment. export DEVKITARM=<path to>devkitARM")
endif

# including devkitARM tool definitions
include $(DEVKITARM)/base_tools

# defining path of lyn
LYN := $(abspath .)/Tools/lyn

# setting up compilation flags
ARCH   := -mcpu=arm7tdmi -mthumb -mthumb-interwork
CFLAGS := $(ARCH) -Wall -Os -mtune=arm7tdmi -mlong-calls

# lyn library object
LYNREF := fe8u.o

# C to ASM rule
%.asm: %.c
	$(CC) $(CFLAGS) -S $< -o $@ -fverbose-asm

# C to OBJ rule
%.o: %.c
	$(CC) $(CFLAGS) -c $< -o $@

# ASM to OBJ rule
%.o: %.s
	$(AS) $(ARCH) $< -o $@

# OBJ to DMP rule
%.dmp: %.o
	$(OBJCOPY) -S $< -O binary $@

# OBJ to EVENT rule
%.lyn.event: %.o $(LYNREF)
	$(LYN) $< $(LYNREF) > $@

Ok that’s clear now. We can proceed.

Reviewing the Makefile

Before going further, I think this is where I need to explain to you wtf the fcuk is happening? (in this particular Makefile that is).

First, here’s a link to the GNU Make Manual TOC. Everything you need to know is there. I’ll assume you’re reading at least the Intro of the whole thing, since this is where you’ll learn the very basics.

Let’s go line-by-line, and I’ll be linking you to the GNU Make manual all over the place so that you can learn more.

.SUFFIXES:
.PHONY:

Those basically reset some special built-in “targets”. .SUFFIXES is the list of “suffixes” that are valid in the context of “suffix rules” that we don’t use (we use pattern rules instead), and is best kept empty. .PHONY decribes the list of “phony targets”, which are, to keep it simple, targets that don’t refer to a file. We’ll get to that soon-ish.

# making sure devkitARM exists and is set up
ifeq ($(strip $(DEVKITARM)),)
	$(error "Please set DEVKITARM in your environment. export DEVKITARM=<path to>devkitARM")
endif

# including devkitARM tool definitions
include $(DEVKITARM)/base_tools

This part, which I shamelessly snagged from an example makefile for homebrew GBA development, is (as the comments suggest) responsible for:

# defining path of lyn
LYN := $(abspath .)/Tools/lyn

This part defines the absolute location of lyn as a make variable. We added this when we first used lyn in this, remember?

# setting up compilation flags
ARCH   := -mcpu=arm7tdmi -mthumb -mthumb-interwork
CFLAGS := $(ARCH) -Wall -Os -mtune=arm7tdmi -mlong-calls

Sets variables that are really just lists of options for GCC and/or AS.

# lyn reference object
LYNREF := fe8u.o

The reference object file for linking through lyn. See the section about that for details.

After that, we just have a bunch of rules. All pattern rules even. Since they all follow the same repetitive format, we are going to look at the first one only.

# C to ASM rule
%.asm: %.c
	$(CC) $(CFLAGS) -S $< -o $@ -fverbose-asm

This is the pattern rule that describes how to make .asm files from .c files. Its recipe is fairly simple: we just call “CC” (it’s a variable that contains the name of the C compiler, which is gcc, and was defined in the devkitARM tool makefile thing) with $(CFLAGS) -S $< -o $@ -fverbose-asm for arguments.

$(CFLAGS) are the arguments defined before. -S means we want to generate asm (and not an object file, in which case we would have specified -c). $< sets the input. It is the automatic variable specifying the first prerequisite (here, the .c file). -o $@ sets the output. $@ is the automatic variable specifying the target name (here, the .asm file). -fverbose-asm means we want the asm to be verbose (lots of comments, including annotations that correspond to the .c source file).

All the other pattern rules are like that.

Listing files

A thing that can get useful eventually, is building a list of a certain type of file. What we are going to do now is make a Makefile variable called CFILES, and it will be a generated list of all .c files make can find. Here:

# listing C files
CFILES := $(wildcard *.c)

We got the list using the wildcard function, easy. We can do the same with SFILES for asm (hand-written, so with the .s extension here) files:

# listing S files
SFILES := $(wildcard *.s)

Note that these lists are not built from subfolders. If you want a “recursive” wildcard, this stackoverflow question (and the answers) might be interesting to you.

Now let’s list possible files. Like the list of all the object files we can get:

# listing possible object files
OFILES := $(CFILES:.c=.o) $(SFILES:.s=.o)

Since listed elements are space-separated, this way of using substitution references works.

We can also make a list of asm files or lyn event files that way:

# listing possible generated asm files
ASMFILES := $(CFILES:.c=.asm)

# listing possible lyn event files
LYNFILES := $(OFILES:.o=.lyn.event)

# listing possible dmp files
DMPFILES := $(OFILES:.o=.dmp)

Ok but why are we doing this?

“all” target

Let’s add in a target that we will call “all”, so that if we make all, we make all the files we can make from our previously listed files.

# "make all" phony target
all: $(OFILES) $(ASMFILES) $(LYNFILES) $(DMPFILES);

Of course, me and my comments spoiled all the fun. It will be the first phony target we will include. So we add it to the .PHONY list:

.PHONY: all

We want it phony for it to not interfere with any eventual file called “all”.

Now we can make all and it will make all the files! This works because the target depends on all the objects in all of the list variables. Even if the "all rule" has no recipe, it will still resolve all its dependencies (ensuring all files are made).

Also, as all is the first target declared in the file, it will be the default goal: when we invoke simply make (without giving it a goal as argument), it will be the same as invoking make all.

“clean” target

This one is kind of a conventional one, but let’s be honest our folder is becomming a mess we probably want to tidy it up at some point anyway.

So here we go:

# "make clean" phony target
clean:
	rm -f $(OFILES) $(ASMFILES) $(LYNFILES) $(DMPFILES)

And we add it to the .PHONY list:

.PHONY: all clean

Now, we can make clean to rm all the files that were (or could have been) generated by our makefile.

Automatic C Source-Header Make Dependency Generation (Or Something)

TL;DR we want to generate, for each C File, a list of dependencies that correspond to the #included files.

Well I say C File, but we want dependencies for the corresponding object file, because, you know, that’s what the target is.

The goal of this whole thing is to make it so that when you only modify some header, that the object file(s) for the including C files are still rebuilt (as the result would maybe be different).

There is a number of ways we can tackle this. (This is another way of saying that solving this problem isn’t that trivial).

What all those methods have in common is that they call either CC (the C Compiler, in our case gcc) or CPP (the C preprocessor, and not c++ (that would be CXX)) with some variant of the -M option. What this option does is tell the preprocessor to generate a makefile defining dependencies.

For example, let’s say we have a test.c file that #includes a gbafe.h file, which in turn includes a gbafe/unit.h file. We would get, from $(CC) -M test.c, the following:

test.o: test.c gbafe.h gbafe/unit.h

This “makefile” contains a single rule with no recipe. This just tells make that the test.o target depends on test.c, but also gbafe.h and gbafe_unit.h, since those are included, either directly or indirectly, by test.c.

Neat, but how do we get that into our main makefile… And how (and when) do we generate it? Well this is where the different methods I found differ, so what follows is my version of the whole thing.

What we are going to do is generate it while compiling (as a side-effect of compilation) (requiring the -MD or -MMD option), and include it if it exists. I think this is the simplest way we can do that, since it doesn’t require us to define any extra pattern rule for “dependency makefiles” and works okay since the only case in which dependency makefiles don’t exist is when the object never was built in the first place (in which case a dependency makefile isn’t useful since the object would be build no matter what).

Anyway, first lets list all the possible dependency makefiles from C files, so that we can easily include and/or clean them when we need to:

# listing possible dependency files
DEPFILES := $(CFILES:.c=.d)

(I’m choosing the .d extension because this seems to be the convention).

Since we’re at it, we can add those to the clean rule:

# "Clean" target
clean:
	rm -f $(OFILES) $(ASMFILES) $(LYNFILES) $(DMPFILES) $(DEPFILES)

Next, we include them, but since those files may not exist, we will use -include (it tells make to ignore missing files, instead of raising an error). I chose to put that at the end of the main Makefile:

-include $(DEPFILES)

(Note that make include can take multiple files, which is convenient as DEPFILES is a list)

Next we define a variable containing the extra options we’ll use for generating dependencies when generating objects from C:

# dependency generation flags for CC
CDEPFLAGS = -MD -MT $@ -MF $*.d

(Note that I used the “classic” way of defining variables. This means that, unlike variables defined with :=, the value of this variable will be evaluated when it’s referenced (we need this because of the $@ and $* automatic variables: they will only be expanded when they have meaning aka in the .c to .o pattern rule))

(-MD means “generate dependency makefile as side-effect of compilation”, -MT $@ sets the target for the generated makefile, and -MF $*.d sets the output makefile file name)

Finally, we modify the .c to .o rule to make it generate the dependency makefile:

# C to OBJ rule
%.o: %.c
	@echo "$(notdir $<) => $(notdir $@)"
	@$(CC) $(CFLAGS) $(CDEPFLAGS) -c $< -o $@ $(ERROR_FILTER)

Now to test the thing. Remember this source file:

#include "gbafe.h"

/*!
 * Gets game time (in frames) and stores it to event slot C.
 */
void asmc_get_time(void) {
    gEventSlot[0xC] = GetGameTime();
}

Well lets make its object. Now let’s try again. I will tell you '<whatever>.o' is up to date.. Now let’s modify gbafe.h and only gbafe.h (just add an extra line whatever). Now make again… Bingo! It’s been rebuilt. Mission accomplished.

What happens when we delete a header?

make: *** No rule to make target '<header>.h', needed by '<source>.o'.  Stop.

Ouch. Even if, in the source file, we correctly removed the reference to the header, Make still thinks it needs <header>.h to build the object.

That’s because the dependency makefile still exists and still references the missing header… But the dependency makefile will only get updated when the object will get generated. Yet we can’t generate the object because of the dependency makefile… Unless we make clean (which honestly isn’t the most elegant of solutions), we’re stuck.

Fortunately, GCC comes with a neat option (-MP) that makes use of a neat Make feature that says that if a rule with a target but without dependency or recipe exists, but the corresponding file doesn’t, it considers the target as updated, and “all targets depending on this one will always have their recipe run”.

So if we had the rule “<header>.h:”, then since that file doesn’t exists, everything depending on it would have been forced to be rebuilt. In other words, we would have found a way out of our initial problem. Neat.

All of this to tell you that all we need to do is add that -MP option to the CDEPFLAGS variable:

# dependency generation flags for CC
CDEPFLAGS = -MD -MT $@ -MF $*.d -MP

But what about the .c to .asm rule?

Right. This isn’t really a thing the various guides I linked you earlier went on, since it’s kind of our custom thing here. But don’t worry! I have a solution. A fairly simple one even.

See, rules can have mutiple targets. When you do that, it essentially means that you’re defining multiple rules each with one target.

This also means that we can have gcc generate rules that apply to multiple targets. See where I’m going? Yes we will tell it to generate rules for both .o and .asm files.

We can do that very simply by adding another -MT option to CDEPFLAGS:

# dependency generation flags for CC
CDEPFLAGS = -MD -MT $*.o -MT $*.asm -MF $*.d -MP

Note that I switched from using $@ (the target name) to $* (the pattern match), so that we can also use CDEPFLAGS in the .c to .asm rule (those flags are target-independent and that’s the important bit):

# C to ASM rule
%.asm: %.c
	@echo "$(notdir $<) => $(notdir $@)"
	@$(CC) $(CFLAGS) $(CDEPFLAGS) -S $< -o $@ -fverbose-asm $(ERROR_FILTER)

There are “D” files all over the place now! How to I hide them?

Well if you really don’t like them all that much I could help you. But it comes at a cost.

See, we could put all those .d files in a dedicated folder (say .MkDeps, the dot is there so that it gets hidden on most unix systems), this would remove them from all over the place.

But we then have an issue: what if I have test.c and someFolder/test.c? Both files would generate a test.d file, even if those are two different files. In our current situation it’s okay, since those files would be in different folders… But if we put them in a single dedicated folder it would mess things up. So yeah, the downside of this method is that we can’t have two files with the same name.

Anyway, I’ll still teach you. First we are going to define a Make variable containing the directory name:

# defining & making dependency directory
DEPSDIR := .MkDeps
$(shell mkdir -p $(DEPSDIR) > /dev/null)

(To Windows users: yes this works, msys is there for you. Don’t worry about this alien /dev/null stuff).

It’s also making sure the directory exists (by forcing it to be made). Make doesn’t make directories automatically (sadly, because it would be so much easier if it did).

Anyway now that we have this setup, let’s modify our references to .d files so that they all end up in this directory:

# listing possible dependency files
DEPFILES := $(addprefix $(DEPSDIR)/, $(notdir $(CFILES:.c=.d)))

# dependency generation flags for CC
CDEPFLAGS = -MD -MT $*.o -MT $*.asm -MF $(DEPSDIR)/$(notdir $*).d -MP

(Note how I used the notdir and addprefix Make functions to “change” the directory the file is in)

And… that’s about it. Fairly simple. Now every dependency makefiles will be generated in that directory.

Eventually when you may want to hide other generated makefiles or intermediate files you could re-purpose this directory as more general-purpose “cache” or “build” directory.

Resources

Directly related

Doc on the tools we used

Doc on the game

My stuff (gotta plug it)

Other

The End

Thank you for reading. Hopefully this was somewhat useful to at least one of all three people that read this. Have fun abusing your newfound powers.

Of course if you find any errors or ambiguous bits, or just have suggestions for improving all of this I’m all ears.

And remember: when in doubt, ALIGN 4.

On that note, Have a nice day! -Stan

8 Likes

<3

staaaaaan come back

2 Likes

I will explain how to trick linker script to inject C code simply.

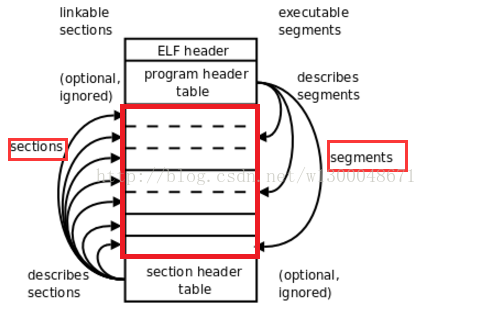
Object files consist of segments/sections. There are some default sections, such as .text, .rodata, .bss, .data and so on. The linker combines the sections from object files. It is also allowed to define our own sections:
For assembly:

.section .your_section_name,"x"

(sth like “x”“r”“w” is the attribute of the section.)

For C (in fact gnu extension grammar):

__attribute__((section(".your_section_name")))

The linker script tells the linker to place which section to where:

. = addr;
.section_name_in_elf : {*.o(.section_name_in_obj)}

We create a section called .rom (name is not important, any works) for the original rom and place it at 0x8000000. Then place .text and .rodata of our new C codes from 0x9000000.
Then the question is: How to connect the 2 parts?
One quick answer is to create many tiny custom sections to act as the bridges. Those sections will go inside the section .rom. You will fail in linking if you try it, because section overlap/overwrite is not permitted by linker. (One address cannot belong to more than one sections) (But really?)
Here is the work around: Deal with the section which needs overlapping specially.
In linker script:

. = 0x8000000;
.rom (COPY): {KEEP(*.o(.rom))}

Notice: .rom : {*.o(.rom)} X
Add these options when dumping the binary rom image from .elf:

OBJCOPYFLAGS := --set-section-flags .rom="r,c,a"

Then our custom sections can fly into .rom section (0x8000000~0x9000000). They are usually wrapper functions of our real functions (0x9000000~, you don’t need to know their actual addresses because you can call them by function name directly in your code.)

At last, here is another C injection method.

3 Likes

Lunix

1 Like

Lunix indeed

I would like to argue that array and pointer is the same thing in C:

a[b] = *(a+b) = *(b+a) = b[a]

No big difference between them except sizeof.

1 Like

That’s not quite true, arrays and pointers are fairly different entities.

See, an object of array type (say, int[4]) will occupy sizeof(int)*4 bytes in memory. If it’s a local variable then it will be on the stack (probably). This object owns the data in the array, and the lifetime of that data is defined by the scope of this object.

A pointer however, is just a pointer. It’s just occupying sizeof(void*) bytes and (more importantly) doesn’t own the pointed object. The lifetime of the pointed object is independent of the lifetime of the pointer object.

The confusion probably come from the Array to Pointer implicit conversion that occurs pretty much all the time you reference an array (such as in a function declaration).

But in the case where I was explaining that, it wasn’t one of those times. I was defining an (extern) object. And there defining a pointer would have been very different, as it would expect the referenced value (object at symbol) to be a pointer and not an array (and I wanted it to be an array, since the event slot value array is, well, an array).

1 Like

I’d like to add 2 methods of creating a library in the linker way:

Convert symbols/labels to a constant address

  • during compiling

fe8u.h

	#define eventSlot    ((int *)0x030004B8)
	#define GetGameTime  (((int(*)())(0x08000D28+1))
  • during linking

fe8u.h

	extern int eventSlot[];
	int GetGameTime();

fe8u.ld

	eventSlot = 0x030004B8;
	GetGameTime = 0x08000D28|1;
2 Likes

Addition

  1. You can also hack in C++.
    In that case, the compiler is g++, the source file is *.cpp, the header file is *.hpp. Others are the same.

  2. Makefile supports recursive execution.
    It is convenient for huge and complex project. Notice how the parameters get passed between layers. Read this for more details.

  3. This is a good example of how to use makefile.
    The effect is to edit an image and see the change in the game directly. I leave it as an exercise for readers.

  4. Dependency in assembly.
    ASM coding can also use libraries.
    Analogy: *.c <=> *.s; *.h <=> *.inc; #include <=> .include
    Use MD option for assembly dependency.

  5. Read this doc if you would like to use gnu linker.


    Linker script is as necessary and essential as makefile. You can modify it based on the default one which the linker uses.
    ld --verbose > ldscript.x
    Linker script also supports include so you needn’t put all things in one huge file. It is also doable to add options to pass these info to linker without script, but an independent file is much better.

  6. Add -Map option when linking.
    It seems that you lose the addresses of symbols/labels when coding in a higher level programming language like C/C++. However that is totally wrong. The linker can produce a map file which tell you those info.

  7. Finer control to generated assembly code.
    It seems that you lose the fine control to binary when coding in a higher level programming language like C/C++. However that is also wrong. You can set a specified register for a variable by keyword “register”. You can even write assembly in C directly if you want.

  8. Other special keywords and gnu extension grammar.
    Now that “register” is mentioned in 6, I list some of others: volatile, restrict, attribute and so on. Keyword volatile and attribute are common.
    GNU C extension. I really use some of those tricks in my code.

  9. Other tool chains.
    gcc is not the only compiler. You can also use clang, armcc and others. Read the manual of your tool. For example, if you think gnu style assembly (similar to at&t) is too ugly, armasm is an alternative. ARM tool chain consists of armar, armasm, armcc, armlink, fromelf.

  10. You can import your makefile project into an IDE like visual studio and eclipse CDT.

  11. Debugging in C.
    Debugging is always with programming. You can use gdb to debug your game in C level without checking generated assembly code, which will make everything faster though the debugger often crashes. Furthermore, you can port printf to your game (sprintf and vfprintf are remained in fe8). Emulators like vba, vba-rr and no$ also have their own debug interfaces, such as swi ff, lua scripts and debug messages, which can also help you to debug your buggy code. Read their manual. GBAFE debug console is also remained in the rom, with which I see Kirb play happily. Remember to add -g option when building your rom.

3 Likes

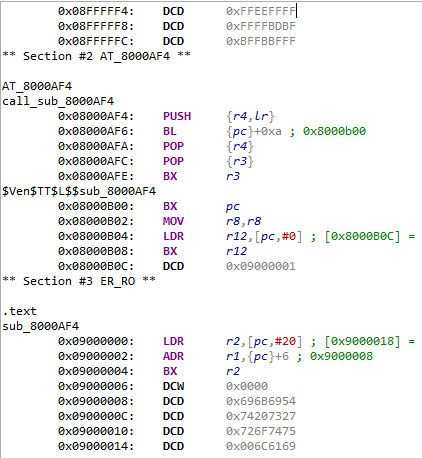
I am here to explain it again because I managed to trick another linker today and have a better understanding of this question now. I have explained how to do that with ld in my previous reply and I will explain why to do that.
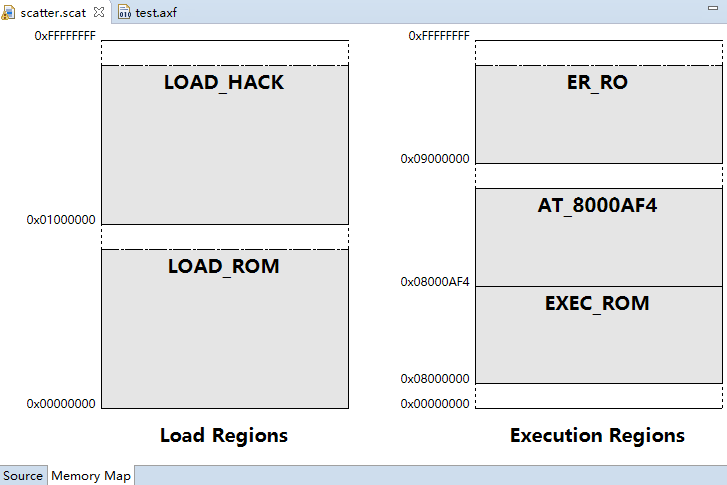
Basic knowledge: section & segment; linker & loader; load regions & execution regions; LMA & VMA.

in fact, it is segment overlap that prevents linking, not section overlap.

(1) armlink

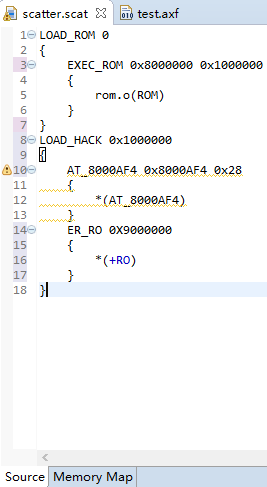
scatter file:


The length of the region (0x1000000 and 0x28) can be omitted. They are here to let you know that.
The memory map has a glitch——the EXEC_ROM is from 0x8000000 to 0x9000000 ,but it doesn’t matter.
add this command-line option when linking:
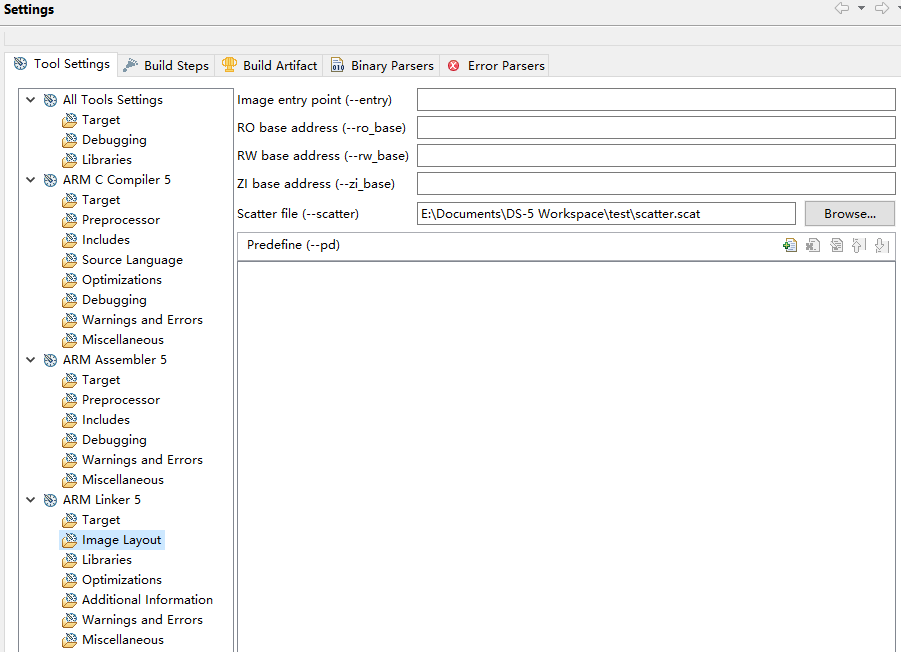
–scatter=scatterfile
or configure it here:

It will give you this error:
L6221E: Execution region EXEC_ROM with Execution range [0x08000000,0x09000000) overlaps with Execution region AT_8000AF4 with Execution range [0x08000af4,0x08000b10).
Then add this command-line option when linking:
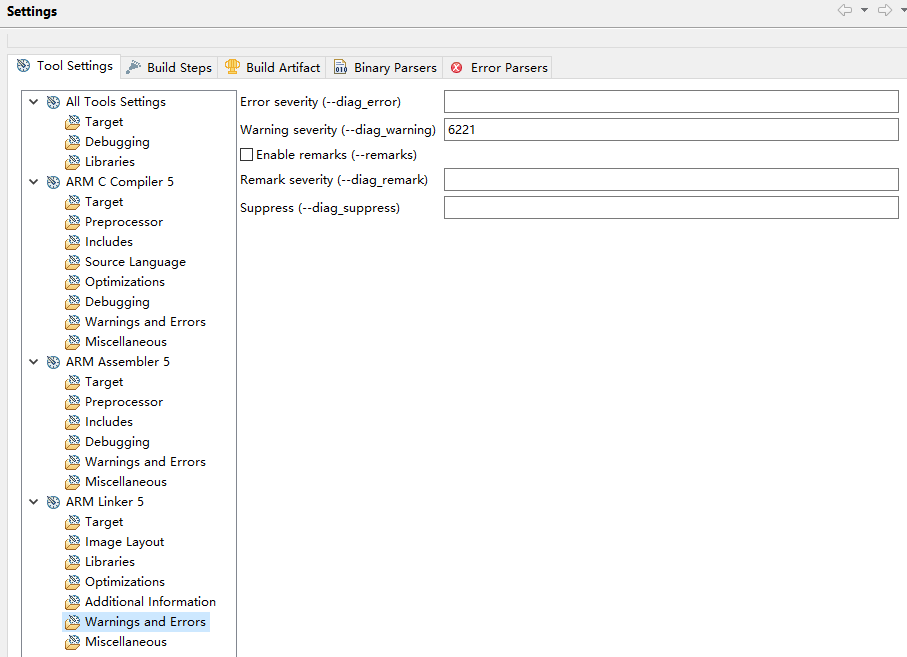
–diag_warning=6221
or configure it here:

As a result, the error L6221E will be downgraded to a warning, which doesn’t affect linking.
(–diag_suppress=tag is also okay)
Then the generated ELF will have overlapped segments.

Then you can dump binary file which can be burnt to cartridge or loaded to emulator directly.
arm-none-eabi-objcopy -O binary test.axf rom.bin
It seems that fromelf.exe in ARM tool chain cannot dump it correctly because of the overlapped segments but I may be wrong, so I use objcopy here.

(2)arm-none-eabi-ld

linker script:

add this command-line option when linking:
-T(linkerscript)
Then the generated ELF will have section .rom, but .rom section will not be included in any segment.


If we dump binary file directly from a.out, section .rom will get lost.
Then we tell objcopy to keep section .rom:
objcopy --set-section-flags .rom=“r,c,a” a.out
The section .rom is marked ‘alloc’. If you don’t understand that, read these:

https://www.freebsd.org/cgi/man.cgi?query=objcopy&sektion=1&apropos=0&manpath=FreeBSD%2B10.0-RELEASE

objcopy will give a warning, but it doesn’t matter:
warning: allocated section `.rom’ not in segment
Then dump as usual:
arm-none-eabi-objcopy -O binary a.out rom.bin

Addition to how to place stuff at a specific address when linking

In fact, there exist more ways to do that, such as:
__attribute__((at(address)))
__attribute__((section(".ARM.__at_address")))
#pragma arm section code = "foo"
#pragma arm section rwdata = "foo", rodata = "bar"
AREA directive
--split_sections command-line option
and the place of __attribute__ is also flexible

Read the manual of the tool you use for detailed info. (especially this step by step guide)