Analysing, Extending and Mimicking the lord split menu
doing that before Kirb steals all the credit lol
NOTE: I will use EA notation to define any non-asm data in here.
PREREQUISITES: Knowledge of how EA works & a bit of asm.
TROUBLESHOOTING TIP: when in doubt, ALIGN 4 (this applies everywhere anytime in life)
PART I: Analysis
Ok so, surely you know how FE8 at some point prompts you with a menu that lets you choose which lord you wish to go with for the next 6 chapters or so idr. Let’s start by looking at the lord split events to see if we can understand them:
Relevant Lord Split Events
	// There are things before

LABEL 0
	ASMC 0x864CD // Call the Split Menu

	SADD 0xC2    // Slot 2 = Slot C

	TUTORIALTEXTBOXSTART
	SVAL rB  0xFFFFFFFF  // [-1, -1] (Centered?)
	TEXTSHOW 0xFFFF      // Displays Text in Slot 2
	TEXTEND              // End
	REMA

	SVAL  r7 True // Slot 7 = True (1)
	BNE 0 rC r7   // Goto label #0 (which is *before* this point) if rC != True (1)

	// Things after that are conditionals for displaying the "Forde/Kyle/Seth goes with you anyway" scenes & shit
From that we can understand 2 things: the lord split menu is called through asm (surprising I know), and that said asm returns a value in slot C. That value is a text id, the text id for the prompt that asks you whether you are sure you want to go with Eirikia/Ephraim. The rest of the events manages looping back if said prompt yields a negative result from the user.
Now, lets look at the ASM: (nicer looking source will be available later when doc will want to update)
Lord Split ASMC ASM
.thumb

CallRouteSplitMenu:
	push {r4, lr}

	@ Saving argument from r0 to r4 (The Event Engine 6C)
	mov r4, r0

	bl ClearBG0BG1 @ 0804E884

	ldr  r2, =pLCDControlBuffer @ 03003080
	ldrb r0, [r2, #1]

	mov r1, #1
	orr r0, r1 @ enable bg0 display

	mov r1, #2
	orr r0, r1 @ enable bg1 display

	mov r1, #4
	orr r0, r1 @ enable bg2 display

	mov r1, #8
	orr r0, r1 @ enable bg3 display

	mov r1, #0x10
	orr r0, r1 @ enable obj display

	strb r0, [r2, #1]

	@ Setting up relevant graphics (Setting up text font and loading UI frame graphics)

	mov r0, #0
	bl SetFont @ 08003D38 | Arguments: r0 = Font Struct (0 for default)

	bl SetupFontForUI @ 080043A8

	bl LoadNewUIGraphics @ 0804EB68

	@ Calling the actual lord split menu 6C, with the event engine as parent

	ldr r0, =pRouteSplitMenuDef @ 089F36A0
	mov r1, r4
	bl NewMenu_DefaultChild @ 0804EBC8 | Arguments: r0 = Menu Def, r1 = Parent

	pop {r4}

	pop {r0}
	bx r0
Ok so it’s a bit boring: most of this stuff is technical graphical stuff (clearing backgrounds, enabling displays, loading graphics in VRAM etc), but the end part is what we are interested in: the actual menu call! Let’s go to 0x9F36A0 to check how the menu definition looks like!
(Note: I will make heavy use of the knowledge present in my notes on menus, so make sure to read the doc!)
(Note 2: The fact that the menu has the event engine as parent is important! if not, then the event engine will continue to run while the menu is up, and we do not want that!)
EAified Lord Split Menu Definition
ORG 0x9F36A0
	BYTE 6 8 18 0    // Geomerty, order: X, Y, Width, Height (Height doesn't matter much)
	WORD 1           // window "style" (1 is a bit bigger than 0)
	POIN 0x9F3634    // Command Definitions, we'll get to that!
	WORD 0 0 0 0 0 0 // No routines to handle B press/R press/construction/etc
Well that’s already more interesting. We have 2 part that we are interested in: the geometry (will allow use to reposition the menu on the screen), and the pointer to command definitions. So lets check those commands now.
(Note: If you messed with the unit menu commands in the past, you will note that the format is very similar. In fact, it is the same! All menus share the same format for menu definitions & menu commands)
EAified Lord Split Menu Commands
ORG 0x9F3634

// Command 1 (Eirika)
	POIN 0x205958   // Not Important here (that's a pointer to some japanese text)
	SHORT 0xC15 0   // Label text id: 0xC15 ("Go with Eirika to Rausten.[X]"), Help text id: 0
	BYTE 0 0 0 0    // No extra parameters
	POIN 0x04F448+1 // Usability routine (this one returns "always usable")
	POIN 0x086514+1 // Draw routine (idk why this one exists, since the default behavior seem to do the same thing but better)
	POIN 0x086564+1 // Eirika command effect
	WORD 0 0 0      // Other 3 routines aren't used

// Command 2 (Ephraim)
	POIN 0x205958   // Not Important here (that's a pointer to some japanese text)
	SHORT 0xC16 0   // Label text id: 0xC16 ("Go with Ephraim to Grado.[.][X]"), Help text id: 0
	BYTE 0 1 0 0    // Idk what that second byte does (actually I think it's related to the tutorial preventing you to use some commands, but it is irrelevant here)
	POIN 0x04F448+1 // Usability routine (this one returns "always usable")
	POIN 0x086514+1 // Draw routine (idk why this one exists, since the default behavior seem to do the same thing but better)
	POIN 0x086564+1 // Ephraim command effect
	WORD 0 0 0      // Other 3 routines aren't used

// End
	WORD 0 0 0 0 0 0 0 0 0 // 9 times 0
Okay so here we are! This is the juicy stuff! first we can see that we can change whatever text ids are used. Then we can see what routines are called for what, which in turn will allow us to look at what the route split does exactly.
Let’s look at the Eirika command effect:
Eirika Command Effect ASM
.thumb

Command_EirikaMode:
	push {lr}

	ldr r0, =pChapterDataStruct @ 0202BCF0

	mov  r1, #2 @ Eirika mode
	strb r1, [r0, #0x1B] @ Chapter Data + 0x1B is current mode

	ldr r0, =0xC17 @ "Will you go with Eirika?[N][Yes][X]" text id
	bl SetEventSlotC @ 0800D1F8 | Arguments: r0 = Value

	@ Return value = (0x1 = ???) + (0x2 = kill menu) + (0x4 = play beep sound) + (0x10 = clears menu graphics)
	mov r0, #0x17

	pop {r1}
	bx r1
This one is fairly simpler than the previous one. It does two things: sets the mode byte to 2 (1 is Beginning, 2 is Eirika and 3 is Ephraim), and “returns” the prompt text id in slot C. The actual return value of this routine will delete the menu. And since the menu 6C was a (blocking) child of the event engine 6C, it means that the event engine will resume execution. And this is where the events we analysed at the start of this will come into place. We went full circle!
(Note: the Ephraim routine does the exact same with different values: mode 3 and text id 0xC18, I won’t bother to annotate that one)
PART II: Extending
Ok so now that we know precisely how the lord split menu works, let’s go and extend it. By extending I mean add new options. So where do we start? Well to add new options is to add new commands, and in order to add new commands we need to repoint the command definitions. Luckily we know where that pointer is, so that’s easy (no need for PFinder or any other tool):
Repointing the lord split menu commands
PUSH; ORG (0x9F36A0 + 8) // The pointer is 8 bytes into the definition
	POIN pNewLordSplitMenuCommands
POP
And then we can paste in the commands into free space:
Repointed standard commands
pNewLordSplitMenuCommands:
// Command 1 (Eirika)
	WORD 0          // No backup string
	SHORT 0xC15 0   // Label text id: 0xC15 ("Go with Eirika to Rausten.[X]"), Help text id: 0
	BYTE 0 0 0 0    // No extra parameters
	POIN 0x04F448+1 // Usability routine (this one returns "always usable")
	WORD 0          // No draw routine
	POIN 0x086564+1 // Eirika command effect
	WORD 0 0 0      // Other 3 routines aren't used

// Command 2 (Ephraim)
	WORD 0          // No backup string
	SHORT 0xC16 0   // Label text id: 0xC16 ("Go with Ephraim to Grado.[.][X]"), Help text id: 0
	BYTE 0 0 0 0    // No extra parameters
	POIN 0x04F448+1 // Usability routine (this one returns "always usable")
	WORD 0          // No draw routine
	POIN 0x086564+1 // Ephraim command effect
	WORD 0 0 0      // Other 3 routines aren't used

// End
	WORD 0 0 0 0 0 0 0 0 0 // 9 times 0
(Note: you will notice that I took the liberty to simplify the whole thing by removing unecessary components, I tested it and it works so it’s all good dw)
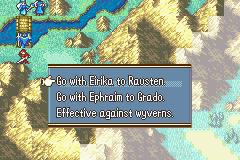
Ok so let’s try to just add an option (no functionality or anything yet), and use text id 0x437 (“Effective against wyverns.[X]” because why not)
New Command
// Command 3 (Whatever)
	WORD 0          // No backup string
	SHORT 0x437 0   // Label text id: 0x437 ("Effective against wyverns.[X]"), Help text id: 0
	BYTE 0 0 0 0    // No extra parameters
	POIN 0x04F448+1 // Usability routine (this one returns "always usable")
	WORD 0          // No draw routine
	POIN 0x086564+1 // Ephraim command effect
	WORD 0 0 0      // Other 3 routines aren't used
(Make sure to put that between the end of the ephraim command and the beginning of the “End” command (the terminator))
ez
Ok but now comes the issue of functionality. The original route split menu sets the current mode byte and returns a prompt text id in the C Slot. The thing is, we could set the mode to something else for the 3rd option (I think 4 is reserved for creature campaign, so we’ll use 5+), but what if we want our option to do something else? Something more local (for example: Kirb & circles are working on having a FEH-style color-based summon thing using that).
Well how about we scrap that “use Slot C for a text id” part and use slot C for the command result instead (read: Slot C will contain the index of the command that has been selected, ie for the standard routine split it would become 0 for eirika and 1 for ephraim). The advantage of that are: 1. that we can use the same effect routine for all commands! and 2. we can use event conditionals and slot manipulations to conditionally execute shit.
Universal Command Effect for Event-called Menus
.thumb

@ _blh macro, for absolute branch with link
.macro _blh to, reg=r3
	ldr \reg, =\to
	mov lr, \reg
	.short 0xF800
.endm

CommandEffect_EventCalledMenu:
	push {lr}

	@ r1 is command 6C
	@ command 6C + 0x3C is command index

	mov  r0, #0x3C
	ldrb r0, [r1, r0]

	_blh #0x0800D1F8 @ SetEventSlotC

	mov r0, #0x17

	pop {r1}
	bx r1
Assembled in EA form
prEventMenuCommandEffect:
	SHORT 0xB500 0x203C 0x5C08 0x4B03 0x469E 0xF800 0x2017 0xBC02 0x4708 0x0000 0xD1F8 0x0800
(Note: if you’re wondering about why we use 0x17 as a return value, see my notes on menus, at the very bottom of the document I have documented what that return value does (and it’s combinable, so 0x17 = 0x10 + 0x4 + 0x2 + 0x1)
And now you can define your menu commands with (prEventMenuCommandEffect+1) as the effect routine!
…
define
Ye let’s #define for it to be easier later
All of the above, but in EA definitions
	#define EventMenuCommand(aTextId) "WORD 0; SHORT aTextId 0; WORD 0; POIN (0x04F448+1); WORD 0; POIN (prEventMenuCommandEffect+1); WORD 0 0 0"
	#define EventMenuCommandEnd "WORD 0 0 0 0 0 0 0 0 0"

	pNewLordSplitMenuCommands:
		EventMenuCommand(0xC15)
		EventMenuCommand(0xC16)
		EventMenuCommand(0x437)
	EventMenuCommandEnd

	prEventMenuCommandEffect:
		SHORT 0xB500 0x203C 0x5C08 0x4B03 0x469E 0xF800 0x2017 0xBC02 0x4708 0x0000 0xD1F8 0x0800
phew, that was work, but now it’s all easy 
BONUS: My Test Events
I used a simple talk event that gives money (the money amount being 10 + command id, to know which command was used):
	ASMC (0x0864CC+1)

	SVAL r1 10 // r1 = 10
	SADD 0x1C3 // r3 = rC + r1

	GIVEITEMTOMAIN 0
PART III: Mimicking
Ok so now we know how to call, extend and “genericify” the lord split menu. But we still have a slight problem here: we can only have one. So let’s setup the required stuff to allow us to define multiple.
Ok so first off, lets rewrite the lord split specific routine to allow use to define a Menu Definition through EA:
Call Event Menu ASM
.thumb

@ _blh macro, for absolute branch with link
.macro _blh to, reg=r3
	ldr \reg, =\to
	mov lr, \reg
	.short 0xF800
.endm

CallEventMenu:
	push {r4, lr}

	@ Saving argument from r0 to r4 (The Event Engine 6C)
	mov r4, r0

	_blh #0x0804E884 @ ClearBG0BG1

	ldr  r2, =#0x03003080 @ pLCDControlBuffer
	ldrb r0, [r2, #1]

	mov r1, #1
	orr r0, r1 @ enable bg0 display

	mov r1, #2
	orr r0, r1 @ enable bg1 display

	mov r1, #4
	orr r0, r1 @ enable bg2 display

	mov r1, #8
	orr r0, r1 @ enable bg3 display

	mov r1, #0x10
	orr r0, r1 @ enable obj display

	strb r0, [r2, #1]

	@ Setting up relevant graphics (Setting up text font and loading UI frame graphics)

	mov r0, #0
	_blh #0x08003D38 @ SetFont | Arguments: r0 = Font Struct (0 for default)

	_blh #0x080043A8 @ SetupFontForUI

	_blh #0x0804EB68 @ LoadNewUIGraphics

	@ Calling the actual lord split menu 6C, with the event engine as parent

	ldr r0, EALiterals
	mov r1, r4
	_blh #0x0804EBC8  @ NewMenu_DefaultChild | Arguments: r0 = Menu Def, r1 = Parent

	pop {r4}

	pop {r0}
	bx r0

.ltorg
.align

EALiterals:
	@ POIN Menu
Assembled in EA form
prCallEventMenu:
	SHORT 0xB510 0x1C04 0x4B10 0x469E 0xF800 0x4A10 0x7850 0x2101 0x4308 0x2102 0x4308 0x2104 0x4308 0x2108 0x4308 0x2110 0x4308 0x7050 0x2000 0x4B0A 0x469E 0xF800 0x4B09 0x469E 0xF800 0x4B09 0x469E 0xF800 0x4809 0x1C21 0x4B07 0x469E 0xF800 0xBC10 0xBC01 0x4700 0xE884 0x0804 0x3080 0x0300 0x3D38 0x0800 0x43A8 0x0800 0xEB68 0x0804 0xEBC8 0x0804
	POIN pMenuDefinition
Now to define the menu:
Menu Definition
pMenuDefinition:
	BYTE 6 8 18 0           // Geomerty, order: X, Y, Width, Height (Height doesn't matter)
	WORD 1                  // style (change it if u want)
	POIN pCommandDefinition // Command Definitions
	WORD 0 0 0 0 0 0        // No routines to handle B press/R press/construction/etc
And for the command definitions (we already did that one remember?):
Command Definitions
pCommandDefinition:
	EventMenuCommand(0xC15)
	EventMenuCommand(0xC16)
	EventMenuCommand(0x437)
EventMenuCommandEnd
And boom, suddely you have a fully custom menu called from events! woot
you’re just an ASMC (prCallEventMenu+1) away from having it in game and all of this without messing with the og lord split menu!
ASM HOMEWORK
Rewrite the “call a custom menu” routine to allow specifying a menu in some Event Slot (say Slot 2) (which removes the need to add it at the end of the routine through EA), in such a way that allows you to do the following:
	SVAL r2 (pSomeMenuDefinition + 0x8000000)
	ASMC (prCallEventMenu+1)

	SVAL r2 (pSomeOtherMenuDefinition + 0x8000000)
	ASMC (prCallEventMenu+1)
(Remember that ROM pointers start at 0x8000000)
Hinty hint: value of Slot 2 is at 030004C0.
There. Hopefully now you have a better understanding on how the Lord Split Menu works, how menus work in general, and how to use those to your advantage in your events!
Credits to @circleseverywhere because it’s his idea of using the lord split menu for other means that inspired me to write this 15k character long mess.
Have a nice day! - Stan