##Tileset and Palette insertion!
Inserting a tileset may look hard for people who are stuck on buildfiles, but with the tools pointed above, it can be pretty easy. Though, we might want to go with the method for full-on FEBuilder users first, since it can be simple enough.
FEBuilder users, please click.
First of all, let’s open a ROM containing the tileset we want to extract. In this case, we’ll open up a good ol’ Binding Blade ROM.
This is how it will look like in our end, a vanilla, untranslated ROM. Nevermind the fact that FE6 has that little error about a kanji.
Now we click on Advanced Editors, and head ourselves for the following option:
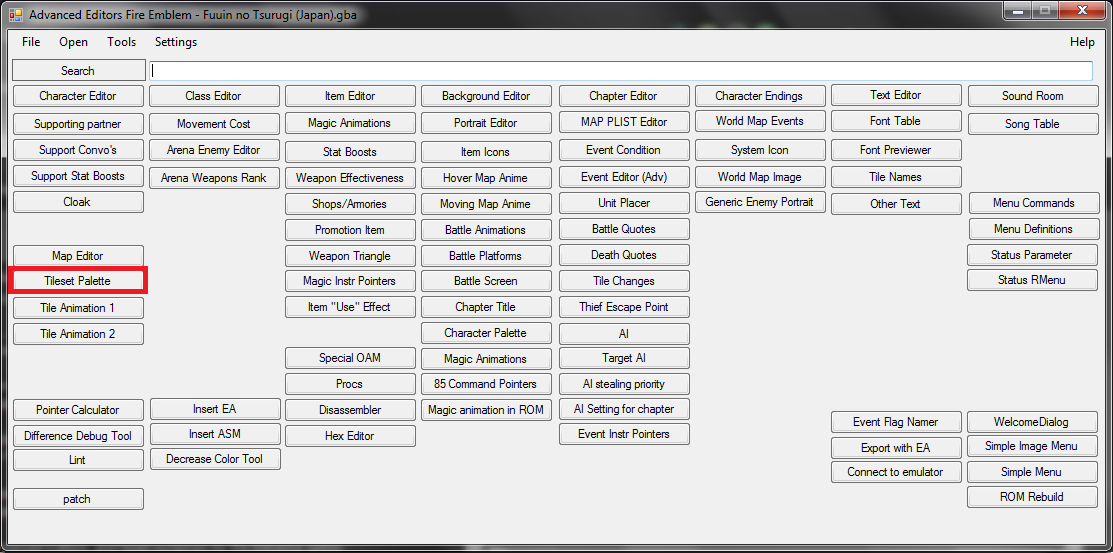
Which brings us to the following screen:
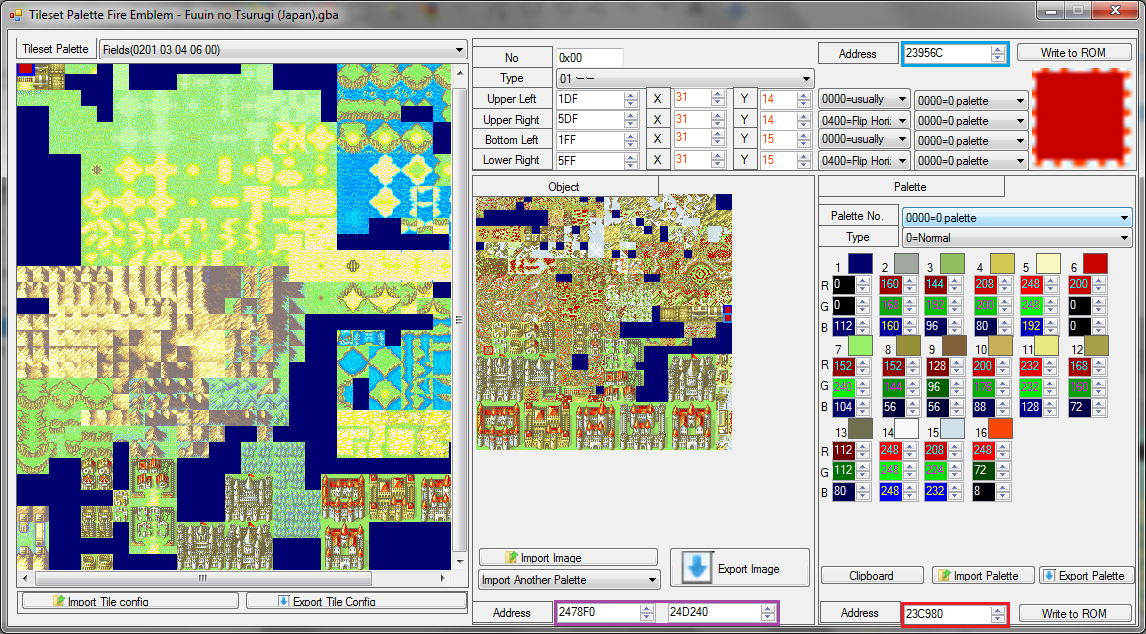
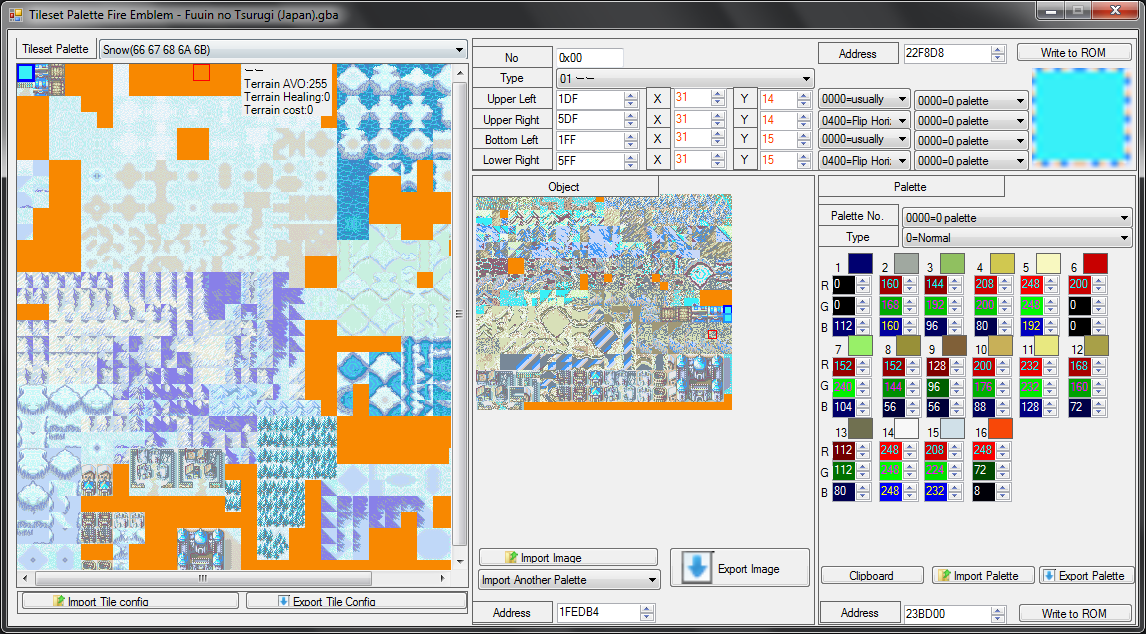
This is the Tileset Editor screen, despite it being labelled as “Tileset Palette”. This will be used to edit tilesets, their palettes and configuration.To the left, we have the bigger tileset map, used by the game’s maps for our units to interact with. In the middle, we got the smaller tileset sheet, which, as explained, is the small tileset map that gets rendered into the bigger map to the left via TSA. To the right, we have the palettes of the current row of palettes of the current tileset, which would be the first row of palettes.
Now as for their hex addresses, one which will be relevant later on; In the purple box, we have what I believe is the Tilemap’s Hex Adresses, which tell us where they begin at. In the blue box, we have the Tile Configuration’s hex adress. Not important for this procedure, unless you want to do a more Hex-y method. However, in the red box, we have the hex adress that’s the most primordial, should you want to include them via buildfiles: The Palette.
The palette is what gives colors to our tilesets, and without them, well… I don’t know. What I know is that, with @Pikmin1211’s help, we managed to find a way to import a tileset from FE6 to FE8, nilly willy. Each palette is 0x140 bytes long, but we’ll explain more when we get into the buildfiles phase.
Now we click on that chest in the tileset to explain some more about how the tilemap works.
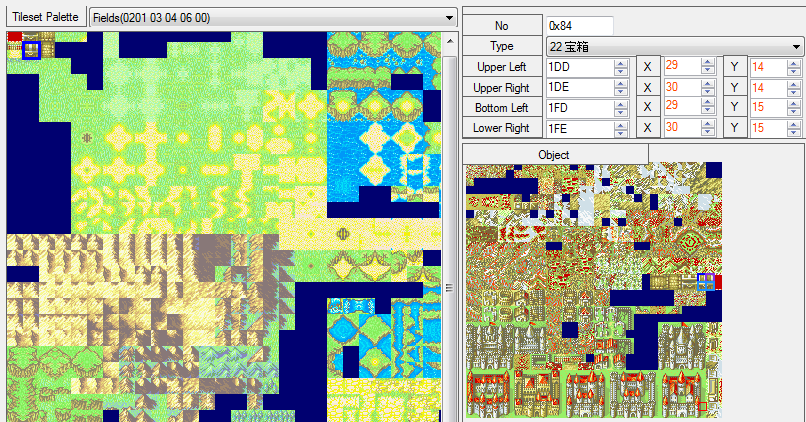
Once we click on it, four small squares will appear in the tilemap, pinned to the chest tile in four blocks. A tile is 16x16, as explained before, but when it’s coverted via TSA in the bigger tile map, however, it’s comprised of four smaller tiles. Their setup solely rely on the palette row used for each minitile, and what orientation they are given. I mean, you can edit the chest to look like so:

However, take this in mind if you’re going to edit the tilemap to include tiles that aren’t present in their respective base game, anyway, notice how the hex for the chest tiles went up by 0x1000; that’s because the tile configuration is using the second row of palettes to draw the chest’s coloration. For every row of palettes, up to the fifth, the tile’s index goes up by 0x1000, going up to 0x4000 as maximum. This editor will also let you see the fog palette, which is located below and to the right, and edit them directly, but you could easily edit them in the palette-editing tools pointed out above.
As a note, the tab above the minitiles’ addresses is a drop-down list of Terrain types: From Plains to Braces, you can edit the tiles to give you a terrain, and even mock players with it, if you’re doing a rage hack. By the way, don’t use the Ballistae terrains, since they are FE6-only; Ballista Traps exist for that sole purpose, anyways.
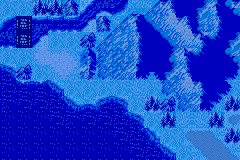
With that on mind, let’s look at a particular tileset that had met “public demand” ever since the Weekly Blitz: Let’s click the tab above the tileset, and let’s pick up the Snow tileset…
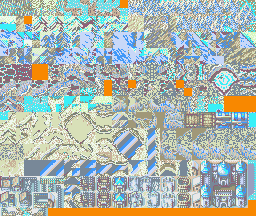
Ahh, beautiful, beatiful snow… Oh! Now that we are here, let’s do something really easy for users of this program, and that is exporting the tileset and it’s configurations. First off, let’s click “Export image”. This will net us a save prompt, and where we would like to save the file. Once you save it with a more recognizeable name, depending on your settings on FEBuilder, it will open the folder where it is stored and automatically highlight/scroll towards it. Our snow tileset should look like this:
Agh! I actually forgot to mention that FE6’s palettes were too harsh on the eyes with the backlight (pretending there’s even one- oh wait, our computer monitors are backlights…), as they were made for unlit GBAs in mind. We’ll go to editing palettes eventually.
Now let’s go back to our Tileset Editor, and click the “Export Tile Config” button below the tileset map. Again, we’ll be prompted to save the file, which is of the “.map_config” format. With that set up, let’s go ahead and close this ROM, before opening a FE8 ROM, and now we’ll do one of two things:
Plan A: Replacing pointers to insert the tileset
Normally, we’d replace a tileset to place ours in, but… that will cause issues, as tileset and tile configurations are shared by a pair of pointers, but are used in a multitude of maps. For this instance, if we want to make a new map with the snow tileset, let’s head to Chapter Editor.
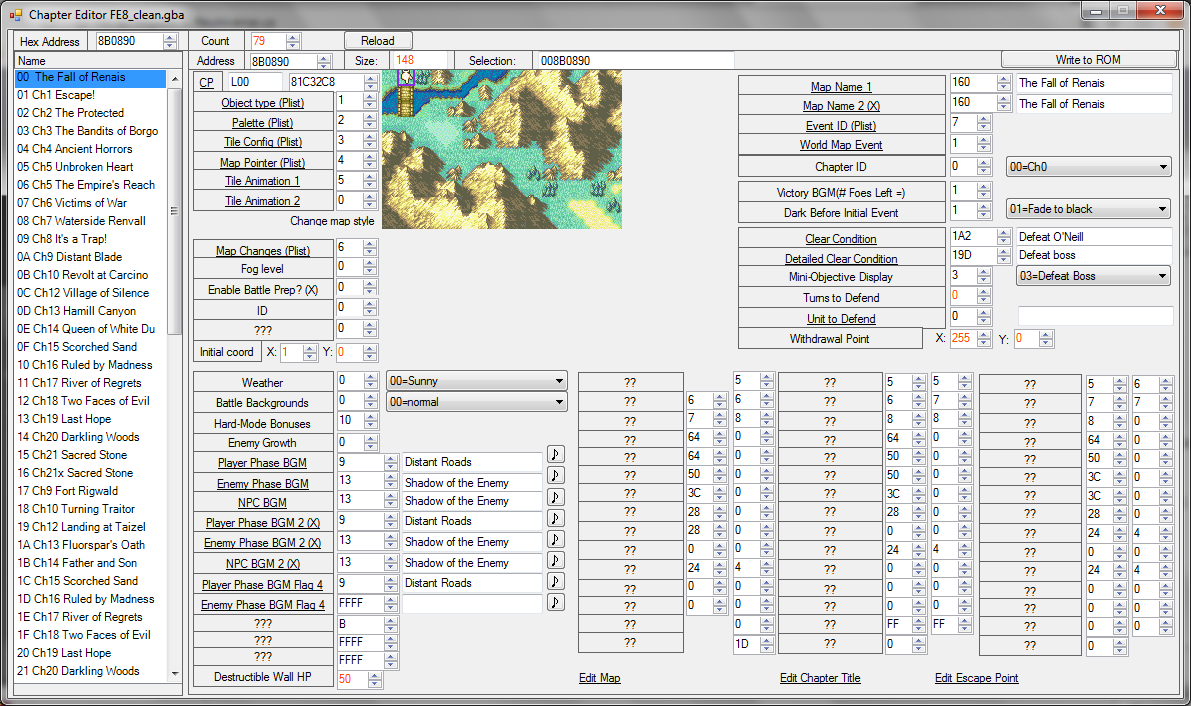
That is one huge screen, alright.
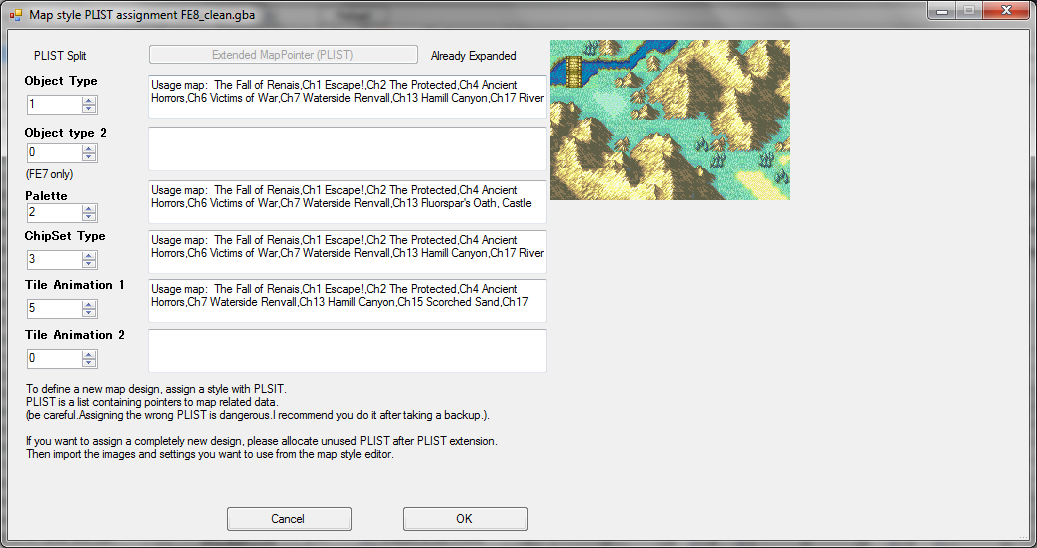
Here, we can configure stuff for the chapter. Music, objectives, Chapter ID, Battle Backgrounds, weather… but their most important part is the PList, or Event Pointer List, to the left of the map view. You can see they are configured like I told back when we spoke about the Event Pointers. Now, what does this have to do with importing a tileset? Well, you’ll see in shortly; click the text “Change Map Style” to be taken to the next window.
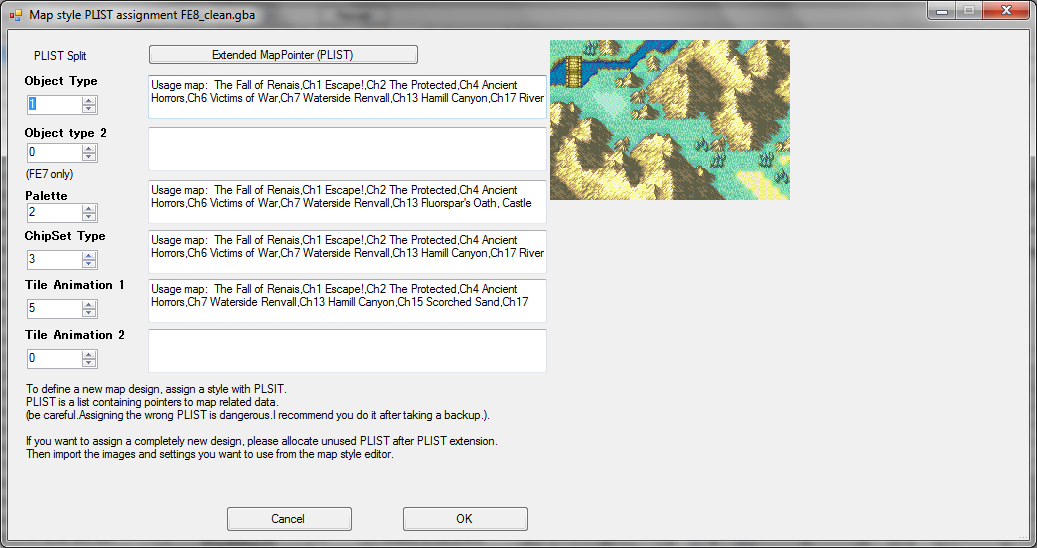
This window will be relevant for two reasons, one which will be revealed soon. Object Type and Palette are obvious, ChipSet Type is the Tile Configuration, which can be confusing if you’re used to one term or another, but now you should know that both are one and the same, and Tile Animation is the tile animations. More on that eventually.
In order to insert the tileset in the prologue, let’s change the pointers to those which we don’t need. Sometimes, while doing world map-less hacks, sacrifices must be made…
0x8B Tower of Valni 1 Map
0X8C Tower of Valni 1 Map changes
0x8D Tower of Valni 1 events
We will change the object map, palette, and tile configuration to these respectively, and it would look like this:
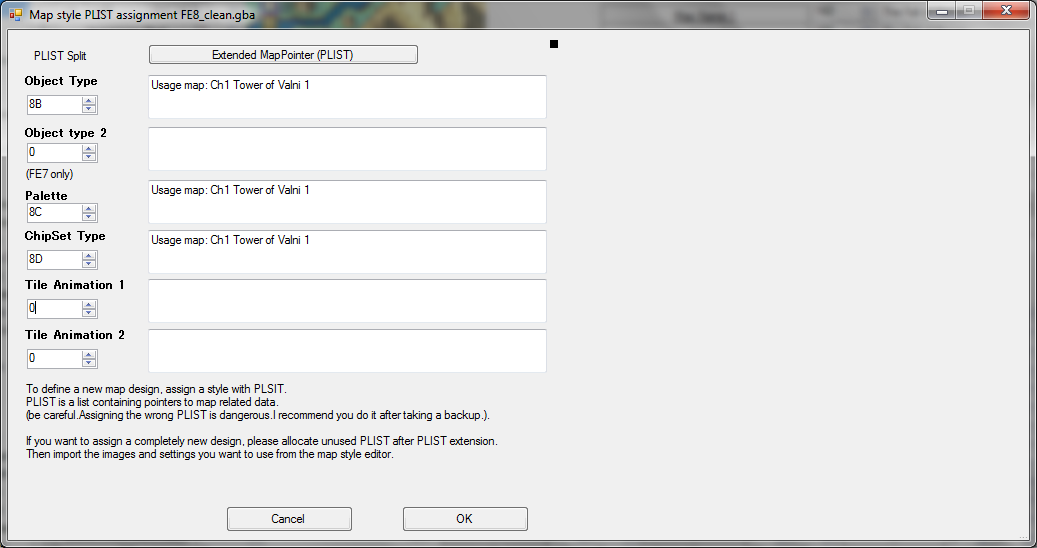
We are replacing stuff from Tower of Valni Floor 1, but we kept their object, palette and tile configuration intact, just in case we need them for another map. Let’s click OK, and we’ll be taken back to the Chapter Editor.

Now there’s a way for us to confirm the changes done: Let’s hit “Write to ROM”, and the changes will be saved. “The map is empty! How could you…?!”, you ask. I say, go back to the Tileset palette/Editor and click on that tab above the tileset.
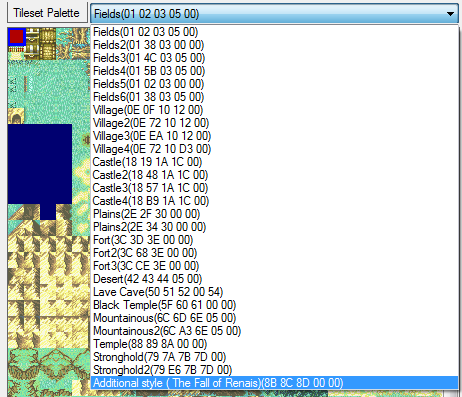
Normally, in a vanilla ROM, the tilesets go up to Stronghold2 (Grado’s Flashback palette), but since we added another one, it’s now known as an “additional style” for the map we chose to import the tilesets on. Now, let’s click on it:
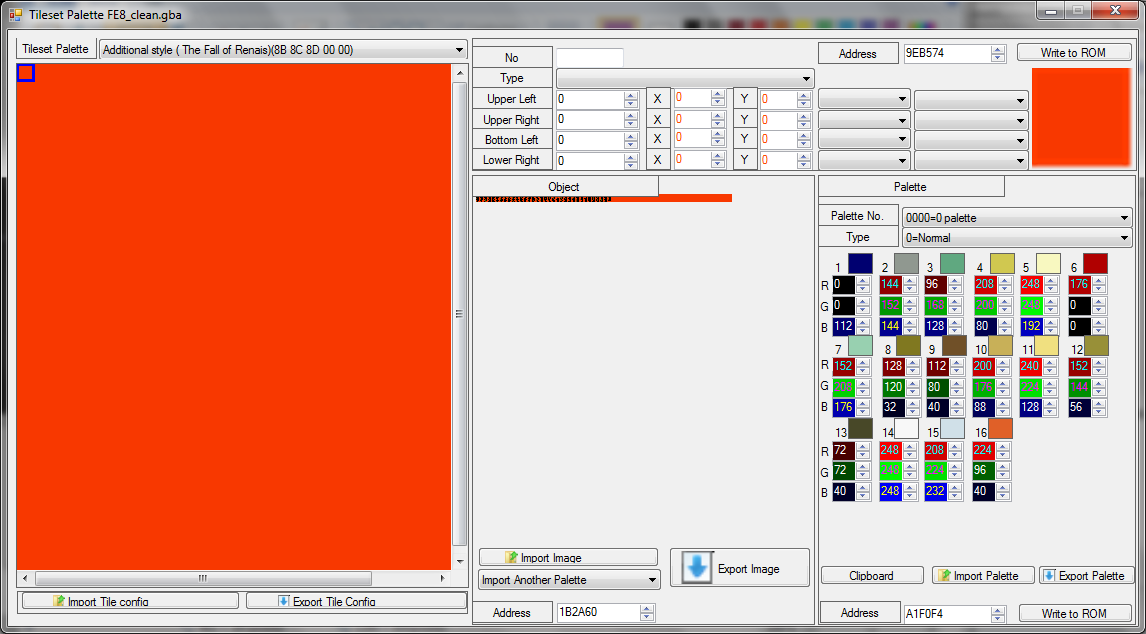
As you can see, it’s all empty, but not for long. Remember those files I mentioned early? First, let’s click on “Import Image” to bring up our Object Map, and choose the image file we have saved in our hard drive a while ago. The result will be this:
It’s all orange now.
Kinda.
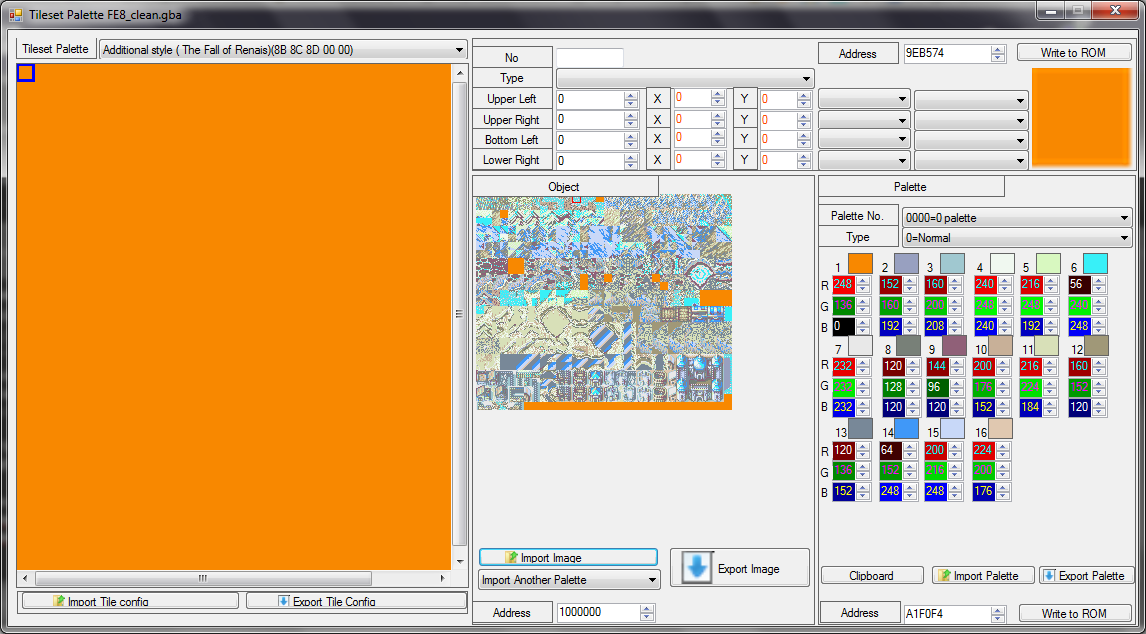
Something’s amiss… what is it? The Tile configuration, of course! Let’s import it after the Object Map, please. We don’t want issues, do we? Click on “Import Tile Config”, and choose your .map_config file!

Presto, our tileset is tidy and nice, ready to be used for any map. Let’s take a look at the prologue map:
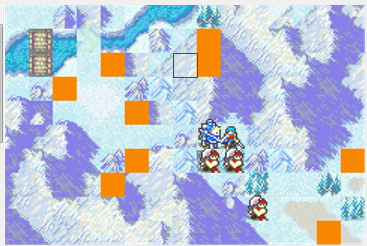
Messy. Manageable, but messy, not to mention it can cause issues with non-traverseable tiles around… Gimme a sec…
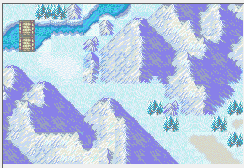
That looks better. A bit broken in the peaks, but surely better.
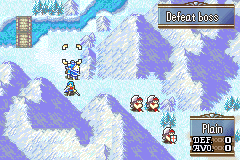
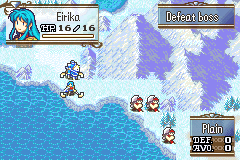
If we must, let’s test the map already to see how it fares.
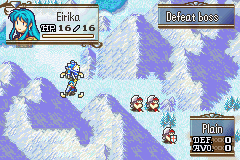
Well, isn’t that dandy? For snow chapters, also make sure to change the Battle Backgrounds to Snow.
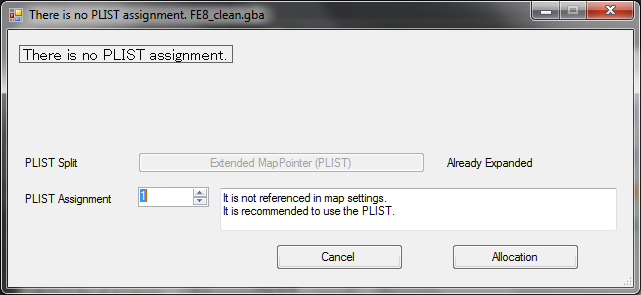
Plan B: Split the Plist.
If you don’t feel like replacing pointers and want to make a big, single project with a lot of stuff, you could always extend, or rather, split the pointer list. Simply click the button above: “Extended Map Pointer (PLIST)”.

A prompt will appear to ask you if you wish to split it. Click “Yes”. Also, pardon my native language.
How do we know it’s already expanded? Let’s check the Map PLIST Editor, in the Advanced Editors Menu. Normally, the Map PLIST Editor would look like in the screenshot past the one above, but after the extension, it now looks like this:
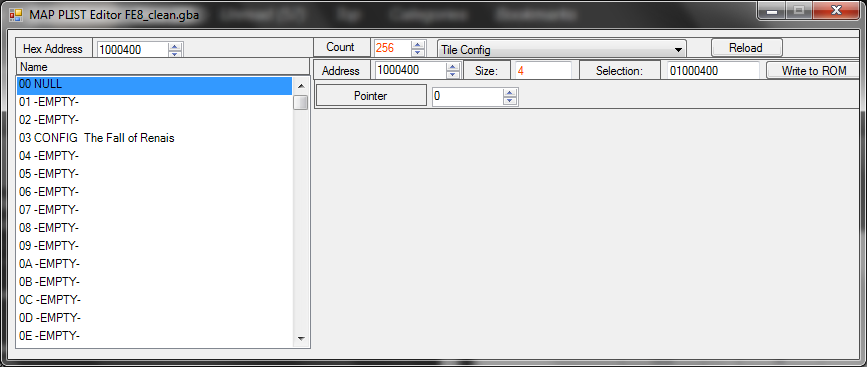
That’s a lot of EMPTY, alright. Notice how now there’s a dropdown menu tab in the top of the window, containing the following items:
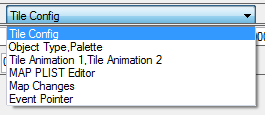
Tile Config is self-explanatory, Object and Palette share one menu for… reasons, so make sure neither of them use the same number. Tile Animation 1 and 2 are used for Tile Animations, which we’ll cover eventually. “Map PLIST Editor” is actually the Chapter’s Map ID, so don’t let that confuse you. Map Changes and Event Pointer should be obvious.
Now we go back to the “Change Map Style” window, and change them to the numbers you desire, for example:

Something’s not right here…
It overlaps with Palette.
It is an unused PLIST, but it can not be used because it uses the same number as Object sharing data.
This is telling us the obvious. When I said that Object and Palette shared the same PLIST, I wasn’t joking, so let us fix that for a sec…
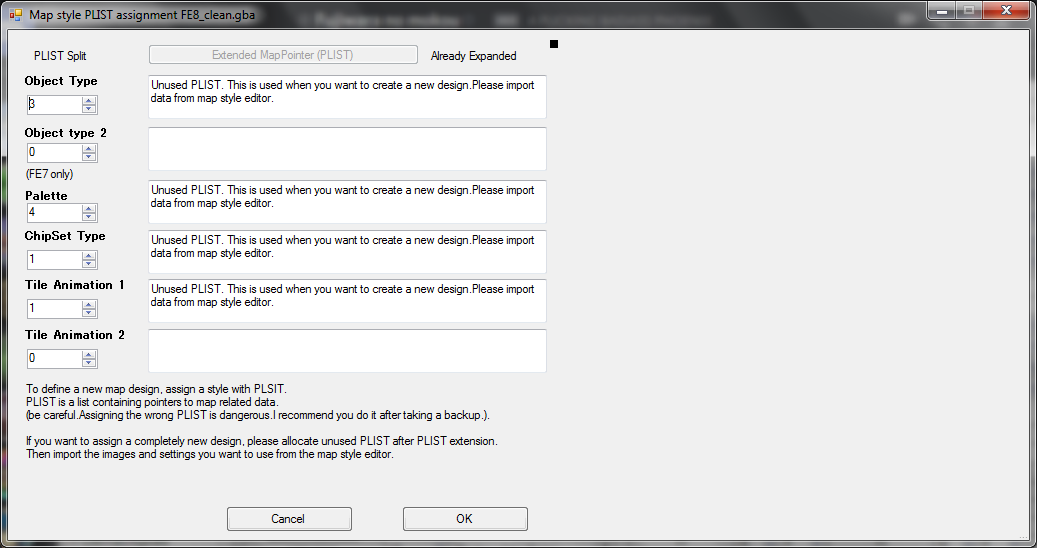
We scrolled both Object and Palette back to 2, then we move object to 3 and Palette to 4, to avoid conflicts. Let’s press OK, then Write to ROM.
After that, we repeat the same steps for importing the tileset, and now we can see the results of our success!
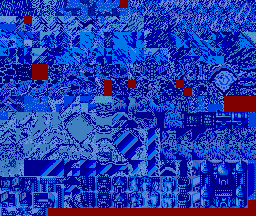
Cool beans! Now we can enjoy our ma-
![]()
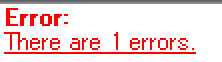
Don’t tell me…
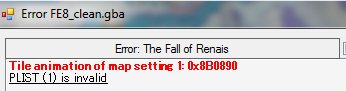
[To be continued in: Part ANIMATIONS]
Tile Animations
Tile Animations can be quite nasty to try and insert, sometimes pretty infuriating but with best results. If we set the animation to 1, what we will get is a glitchy mess, or the game hanging horribly on us with that bloody scream, so now let’s import an animation.
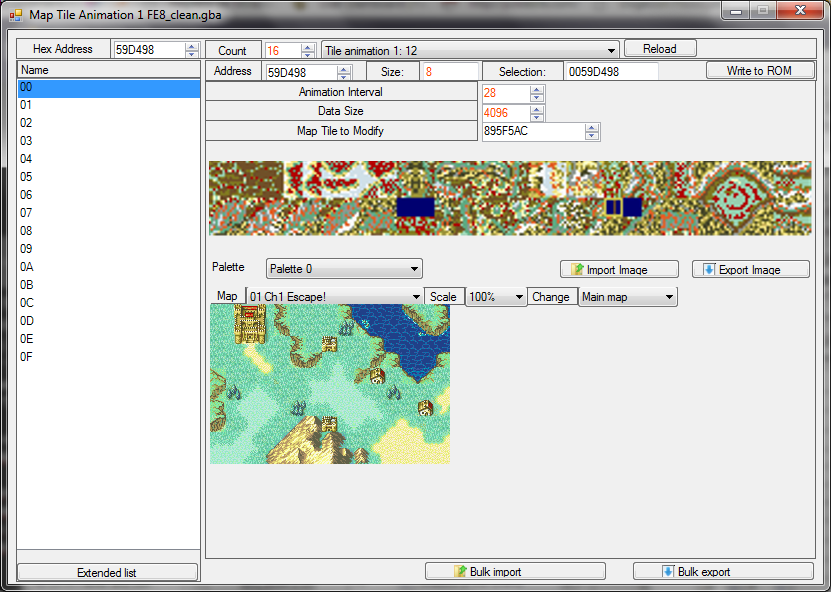
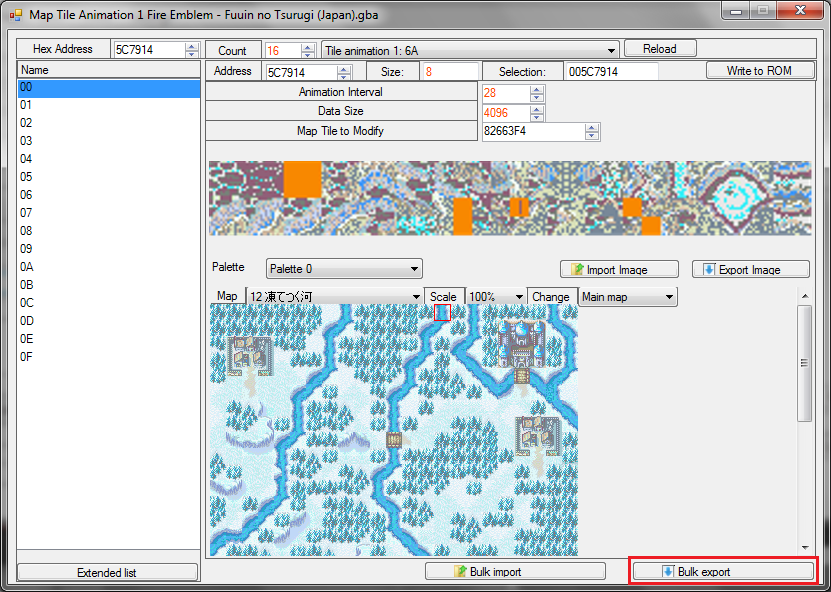
First, let’s do a short study on the Map Tile Animation window:
To the left, we have a list of frames, which for the overworld maps, it’s normally 16 frames.
On the right, we have a tab with a short list of the tile animations, the interval of the animation in decimal numbers, the data size, and the address of the map tile to modify, which would be, as explained, the rows with the water tiles in the Object Map.
The Animation interval is, in this case, a duration of 28/0x1C frames and the Data Size is of 4096/0x1000 bytes.
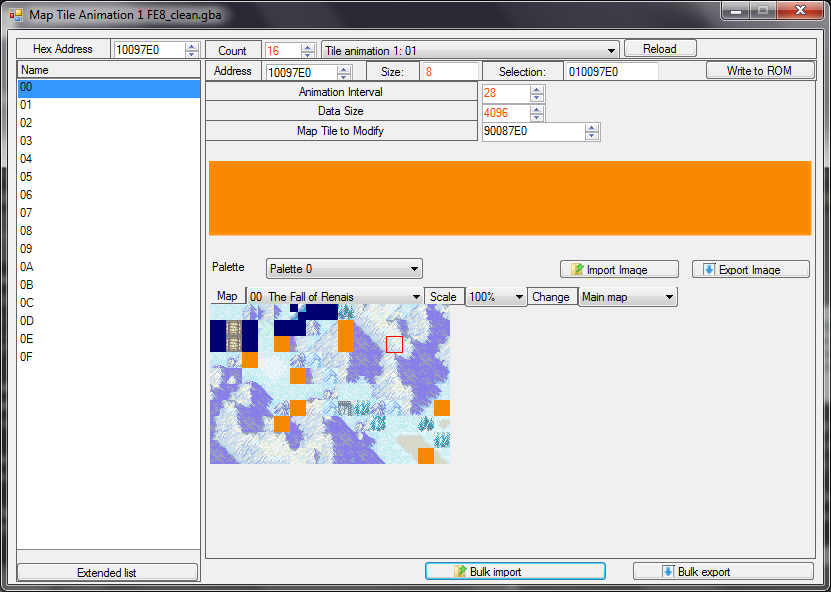
Now, back on Chapter Editor, let’s put our Tile Animations back to 0, and Write that to the ROM.
Then click on Tile Animation to allocate space for a new Tile Animation.
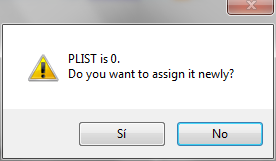
Click Yes and look for a pointer that’s not referenced, and after all of that, the screen should look like this:

Rough, I know, but that will change soon.
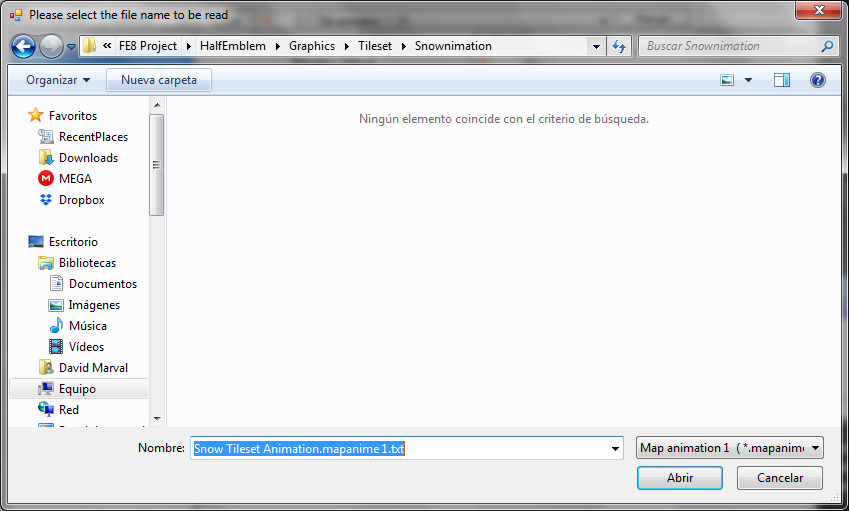
If you’re wondering where we can get the FE6 Snow Tile Animations, we can extract them from the FE6 ROM, alright! Let’s open up this window in our FE6 ROM, and click Bulk Export, and make sure to save it in a folder under a name. It will open the folder with a txt file and the frames we extracted in one click!
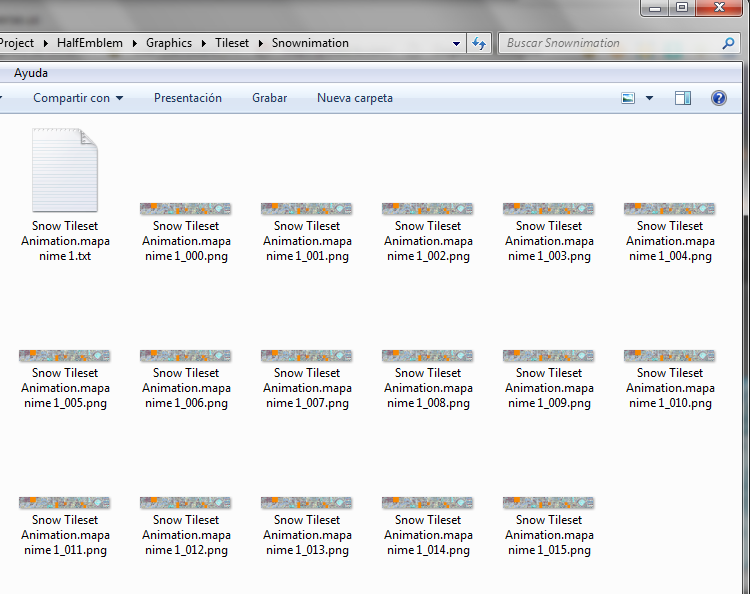
While we can do the above for each frame we insert after setting up, the txt file contains a frame count for each frame, and the filename it is pointed at, for when we import it, and it instructs the program to insert them on the fly. Useful, huh?
Just in case, click Extended list, and change the amount of new data to secure to 16, and press the “Reallocate data and repoint” button.

Now that we have our 16 frames, we can do the procedure manually per frame, or import them by bulk, however you want. Remember to select each frame individually, if you’re playing it slow. Else, click Import Bulk, and choose your txt file with the frames.
… Huh? Where’s the file? For some reason, the program doesn’t seem to recognize the file type, but you can actually type in the file you’ve named upon saving, and it’ll still import the bulk; however, I’d recommend importing the frames’ image files manually for each frame instead, since bulk importing seems kinda glitchy at the moment. Plus, importing them manually saves a huge headache as it gives each frame their tile modificator pointer.
Remember to make the Frame Duration 28 and the Data size 4096!
Once each frame has been made, we can finally see the fruits of our labor!
Well, that wasn’t enough water… How about I show you more, then?
That’s more like it!
This can also be done for non-split PLists, just so you know.
Palettes

Now that we are done with the hard part, it’s time for us to focus on a relatively easy part: the palettes. You are actually able to edit them freely, from FEBuilder’s interface, but you can also use the image edition tools I have described a while ago, Usenti and GraphicsGale. GraphicsGale is easier, if you want to give the whole tileset a color to make it nightly, and edit tiles.
Like so. If you want to import the palette from a image, click on Import Palette, and choose the image in question.

Bam, our snow tileset is now nightly, as we explained. The change applies to our prologue map, too! However, this is actually tougher than it seems, at least in the sense of importing the palette to buildfiles, but we’re already over, so…
Now that we have covered this section, we are already ready to cover the buildfile zone!
Buildfile users, please click.
The procedures for extracting the Object Map and its configuration are pretty much the same, but then there’s the part where we have to insert them. It’s not hard, really:
- Create a .txt/.event buildfile, and give it a name such as
Tileset and Animations Installer.event - Next, write the following into your buildfile, if you must:
ALIGN 4
SnowObjects:
#incext Png2Dmp "Tileset/FE6 Snow.png" --lz77 //A bit of a note: This isn't the tileset you see in Tiled when making a map; it's the compressed image for the metatiles used for the bigger scope. (Thanks to Snakey1 for pointing out)
ALIGN 4
SnowTiles:
#incext compress "Tileset/FE6 Snow.mapchip_config" //This is the configuration of the tiles and their patterns.
Now we would be ready, if not for the palette. Now, if we’re doing something such as including the palettes, we would normally do --palette-only at the end of including a palette, but this hasn’t been confirmed, so, for now, we will teach you how to extract the palette out of a FE6 ROM.
- Open up your FE6 ROM in FEBuilder, and go to
Advanced Editors > Tileset Palette - Remember that Hex Address from before, the one marked in red?
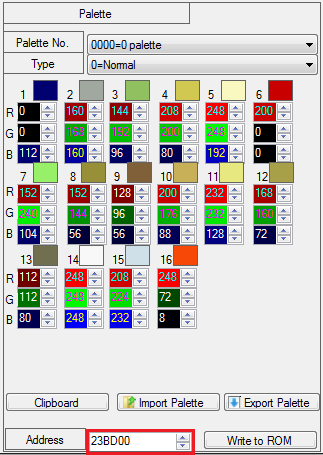
- Remember this address as we open up the ROM in our Hex Editor. Go to this address (
0x23BD00), and select0x140bytes from that address. - Open a new file, and confirm to paste it, then save said file as a .dmp file.
- Now we can include it along with our stuff! First, though, make sure to assign them a Event Pointer you don’t need. Use the pointers for Valni Floor 1, for example:
ALIGN 4
SnowObjects:
#incext Png2Dmp "Tileset/FE6 Snow.png" --lz77
ALIGN 4
SnowPalette:
#incbin "Tileset/SnowPalette.dmp"
ALIGN 4
SnowTiles:
#incext compress "Tileset/FE6 Snow.mapchip_config"
EventPointerTable(0x8b, SnowObjects)
EventPointerTable(0x8c, SnowPalette)
EventPointerTable(0x8d, SnowTiles)
Simple, huh? Well, not as much, but it’s not quite the chore either, depending on your recoloring skills. If you want to insert an extra palette for some reason, and for a tileset, do the following:
- Open your FE6/7/8 ROM.
- Go to the Tileset Palette Editor and extract your object map.
- Open the object map with your image-editing program, preferrably the ones that allow you to edit the palette, and edit the palette however you want. Save the changes.
- Import the Palette of the Object map only.
- Save said ROM as a “Dummy ROM”, and take in mind the palette address.
- Open it up in your hex editor, and go to the hex value for the palette, then grab
0x140bytes and paste them in a new file, save it as a .dmp, and include it in your Tileset installer. - Remember to give the palette a EventPointerTable entry!
ALIGN 4
SnowObjects:
#incext Png2Dmp "Tileset/FE6 Snow.png" --lz77
ALIGN 4
SnowPalette:
#incbin "Tileset/SnowPalette.dmp"
ALIGN 4
SnowTiles:
#incext compress "Tileset/FE6 Snow.mapchip_config"
ALIGN 4
JojoFields:
#incbin "Tileset/JojoFields.dmp"
EventPointerTable(0x8b, SnowObjects)
EventPointerTable(0x8c, SnowPalette)
EventPointerTable(0x8d, SnowTiles)
EventPointerTable(0x8e, JojoFields)

Tough for the palettes, indeed.
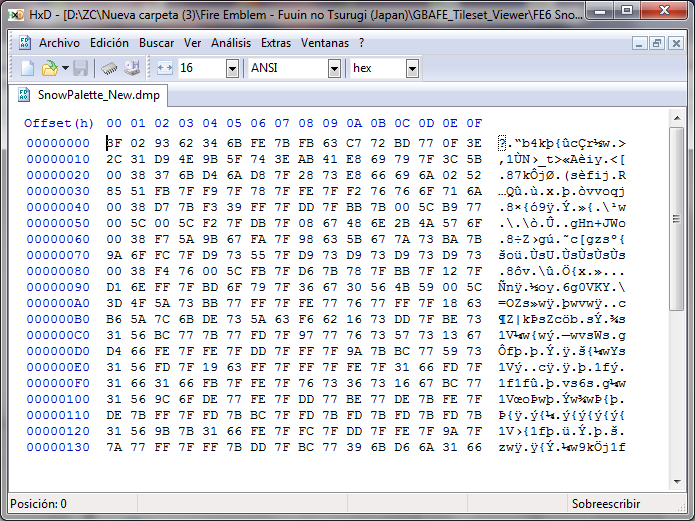
This is how a .dmp of a palette looks like, by the way.
Are tile animations easier, or…?
Depending on whether it is a vanilla tileset or not, it may be easy or hard. Still, to do it, you must have the frames extracted beforehand, by using FEBuilder to extract them (though you may want to read the FEBuilder section to know how to extract them).
Procedure:
- Create a Tileset Animation Installer
.eventor.txtfile. - Next, write this down:
Lenghty Code Ahead!
EventPointerTable(0xcb, SnowAnimation)
#ifndef tilesetAnimation
    #define tilesetAnimation(speed, size, pointer)    "BYTE speed 0; SHORT size; POIN pointer"
#endif
ALIGN 4
SnowAnimation0:
#incext png2dmp "Frame0.png"
ALIGN 4
SnowAnimation1:
#incext png2dmp "Frame1.png"
ALIGN 4
SnowAnimation2:
#incext png2dmp "Frame2.png"
ALIGN 4
SnowAnimation3:
#incext png2dmp "Frame3.png"
ALIGN 4
SnowAnimation4:
#incext png2dmp "Frame4.png"
ALIGN 4
SnowAnimation5:
#incext png2dmp "Frame5.png"
ALIGN 4
SnowAnimation6:
#incext png2dmp "Frame6.png"
ALIGN 4
SnowAnimation7:
#incext png2dmp "Frame7.png"
ALIGN 4
SnowAnimation8:
#incext png2dmp "Frame8.png"
ALIGN 4
SnowAnimation9:
#incext png2dmp "Frame9.png"
ALIGN 4
SnowAnimation10:
#incext png2dmp "Frame10.png"
ALIGN 4
SnowAnimation11:
#incext png2dmp "Frame11.png"
ALIGN 4
SnowAnimation12:
#incext png2dmp "Frame12.png"
ALIGN 4
SnowAnimation13:
#incext png2dmp "Frame13.png"
ALIGN 4
SnowAnimation14:
#incext png2dmp "Frame14.png"
ALIGN 4
SnowAnimation15:
#incext png2dmp "Frame15.png"
ALIGN 4
SnowAnimation:
tilesetAnimation(0x1C,0x1000,SnowAnimation0)
tilesetAnimation(0x1C,0x1000,SnowAnimation1)
tilesetAnimation(0x1C,0x1000,SnowAnimation2)
tilesetAnimation(0x1C,0x1000,SnowAnimation3)
tilesetAnimation(0x1C,0x1000,SnowAnimation4)
tilesetAnimation(0x1C,0x1000,SnowAnimation5)
tilesetAnimation(0x1C,0x1000,SnowAnimation6)
tilesetAnimation(0x1C,0x1000,SnowAnimation7)
tilesetAnimation(0x1C,0x1000,SnowAnimation8)
tilesetAnimation(0x1C,0x1000,SnowAnimation9)
tilesetAnimation(0x1C,0x1000,SnowAnimation10)
tilesetAnimation(0x1C,0x1000,SnowAnimation11)
tilesetAnimation(0x1C,0x1000,SnowAnimation12)
tilesetAnimation(0x1C,0x1000,SnowAnimation13)
tilesetAnimation(0x1C,0x1000,SnowAnimation14)
tilesetAnimation(0x1C,0x1000,SnowAnimation15)
WORD 0 0
- Like in the Tileset Animation installer, we must install it in a Event Pointer, too. Additionally, notice that we can give our tileset animations any number of frames (not sure about limit, but I’d stick with 16 frames), and with the macro, we can define the amount of time for each frame and it’s size in hexadecimal, and the pointer for the graphics.
- After that,
#includeit in your Tileset Installer, if you must, and after your CSV tables! - You should have it running and up!
Thanks to @Leonarth for creating the Tile Animation insertion method, by the way. Donate to him, if you must!
A tileset editing tutorial will be on the works soon, but for now, I need a break and some time to play Terraria with folks, so feel free to tell me if anything’s amiss.
![]()