Zoramine's Bucket Of Many Random Things

Zora I love this map so much, and I love that you named it Crescent Lake, since that’s the same name of a lake I’ve been going to since I was a kid (and have many memories playing FE on the beach with my gameboy lol). I love the revival, since it adds the mountains and the forest which makes it feel all that much more real to me. Keep up the awesome old-map-remakes!

1 Like

Crescent Lake was the titular map at the end of my first (now removed) project, and easily was my favorite with the ways players could tackle it. At the time I loved it, and ngl I still do, I just wish I knew how to actually make maps back then.

Late-ish night post.

Part one of two maps that’ll be 100 tiles long as RandomWizard jokingly said ‘hey you should make a 100 tile long map’ and i have zero understanding of sarcasm. Water detail and grass detail isn’t final.


I’ve not got any immediate projects I’ll be working on for a bit, lmao thats a joke I’m adding W I D E bridges to the updated Desert Bastion Venno put out around post 90.

After that or maybe during/with that I’ll be going through the laborous task of actually explaining how the fuck I make my detailed peaks. That’s going to be one of the longest posts I’ll ever make for FEU and I hope it long outlives me in terms of how relevant it is.

9 Likes

Zoramine’s Guide to Detailed Peaks (8/6/2020)


This guide utilizes a currently un-released (outside of the bottom temporary download) but soon to be released update to my Fields tileset including a few tile updates (a Mtn tile that used a water color) and mostly just peak updates to remove tiles that were redundant and add pieces used for maps like my giant mtn chain or Wyvern’s Dale.


This guide does not work with vanilla as vanilla lacks many of the vital tiles that I use.

This guide is also not a beginner’s tutorial to Peaks. If you are new to mountain making and want to learn how, I recommend checking post 84 in this thread or the gif uploaded on Discord, pinned in the #Cartography room.


Now then…

Detailed peaks are easily some of the most pretty shit you could possibly look at and the fact I was able to nearly perfectly recreate New Mystery of the Emblem’s Wyvern’s Dale map in GBAFE without many of the tiles that’d make it easier is insane. Detailed peaks are hard to do in vanilla, but are possible with tons of effort and don’t have certain details. This guide will be a long winded tutorial upon how to (try) to make larger peak chains.

Also, because I’m kind enough to not make this post TOO long, I’m going to use spoiler tags for most of the guide which you can extend as you please.


Base 1

For the base, we’re going to start with a gigantic mountain chain created with the basic methods outline in my old guide. This will serve as our baseline to look back at and to reference from. At the end of this document will be the .png files of every future vers, along with this base for practice and the final product which is free to use.

Adding a new 'chain'


We start our new ‘chain’ through the tail end of a mini ridge. They’re found below the standard ridge and topper pieces, which we will make use of as makeshift starts.


With our ‘start’ point, we now build a ridge line like we normally would, following all the basic rules.


The tile currently on the right is an entirely new tile that is more important later but fantastic to point out now; its location is next to the solitary pine tree that isn’t a thicket. It is used for shifting the shadow side of the mountain to the left.


Then, we can add connectors which are used in the standard tileset. That way we now have a way to shift the shadow to the left and to the right. These ridges will almost always move to the left.


Now we fill in the gaps with tiles that fit such as the diagonal shadow/light tiles. We now have a workable mini ridge, but miss one important step.


This unique topper was an old addition from one of the earliest versions of this tileset, but works fantastically to top off the isolated peak. Now, we have a natural-looking formation which fades mostly naturally into the light side again.


I added one more chain here so that I could show it working once again with a slightly different shape. Remember to follow all my rules for peak making. I did forget step 6’s topper on this one, but it’s fine for now.

Funky Corner Pieces


This new miniridge is a fantastic example of one issue with this tileset (normally). Here, we have a peak top that has a light end on the right, used to shift the top of the ridge to the right. How do we get the shadow side to move with this?


The obvious answer was to create an entirely new tile specifically for this one purpose. Tile is found next to most of the other shadow to light tiles. This allows the ridge to shift abruptly when you don’t want to use the topper in step 6 of the previous scenario. Now we have a new issue: Instead of the double topper from step 6, now we just have the bottom left that needs a topper.


Yet again is another new tile. Similar to step 6, this tile is found 1 below and 1 to the left of the double.


In the scenario we want this miniridge to shift to the right but keep going, we need to use another piece that makes certain details possible.


Through the new tiles placed, the ridge shifts to the right by 1 then continues on its intended path. Once again I’m smrt and forgot to add the double topper to the end.

Connecting To The Base of the Peak

An issue that can arise is that we don’t just want this scenario to happen in a vacuum; if we’re quickly throwing together a map and trying to design ridges, we want to have a quick way to add one in to the bottom. Sometimes one gets ideas on what to add as a cool chain then just forgets to add a bottom bit to connect to it. NEVERTHELESS, we can resolve this issue in one action - connect these new ridges to the top!


Here, I’ve created a new ridge that starts at the bottom.


Using all of our previous steps, I’ve connected it up with decent looking shadows.


And here, I’ve reverse engineered to make the ridge in reverse - place tiles that go backwards, aka downwards and to the right, to connect it to a new bottom. Note the difference between this image and the one directly above it.

Adding New Tops - Shadow Side

Converse to the previous issue, now we’re going to extend upwards rather than push the ridge downwards.


Here’s the same as the previous frame, but with the most useful tile. This tile allows us to start new ridges wherever we want in the shadow as long as there’s room. It’s similar to the tail end used to start mini ridges, but on shadow.


With this new starting ridge, we can push the shadow further upwards. I placed a bunch of random shadows roughly in the shape of an upwards triangle that follows the path I want.


Using everything else we’ve learned, we now have the perfect setup for a small ridge that makes the shadow less boring. You could even extend the furthest right base ridge upwards to connect to this if you wanted.

Adding New Tops - Light Side


We’re now going to create the same effect on the Light side, using a tail piece to start the ridge. I’ve extended the left edge of the peak to fit where I generally want the ridge to go, and even got a few tiles set up to start.


I then connect everything together and kablamo. Make sure that the shadow side and light side aren’t too big at any point on your entire peak chain.


With finishing touhes of a much of small tips made with tails and tops, along with caves, we’ve now got a fully functional, amazing looking peak chain. If it’s too much on the eyes, you can reduce the amount of details thrown about and even cut out one or two ridges and you’ll be fine.

Extra Tips

Here’s a bunch of miscellaneous Peak and Mountain tips.

Extra 1 - Topper Pieces
These two pieces are fun but are rarely used, which extend the ridge at sharp left angles. I’m not very fond of them. They’re useful, though, for making peaks that need to shift left FAST.

Extra 2 - Shadow-Side Mini Peaks
This little peak tile (and its other variations) are fun when the shadow side of your peak chain is too uniform. They use itself, a tiny shadow piece to the right and a super tiny bit that’s mostly grass to simulate the tip.

Extra 2 - Thin Top + Shadow
These are stupid ridges that are good for when you’re an absolute fucking idiot like moiself who forgets to put room for peaks in his maps. They are used when you REALLY want the shadow side of the peak to be tiny in a section, but are butt ugly.

Extra 3 - Thracia-style Mountain Placement
Part 1 of 2 - Peaks are cool. Mountains surrounding peaks are also cool. Hugging Peaks with Mountains gives bandits cover, gives players spots to combat the bridgands from cover, and just makes sense - it’d be rougher terrain close by them. Be sure to try to avoid placing the same mountain tile next to itself. If you have tons of mountains, inevitably one will be the same, but thats ok.

Extra 3 - Thracia-style Mountain Placement 2
Then, we can add SUPER MINI PEAKS. I love these tiles and they’re very easy to place around. I use them for blocking off paths or for more detail close to a larger ridge. They’re used in the combinations put to the right, and I don’t encourage too much experimentation as they’re fairly rigid tiles that don’t allow for that.


This took over an hour to write and was absolutely not worth my time. However, if you enjoyed this guide, then go make your own mountains. now. add mountains to every map. create sand peaks. become epic.

…Really, though, I just exhausted myself by adding too many extra bits to this guide I didn’t need. Especially right after working. I’ll add Wide Bridges to Desert Bastion tomorrow maybe.

As promised, here’s all of the frames, a .tmx of the base AND final version of the chain, AND a temporary mapchip config + object image for my current vers of my Fields. I’ll have something out for it soon once I iron out all the tiles I never use/never expect to use. Be sure to credit everyone who worked on it. Check its page for more info on that.

20 Likes

I detest making mountains and inside castle maps. So I’m always happy and grateful for mapping tips. I think my biggest issue is not seeing the map pieces on the tileset that i need, so I do ALOT of trial and error lol.

kinda remembered that i do mapping for fun as my relaxation after sitting around for an hour listening to nothing but Pikamee be fucking adorable

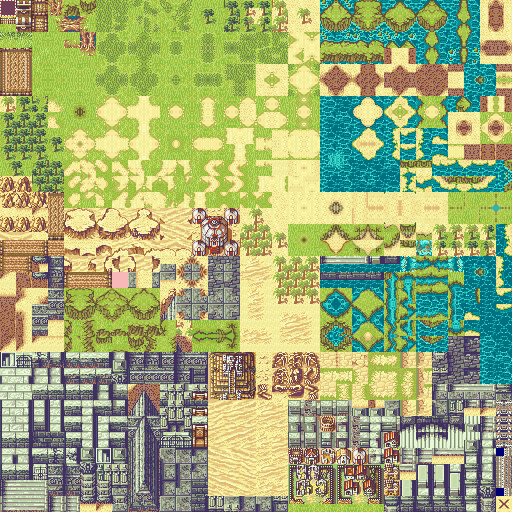
Wide bridges in the most up to date version of Desert Bastion. It’s genuinely terrifying how far this tileset’s come. I couldn’t fit in all of the bridges that my other wide bridges have, but this tileset doesn’t need that - if you need a 1x4 bridge, i have no idea what you’re doing.

12 Likes

bless pikamee’s streams for being fucking adorable, seeing her play doom is brilliant


Mini-castle mostly as an initial experiment with the over-water bridge and an attempt to create more detailed castle walls since this one’s so tall. I fucking love this tileset man


Supermodern-style bridge without any real rhyme or reason to why I made it. Screwed up a few tiles on the far right but thats fine, the ma’s mostly fine as-is. I really like the stair detail and will be using that in future maps, especially a sewer map if I decide to make a better one.

7 Likes

Yooo, water & castles? This looks cool & epic!

image-1.png (48)

Kinda basic recolor/light armor addition to generic villager possibly for an upcoming project idk anymore tbh

she cute and thats all that really matters

7 Likes

Portrait Editor Tale of Two Stories.GBA_30@1E Marisa_01004494-1.png (4)

Slightly less generic, eh?

Blue haired Rebecca possibly for the same project as above, using some of Syrene’s hair for the back, Lute/Neimi’s for the wisps of hair on the front and the right, Beran’s scarf and Neimi’s arm but worked a bit for the position. I’m REALLY happy with how this one turned out.

im not biased towards rebecca nah never could be

Oh, and since I forgot, the sprite in my previous post uses a minimug of another sprite of mine based on this villager, a wisp of hair from Neimi and a shoulderpad from Shanna.

11 Likes

Got 3 more to go along with this along with a comparison.

image-1.png (54)
Harhar golden ephraim boye
Ephraim’s face really just works with what I want with this sprite. Uses a bunch of pieces from everywhere for the hair to make it a bit messier, combined with Legault’s cape, Hector’s far shoulder pad, and Lowen’s neck guard thingy.

image
A very work in progress boye who I’m pretty happy with besides parts of the hair. I want a similar messy look, but less kept spiky and more ‘I don’t give a shit about what happens to my hair.’ Also book.

image-1.png (49)
I’m not fully sure how, but I managed to make Oswin incredibly cursed just by adding Orson’s eyes. Then I made him younger, removed lots of the wear on the face, added some more hair (Ephraim, Caryle, and… I think Beran?) and a combo of Ephraim, Gerik and Caryle’s armor and clothing.


image-1.png (54) (1)
Going from basic palette swaps to some bigger edits on sprites has felt nice. I still don’t have the ability to make completely unique sprites, so I’m trying to just differentiate base faces/head shape and reworking everything else around them.

7 Likes

image-1.png (54)-1.png (15)
Less perfect but I think it’s now a lot more distinct from the source (Leila).

6 Likes

Nose seems a little choppy but I enjoy how you used purple and red together, it’s surprisingly pleasing.

1 Like

I’ll keep that in mind for her and I’ll see what I can do for the Leila splice. Above everyone else I want to make sure she’s high quality.

image-1.png (56)-1.png (7)

Speaking of portraits that shouldn’t be high quality here’s another sprite, loosely based off my party’s cleric in my D&D session. I say loosely in the most broad term because I know extremely little about the character because i peewee brain who only thinks in sprites, Sprite soda and Pokemon.

If there was a definition of ‘pure unbridled chaos,’ it’d go to them.


Post Zora edit because despite the fact it’s later at night, I was even more tired earlier.

I’m doing lots of portraits for the next bit, all splices, because I want to improve my expertise than just ‘oh I’m the Map guy who made animations and portraits in the past’. I want to be the guy y’all can ask questions about anything to, except ASM and events bc im bad at that.

4 Likes

It’s good to expand your horizons and learn new things.

1 Like

Astore-3.png-1.png (5)
Generic-y portrait made with a shit ton of hairs (Marisa, Syrene, Lute, iirc Farina, a portrait from one of the Mugging Blitzes which was also used for the head), fur from another mugging blitz sprite and then a jacket from my namesake portrait. Originally made for a friend at mention that he didn’t have a reference for his OC. Had a bunch of edits on top of this, but since I had this base, well, might as well use it.

I know that I need antialiasing on the skin near the ear, but besides that, I think she’s set!

And she’s cute. Thats the most important bit.


Next two are still work in progress and still very much so resemble the original (one by design, the other because my DM still hasn’t fuckin told me if the character has longer or shorter hair)

image-2.png (33)-1.png (1)
Meet Ford. With Forde’s armor. Was a test to see just how much I could mess with normal armor and make it work; most of the shiny bits and red armor was actually gerik’s normal armor but tinted red with a shiny effect on the rims, only the near pauldron is Forde’s. Also, scarless and capless Gerik is infinitely bothersome to me, like normal eye Oswin.

Astore-3.png-1.png (3)
One I’m still working on right now (I got this done maybe 30-40 minutes ago). Mouth-covering cloak + wrapping over head on Astore. This one’s based on a D&D Rogue that left my party a few months back; he let me use his character as a reference except I never actually got what hair color he had and its length. DM still hasn’t gotten back to me on that.

I’ll have another comparison shot after I can get the Astore splice finished, since the Gerik one is practically done. I’m really happy with how these are turning out.

Oh, I’ll probably make most of these free to use/edit/whatever at some point. I’m not terribly attached to most. [9/12/2020] Nah, these aren’t free to use free to edit, but if you ask me I’ll almost certainly say yes after knowing what you’re doing with it.

4 Likes

image
This marks the point where my sanity has officially reached the negatives tonight as I’ve lost my mind trying to get these fucking trees to work holy ghdnfjsfrngijrvndjnuvi gfnrdshngurhnuvjerdhnguhndrtrdhgrubgtrhuejwqbguoerwhbgnf


I’ve basically got all of the visual aspects of this tileset done and oh my god have i exhausted myself making the entire rest of it in one night from my last post on it. I don’t have an immediate estimate on when exactly this will be available, but I assure you that it’ll be soon. If I can keep sane.

Big things with this tileset are…

  • inclusion of more floor tiles with their shadow variations, sourced directly from the Castle tileset

  • a darker green grass color that both molds into road/paths a lot smoother but also makes…

  • FORESTS. The original forests are in tact for those of you sadists who actually like those trees, but there’s also my Fields tileset’s forests and thickets (thanks Flasuban iirc for that).

  • a raw copy of all of the important Peak tiles transferred 1 to 1 from my Fields tileset (all the other pieces are also there, but I just didnt have the energy today to finish putting them up/i dont use many more than this). There’s some hanging on the shadow side bits I forgot but that’ll be added by the time this is proper released.

  • H O U S E S. Whole reason I even started this was to shove buildings into the Fort tileset and to possibly add my peaks to create Thracia maps in GBAFE even better. Every important building is here. I know that space CAN be saved on it but I really could care less, I’ve got so much stuff in here as is.

I also had to, uh, shift half of the tiles around to make room lmao

All palettes normally in FE8 are bork’d and will remain that way thanks to me using the tool that Vesly brought up to start with. I’m intending to find out a good setup for alternate palettes and even getting the carpet back itll be disappointing

BUT THAT’S ALL LATER BECAUSE ITS 12:50 AM AND I AM ABOUT TO COLLAPSE

10 Likes


Progress. Added the remainder of the important houses and condensed every one of them, then added all the floor tiles I’ll need, and anyone should need.

9 Likes

Aight, status update because I feel like it. Also, a plug for My Updated Fort tileset. It’ll be added to my compendium all the way up above in a bit. Kinda my excuse to go on ahead with this post.


I’m currently in burnout. I want to do more cool stuff but my quality kinda hit a brick wall after exhausting myself so hard. Working on those mountains was a bitch and I spent about the past month working up the courage to do it again after I found out Vesly’s post of the importing tool. That compounded on top of just running out of energy for normal ol’ mapping.

The entirety of that tileset was an experiment to see what I could accomplish with it which quickly spiraled into me going waaaaaaaaaay too far on it just to have a product I was happy with. The Peaks imported fine in the object image but recreating them reminded me why I don’t do tilesets anymore - repetition makes me tired as all hell. The trees taking forever also didn’t help, as did setting up the entirety of that terrain in two days.

The portraits above are for a project I’m working on right now that I’m keeping mostly quiet on, I want it to be as good as I can get when I decide to have others seriously look at it. It was also another attempt to at least somewhat past burnout and damn did it help. Aaaaand look where I went right afterwards.

Does this mean that you won’t hear from me? No, I like looking at stuff. Helps me get ideas.
Does this mean that I’ll stop making funny things? Nah, I can’t stop myself if I get a concept I like.

But I need a break and I might forcibly impose it upon myself and return with a hodgepodge of funny things afterwards.
Idk. I’ll figure that out when I get there.

College starting up also is a thing, so I’ll have longer times in-between posts from this point for a bit as I don’t want to screw this year up.

Have a good day, y’all.

8 Likes

image-1.png (89)-1.png (2)
Look at that! Another portrait. This time, it’s a character that I honestly had 0 fucking clue how to do. Initially she started as an Igrene splice which actually worked pretty well for what I wanted, but since I was already redoing all of my other simple color swaps I thought it’d be worth it to keep tooling with this. Scarf was partially stolen from Eliwood then modified a bit, armor was a bunch of sources that I can’t remember but includes Canas’s robe and Wil’s shoulderpad. Minimug isnt perfect but I’m bad at that, and my usual method resulted in what’s there now.

…and with that…


Lookatthat. A bunch o’ portraits. All of them are splices because I’m extremely bad at making my own stuff, but I’m happy with all of them. I don’t think I’ve shown a few here before, so here’s your chance to view them all.

And there’s green Innes but atm he doesnt have a name or a personality so I could care less lmao, i’ve got more pressing matters for me.

There’s a few pressing issues with these, such as the Garcia splice’s cheek scar disappearing in the eye frames, the Leila splice needs moth move frames, the Rebecca splice having funky eye shading in blink frames and so on, but overall I think as someone who was way too afraid to do portraits before this has been a fun venture into something that isn’t as painful as tileset making.


Another side venture into the two portraits I’ve never elaborated on!

image
Meet Gala! He’s my oldest true splice and god do I love him. He was originally made for a Twitch streamer out of friendship in his image (Thanks Dave!) and uses Douglas’s armor and Garcia’s thicc neck. Despite being my oldest splice, I’m still really happy with him and I intend to further distinguish between him and Garcia soon once I’m more confident with modifying the face.

Portrait Editor Tale of Two Stories.GBA_30@1E Marisa_01004494-1.png
And meet Alice! She’s my oldest splice and the hoodie is my favorite thing. Original was made by me, but Wan iirc helped a ton with the hood and she’s been my posterchild for my account for a while now ever since adding an icon. However, she’s originally created for my namesake character, Zoramine Fae, but has been repurposed here because I love the coat n hoodie.


These all are used in an upcoming project maybe. I’ve hinted at it before, but it’s still work in progress as I broke half of my item table, screwed up a bunch of animations then realized that I overwrote a bunch more data that shouldn’t be overwritten for classes. Whoops.

For names of them (in order):
Lin, Elyva, Christine, Al, Fergus, Alice, Rei, Lomenaro
Phoenica, Saul, Ford, Crassius, Ariel, generic innes recolor, Gala

Names kinda are iffy for me, I’m bad at words tbh

how do i end posts


EDIT BECAUSE I FORGOT LMAO IM DUMB

I’ll make all of these aside from Gala and Alice F2U and F2E at some point, even if they’re just splices. The unnamed villager girl from Aug 17th will also not be made F2U and F2E as it was made for a friend and will be used by me as I was the one who made her. The generic Soldier will join the larger group that can be used.

[9/12/2020] All portraits are requiring you to get explicit permission to use and edit. I will want to know what you’re using it for. However, you’ll almost always get a ‘sure go ahead’ for anything that isn’t Beruka, Alice or Gala.

14 Likes