The Ins and Outs of Text Editing
Introduction
So, FE8 has a lot of dialogue in it. Unfortunately, it’s not so simple as just writing a script and inserting it into a game. Oh no, there’s all sorts of annoying control codes controlling what’ll fly and what’ll just break the magical text boxes that keep changing size and overflowing horribly.
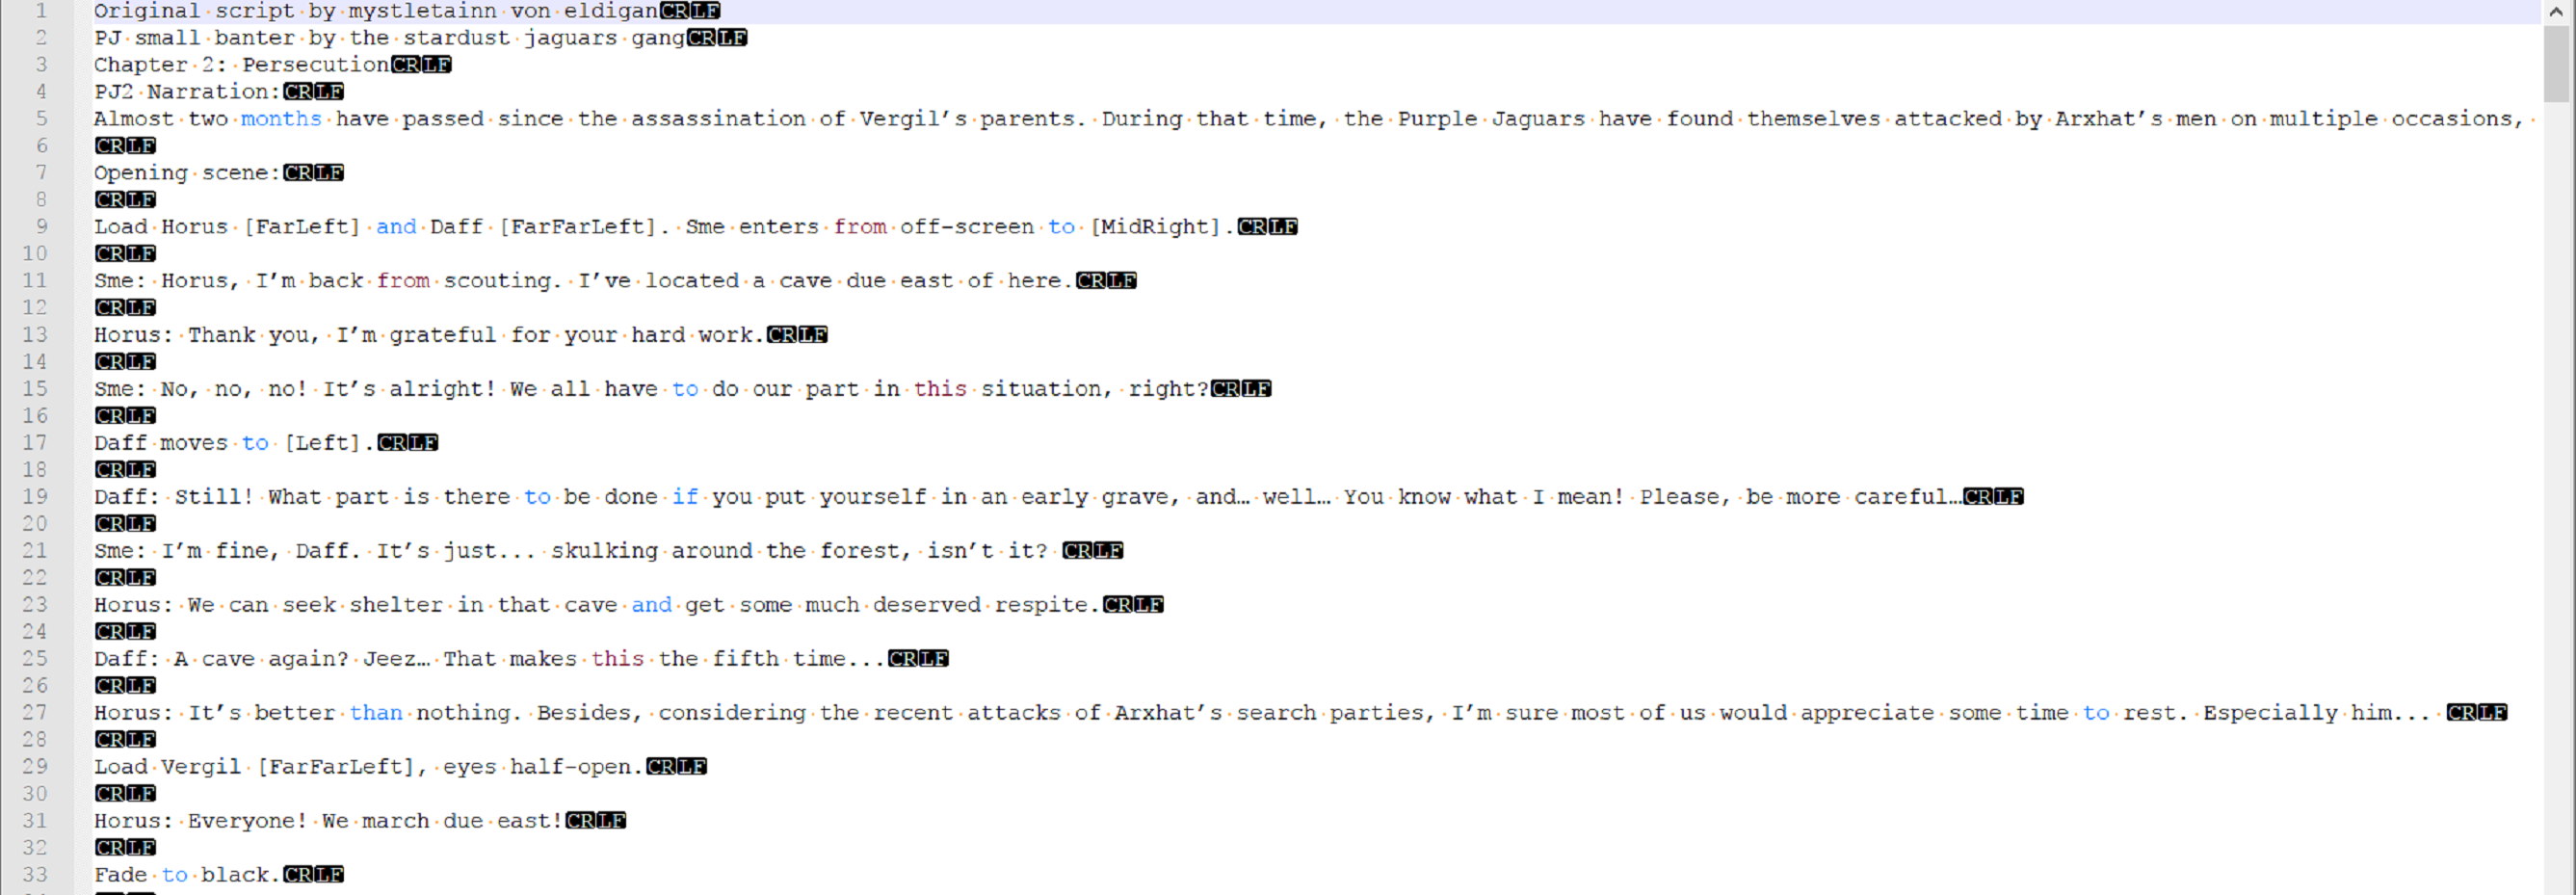
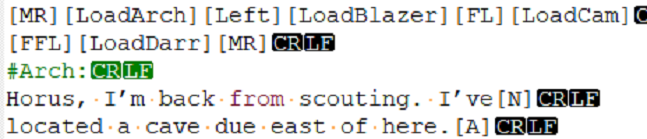
For example’s sake, here’s a big block of dialogue from Tale of Ternon. As I’m sure you can see, it’s written rather like a conventional script, with stage directions and each character’s line being clearly represented. Computers are notoriously horrendous at jumping to conclusions and filling in blanks though, so it will just go and error because you went and forgot an in the previous file or something stupid like that. Let’s go and make this thing look nice. Note that this tutorial is going to assume you’re using buildfiles and TextProcess. Most of the control codes are similar in FEBuilder, but some more customisable elements will not apply. This system is originally rooted in FEditor text editing, but the same caveat applies there as well. Snippets of dialogue and screenshots will be used to enhance understandability and to provide examples.
The Basics

However you manage your buildfile, go open a new file. I strongly recommend using Notepad++ for all your text editing needs. It comes with many features that make editing large files easier.
The first line of each file should look like this:
## NameOfTextHere
The two hashes represent the text ID. Using two of them tells the programme to automatically use the next available ID. Alternatively, you can specifiy a specific text ID like so:
#0x0094 HPBarText
This will make sure the specific text will use slot 0x94, for instance. The name following the number is optional, but it serves as a definition for eventing purposes and makes life much easier later on. I would strongly recommend you label all text entries. This step is not necessary if you’re using FEBuilder.
Now for the text. A line can only be so long. Generally, a line within 30 characters will be safe. If the letters are fairly narrow, the line can go up to 35-40 characters.
Beyond 40 characters, your text box is in serious danger of overflowing. This means it has gotten too large and wrapped around to the other side of the screen. This makes the text box completely unreadable as some other layer of box is overwriting everything. Be sure to keep your lines reasonably short and don’t cause any text overflows. Of course, the next question is “How do I keep my lines short?” TextProcess doesn’t understand that new lines mean you want to move on to a new line. This is where the control codes come into play.
Here’s that snippet of text again. Notice the things in the [square brackets]. These are Control Codes. They control how the game processes text. These two are absolutely essential for any well-formatted text.
[NL] - New Line
Does exactly what it says on the tin. Place at the end of every. Single. Line. It’s frustrating, but necessary. FEditor actually performed better and took a new line as a line break.
[A] - Press A
This pauses the text so you can read it. Always use every two lines in dialogue to prevent text skips. Brown box text is more lenient with this.
There is a large amount of control codes, and they’ll be addressed as they are encountered. Continue on formatting your text, ensuring it keeps within around 40 characters and the required control codes are placed after every line. Once you get to the final line of the text, another vital control code must be included.
[X] - Exit
Ends the current text entry. Must come at the very end of a text entry. Mandatory; TextProcess will behave unusually if the code is missing.
A text file can contain multiple text entries. Once you’ve ended one entry with , the next one can be started with ## LabelNameHere . I recommend using a new file for every chapter of your hack.
With this, you can now create very basic brown-box messages. However, brown-box messages don’t really convey dialogue too well. Let’s take a look at some dialogue now.
Common Dialogue Control Codes
[Open] - Open Portrait Position
This comes in eight varieties for the eight portrait positions. This prepares a specific slot to have an action taken on it. Before a character speaks, their location must be opened first. Note that the FarFar positions are located off-screen.
- [OpenFarFarLeft]
- [OpenFarLeft]
- [OpenMidLeft]
- [OpenLeft]
- [OpenRight]
- [OpenMidRight]
- [OpenFarRight]
- [OpenFarFarRight]
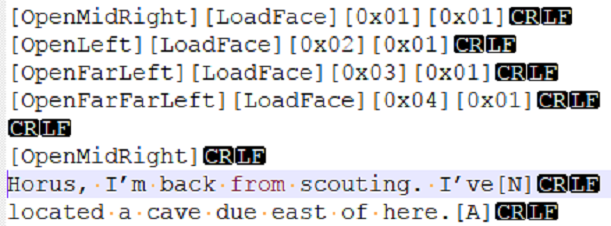
[LoadFace] - Load Character Portrait
This loads a character’s face into the opened slot. Note the two parameters that follow [LoadFace]. The first one is for whatever character portrait you wanted to use. Say 0x01 was Arch’s portrait, 0x02 was Blazer’s, 0x03 was Cam’s, and 0x04 was Darr’s. If you wanted Arch and Cam to talk, you’d load 0x01 in one slot and 0x03 in another. The second parameter is always 0x01. Bad things happen if it is absent. The sole exception to this is if you want the active unit’s portrait to be loaded in a village scene, for example: replace the parameters with [0xFF][0xFF].
There is an easier solution to avoid all these confusing numbers, but I’ll address that later. For now, I’m just going to do everything by the book for explanation’s sake.
[Move] - Move Character Portrait
Like [Open], [Move] comes in eight varieties for the eight different types of movement. A slot must first be opened before the portrait can be moved. If you move a portrait to its current location, it will bounce in place.
- [MoveFarFarLeft]
- [MoveFarLeft]
- [MoveMidLeft]
- [MoveLeft]
- [MoveRight]
- [MoveMidRight]
- [MoveFarRight]
- [MoveFarFarRight]
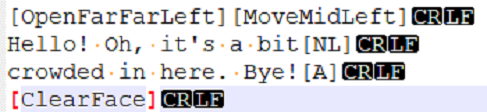
[ClearFace] - Remove Character Portrait
When a character’s purpose in a scene is done without the actual scene itself being done, they can be removed. Open the appropriate slot beforehand and their portrait will fade out.

[…] - Pauses
These come in multiple varieties. Their purpose is to stall text printing for a period of time. They are not required, but some like to use these breaks after punctuation or to add emphasis to specific parts of the text. The more dots present inside the bracket, the longer the pause will be. Between four and seven dots are valid.
[.]
[....]
[.....]
[......]
[.......]
[ToggleMouthMove] - Toggle Mouth Movement
This enables or disables mouth movement. It is typically used to stop character mouths from moving during ellipses or other moments representing silence. Once it is turned off, another [ToggleMouthMove] re-enables mouth frames.
[ToggleSmile] - Toggle Smiling
This makes the character use their smiling frames while talking instead of their normal mouth frames. Use the code again to disable smiling.

[ToggleRed] - Toggle Red Text
This turns text red. This is typically used to draw attention to important elements in tutorials or to warn players of any potential chapter gimmicks that need to be explained beforehand. Toggling text again will switch it back to black.
There are more control codes that aren’t used as much, and I’ll cover those ones later.
TextProcess Features
You can write a reasonable piece of dialogue with the codes I’ve illustrated so far. However, buildfiles allow for more advanced methods of processing text. Do be aware that this generally won’t work in other tools.
Parse Definitions
Your buildfile should have a file called ParseDefinitions.txt. If you don’t, the default contents are available in HyperGammaSpaces’s control code reference [FE8] Text code reference. By default, it contains a lot of useful definitions to cut down on tedium, and it’s simple to add on your own definitions to that list.
To add a definition, simply write your new control code and equate it to the default code. For example, let’s say you’re sick of constantly typing in pauses after commas and you want to make a definition to shorten that. It could look something like…
[,] = ,[....]
Be sure to save ParseDefinitions first. This definition means that when you type [,], TextProcess will print a comma and then have a four-dot pause. By typing in your new [,] code, TextProcess will convert it into ,[....] and the game will recognise it. I would recommend having all definitions surrounded by [square brackets] for consistency with the default control codes. Definitions can be used and abused for whatever purpose you desire. One of my personal favourite uses for definitions is for loading character portraits.
This is long and takes a very long time to type out. Using definitions, this can be shortened to
Note the significant reduction in keystrokes. Definitions also helps improve readability, with Arch’s portrait being 0x01, to use my previous example.
[LoadArch] = [LoadFace][0x01][0x01]
The former is a lot easier to read at a glance. Note the usage of [N] instead of [NL]: every keystroke counts. The slots are abbreviated to their basic components: [MR] equalling [MidRight]. An alternative form found in ParseDefinitions is to judge based on screen position, with MidRight being […v.] since it’s the fifth slot on the screen. Experiment with definitions and find the flow that works best for you.
Comments
In the previous snippet, you’ll see a hash in front of Arch’s name. This signifies that the line is commented out. This can be used to show who is currently speaking in a long line of text. “Stage directions” can also be commented out for reference. Be careful, though. Comments can be finicky. Because TextProcess opens text entries with hashes and comments out lines with hashes, the two can sometimes clash.
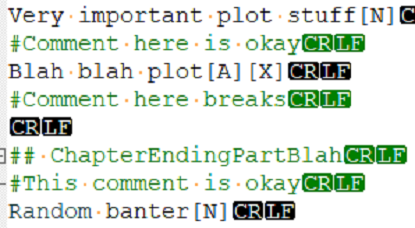
This is a rough comment guide on how to stop them from breaking randomly.
Character Limitations
TextProcess does have some limitations, however. Though FE8 uses a reduced version of Windows-1252, TextProcess only accepts pure ASCII characters.
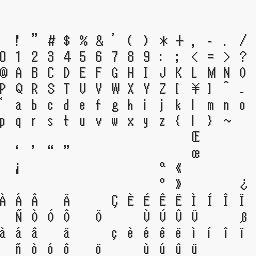
(Image courtsey of Zahlman)
For those who don’t know the ins and outs of text encodings, what this basically means is that TextProcess can only accept the first six rows of the image, everything between space and ~. It will then break should it encounter a character that’s not in those first six lines. For the curious, a table of the full encoding can be found on Wikipedia: Windows-1252 - Wikipedia. Note the yen sign in place of the backslash: this is a standard Japanese variant of ASCII and is found in many East Asian fonts.
To input one of these characters, you must directly input their corresponding byte value as a control code. For a double curly quote, you must write something like this:
[0x93]Greetings![0x94], the barman shouted.
In game, this should render like so:
“Greetings!”, the barman shouted.
Another danger can be found when using Google Docs. Google automatically converts several characters into different ones, with apostrophes, quotes, and ellipses being the most commonly affected. TextProcess cannot recognise Google’s “smart quotes”, and so they must be converted to ASCII equivalents. I will list some common Google conversions and what they should be replaced by to get them insertable into the game without causing errors. I have also included the proper way to display a curly quote using the control codes.
* ’ = ' or [0x92]
* … = ...
* “ = " or [0x93]
* ” = " or [0x94]
Good Formatting Practice
Formatting presentable text can be difficult. A few ground rules will help in making text presentable.
Keep Line Length Even

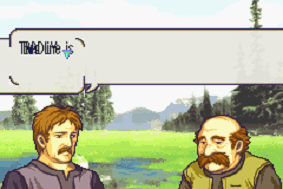
The GBA Fire Emblem games work unusually when it comes to dialogue boxes. Most games have a fixed box that’s always the same size and can have a fixed amount of characters fitting into it. GBAFE instead has a speech bubble that looks like it came out of a comic book, and the bubble’s size varies from line to line. In general, the bubble stretches out to accomodate the longest line a character says. Avoid mixing long and short lines in a single character’s dialogue. The above image has little white space and the lines are about the same length.

In this example, a long line is being followed up by a very short line. The end result of this is a very large amount of whitespace that can be quite distracting. The solution is to keep lines reasonably close to the longest line’s length to make good use of all available screen space.
Don’t Have Three Portraits on One Side of the Screen

GBAFE allows four portraits on screen at a time, with three potential slots on each side. The middle slots are best used for one-to-one conversations, while if two people are on one side of the screen the near and far slots should be used. Some people use all three portraits at once. This is bad practice because it crowds the screen up and makes it difficult to see the other characters. Consider moving one of the characters to the other side of the screen or simply clearing a character who is largely standing around doing nothing in the scene.
Other Control Codes
All the other codes will be addressed here. This section will not be as thorough as the basic control code section.
[2NL] - Two New Lines
Skips two lines instead of one.
[CloseSpeech]
Comes in two varieties: [CloseSpeechFast] and [CloseSpeechSlow]. Place after the final [A] to speed up or slow down the text bubble.
[Yes] - Yes/No Prompt
Defaults to yes. Use [No] to default to no.
[Buy/Sell] - Buy/Sell Prompt
Only for use in shops.
[SendToBack]
When combined with [Open], hides the unit behind others instead of placing them in front.
[FastPrint]
Prints text faster. Not present in FE7. Has a [NormalPrint] variant only in FE6.
[LoadOverworldFaces] - Play Event
This name is misleading. It pauses printing text and instead executes events until it encounters a TEXTCONT event code, where text then resumes. Useful if you want sound effects playing or want to swap the background out mid-scene.
[G] - Gold
Prints whatever money the shop needs.
[Blinking] - Blink Controls
Comes in a few varieties. [EnableBlinking] turns it on, while [DisableBlinking] turns it off. [DelayBlinking] and [PauseBlinking] disable blinking for a period of time, with [Delay] being longer. Repeated uses don’t seem to work correctly.
[Eyes] - Eye Controls
[CloseEyes] forces a character to close their eyes, in case they’re feeling sad or tired. [OpenEyes] opens them again. [HalfCloseEyes] uses the transition frame between open and closed. [Wink] only closes the outside eye.
[Tact] - Show Mark’s Name
Only used in FE7 by default, it shows the tactician’s name. The same code will work in FE8 if a tactician is included using [FE8] Tactician naming.
[Item] - Show Item Name
Only used in messages such as the discard prompt.
[SetName]
Sets the name that is displayed in CG text boxes. Generally used for whoever is speaking at that moment in time.
[ToggleColorInvert]
Changes the colour of the text box from white to black. Used during some Demon King scenes in vanilla.
Conclusion
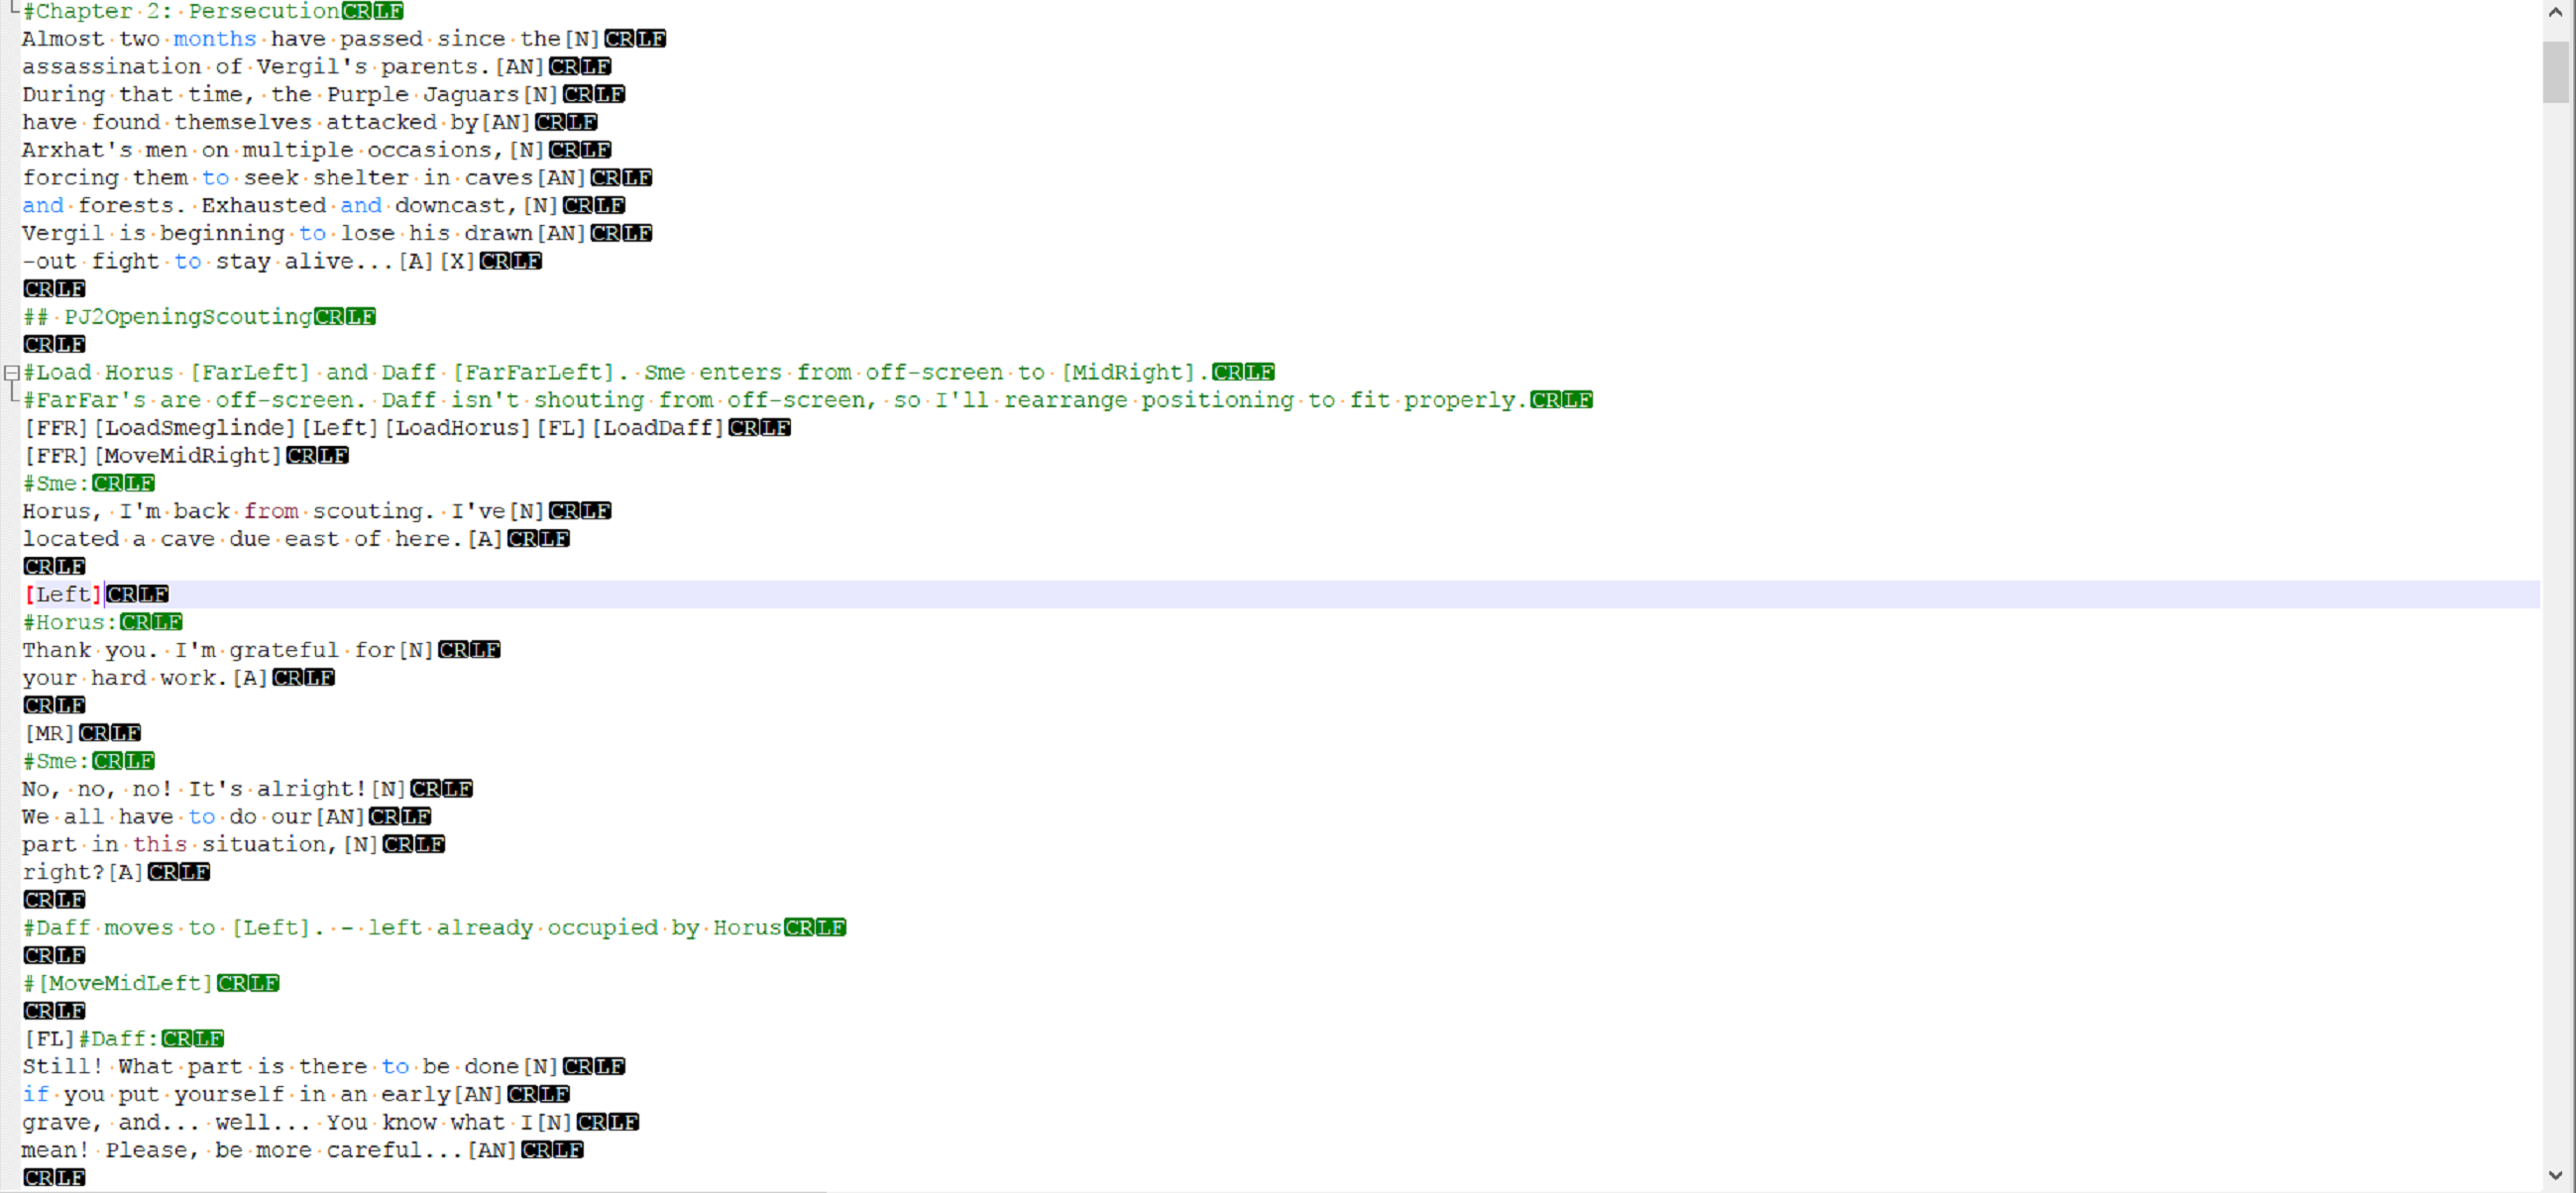
Text editing is a vital part of romhacking. However, it is not the sole element in scene construction. This tutorial will not cover these, but I encourage reading about how to event scenes properly to enhance the effect of the dialogue. Show, not tell, after all. I hope that you found this tutorial useful. To compare with the initial unformatted screenshot, here’s the same dialogue formatted and commented. Text editing can be frustrating at times. Pay attention to the error messages. They will give you some pointers most of the time. Don’t be afraid to ask for help either. Someone will give you a pointer to where you’re going wrong. Dialogue shouldn’t be the top priority when making a hack. However, it is important if you want your hack to be considered truly great.
Useful Links:
- [FE8] Text code reference - HyperGammaSpaces’ control code doc
- Windows-1252 - Wikipedia - the encoding FE8 uses, reference for inputting diacritics and other non-ASCII characters
- Text Editing for Dummies - Arch’s old tutorial