How do I make a portrait from the Character Creator work in-game?
First of all, if you’re going to use the Character Creator, make sure you’re using version 3, which can be found here. Older versions had so many issues, between the awful colors they output, the lack of color control, and exporting at the wrong size, that it’s not worth the effort to clean up portraits made with them. Character Creator version 3 can be found here:
While working in the CC, here are a few things to keep in mind:
- Pick colors from the “FE Palettes” tab, especially for skin tones. These are predefined color sets by an actual community artist. The other methods of generating colors use the old CC’s procedural algorithm, and while you can use your judgment with it for things like armor and hair, it sucks at skin tones.
- Leave the outline at its default (RGB 56/32/64). This is FE8’s standard outline color, which the rest of the game’s graphics are designed around. It looks much more vibrant than using actual pure black. Colors in the “FE Palettes” tab are designed to work with it.
- Beware the color limitation, you can have no more than 16 different colors in a GBAFE portrait and that counts the outline and background colors. The CCv3 shows an active count of how many colors you’ve got, but it doesn’t account for the background, so if you’re using its display to track that the number to target is 15 or less.
- Do not press the “anti-alias” button. The CCv3 programmer’s attempt to anti-alias the hairline algorithmically just results in banding (bad), and it’s much harder to clean up properly if you export with it than if you export without it. Reference how the hair meets the face in vanilla portraits, and ask the #spritans channel in the FEU Discord server for more advice if needed. If you do press this button by accident, just move a piece of the portrait to clear it, then move it back.
- Export as 96x96. Older versions of the CC exported at double scale, and while that functionality still exists as the regular “export” button, “export as 96x96” was added in v3 to allow for proper pixel-scale export.
Once you’ve finished the base portrait in the CC, you will still need to clean it up. In particular, the hairline will need anti-aliasing added (proper anti-aliasing, not what the auto button does), and the place where the neck meets the head usually needs to be re-shaded. Once it’s cleaned up, you can then format it for insertion.
How do I format a portrait for insertion?
First of all, make sure the portrait has no more than 16 different colors in it, counting the background and the outline.
The background color can be anything so long as it is not used elsewhere in the portrait, but you’ll notice if you export a vanilla portrait from FEBuilder or if you look at any portrait in the Repo that they mostly all use a standard shade of green.
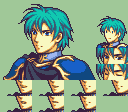
Now, when inserting the portrait, you can’t just insert the portrait by itself, you need to add blink frames, mouth movement frames, and a minimug. For example, here’s Ephraim’s vanilla portrait:
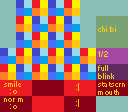
And here’s a commonly-used template that shows what goes where. (This template also shows the hackbox, an area of the portrait space that gets cut off.)
The top row of mouth frames is smiling, bottom row is normal, and the one on the far right directly below the eye frames is for the statscreen. The upper eye frame is the halfway-closed “midblink”, the lower one is fully closed. Each frame is 32 pixels wide and 16 pixels tall. They’re overlaid onto the face by shifting in increments of 8 pixels, so make sure you select an area of the face that’s a multiple of 8 pixels from the edges of the portrait.
If you’re splicing, whether by hand or with the Character Creator, you can usually export the vanilla portrait you used the mouth/eyes/face of and copy how the eyes and mouth move there.
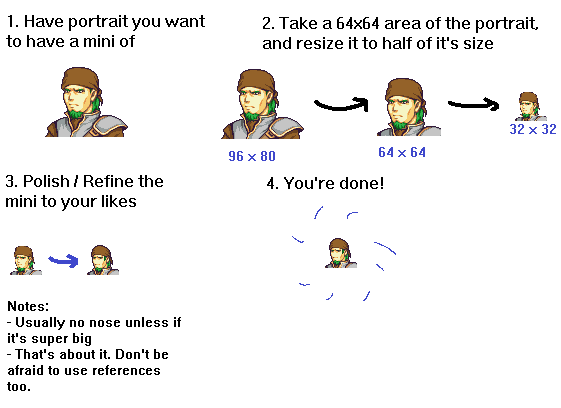
The minimug must fit within a 32 pixel by 32 pixel space. Here’s a shortcut method for making it, courtesy of Feier:
Once you’ve done all of these things, your portrait is ready for insertion!


