Preface
As I’ve spent time in this community, I’ve seen a not-insignificant amount of people approach the limits of SkillSys in FEBuilder. They ask about changing the effects of skills, adding new skills, and most frequently removing the strength/magic split. To make these changes people are often directed to a Custom Build, a process involving changing a SkillSys buildfile and using that for the default values in an FEBuilder project. They’re often considered time-consuming and frustrating to set up with Builder users.
It is my humble recommendation that everyone even considering a custom build for their project learns buildfiles (so long as it’s early enough in development). Buildfiles’ reputation for having a higher learning curve than FEBuilder is completely overblown, they are an extremely intuitive method of hacking when you know what you’re doing.
The issue has always been accessibility. Many more builder tutorials exist than buildfile tutorials, not to mention the active help from report.7zs and asking questions in the FEU Discord. Nevertheless Contro, Vesly, Snek, and others have each put incredible buildfile tutorials to help people learn the ropes.
All of the general buildfile tutorials are incomplete, but that’s okay! In my opinion, the magic of learning buildfiles is that at a certain point you suddenly understand how to do it. You just get it. That moment is what I consider being able to see inside the matrix, and getting you to that moment is my ultimate goal. But you have to be the one to take the first step.
The First Step
The first step is downloading Mystic’s EasyBuildfile or SkillSystem. Both are buildfile templates that you can build off, and I’ll be using the specific terminology of EasyBuildfile in this tutorial. Regardless of which you chose, copy a clean FE8 ROM into the base (root) of the folder and name it FE8_clean.gba. Once you do that, we’re ready to begin.
In order to teach the fundamentals of writing data to a specific offset, our first project is going to be to change the amount of HP a vulnerary heals. I think vulneraries are nasty Jagens that steal valuable exp from your healers, so let’s reduce the amount of HP it heals to 7.
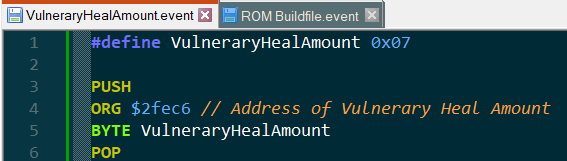
Open up a new text file in your text processor of choice (I prefer Notepad++ with Event Assembler syntax highlighting) and name it VulneraryHealAmount.event. This is a file designed to be parsed by Event Assembler, a tool that edits the ROM with the instructions we give it. In the file, copy this code:

This code changes the amount of HP healed by a vulnerary to 7. Let’s break it down line by line:
PUSH - A command that saves the offset, our current “place” in the ROM. Since we jump around so much in the ROM when writing data, it’s incredibly important that we save the previous offset every time we jump. If we write to the wrong place, awful things will happen.
ORG - Jumps to a specific offset. Offsets are in hex(adecimal), the base-16 numbering system. Numbers in hex are preceded by a $ or 0x. I personally use $ for addresses and 0x everywhere else, but it’s just a matter of preference.
BYTE - Writes the value of the byte to that current offset. A byte can be any value from 0-255 in decimal (0-FF in hex). After writing at a certain point, the current offset is advanced by the length of what was written.
POP - Returns to the offset that was saved in PUSH. Every single PUSH must be followed by a POP, that’s how all these jumps are organized.
Putting this in the context of our project, the amount of HP a vulnerary heals is stored as a byte at the address $2fec6 (I’ll explain how I know that’s the correct address later on). So we PUSH to save our previous offset, ORG to $2fec6, change that BYTE to the value 0x07 (which is just 7 in decimal), then POP to return once we’re done.
Now that we have our code, it’s time to include it in the buildfile to run. Move VulneraryHealAmount.event into the “Engine Hacks” folder and open up “Master Hack Installer.event” You should see a handful of #include statements followed by file paths. Copy that format for the file you just created:

#include is very self-explanatory: when the buildfile reaches this command to parse, it will also parse the contents of the file that’s been included. This is done so that each individual data change is organized separately rather than all being present in one colossal file.
Files are also grouped depending on what changes they make to the ROM. Text files are #included in “Text/Install Text Data.event”, graphics in “Graphics/Installer.event”, etc etc. Changing the vulnerary heal amount falls under the engine hacks category, which is why I told you to move it to the Engine Hacks folder and include it within “Master Hack Installer.event”.
Now that we’ve successfully included our event file, it’s finally time to test it! Return to the root of your buildfile and run MAKE HACK_full.cmb. If you’ve done everything right, it should show the message No errors. Please continue being awesome. and generate a file called myHack.gba in the root.
Extra steps for EasyBuildfile users
If you’re using Mystic’s Easybuildfile, there’s one more step before building the ROM. Go into “ROM Buildfile.event” in the root and comment out #include "Map/Master Map Installer.event" and #include "Events/Chapter Events Installer.event". This brings the vanilla prologue back, which is much easier for testing our changes than the custom map.
![]()
For a reason I don’t know, EasyBuildfile also randomly throws an error parsing a file when making the hack. If this happens, just run it until the error doesn’t occur. This happens much less often with SkillSys.
All that’s left is to open myHack.gba and see our new changes firsthand!
Exhilarating, is it not? If you’ve followed all the steps correctly, congratulations! You’ve just performed your first edit with buildfiles. If you enjoyed this process at all and would like to get more into it, then this method of hacking may be for you!
Now, although we’ve finished our project, there are still some questions to answer and minor changes to make. If you’d like to pursue buildfiles as a hacking method, these are virtually required to know.
Technical: How did I know the vulnerary heal amount is stored at address $2fec6?
Glad you asked! I found this address by going to FEBuilder’s Patch menu, searching “vulnerary”, and looking at the patch that lets you change the vulnerary heal amount.
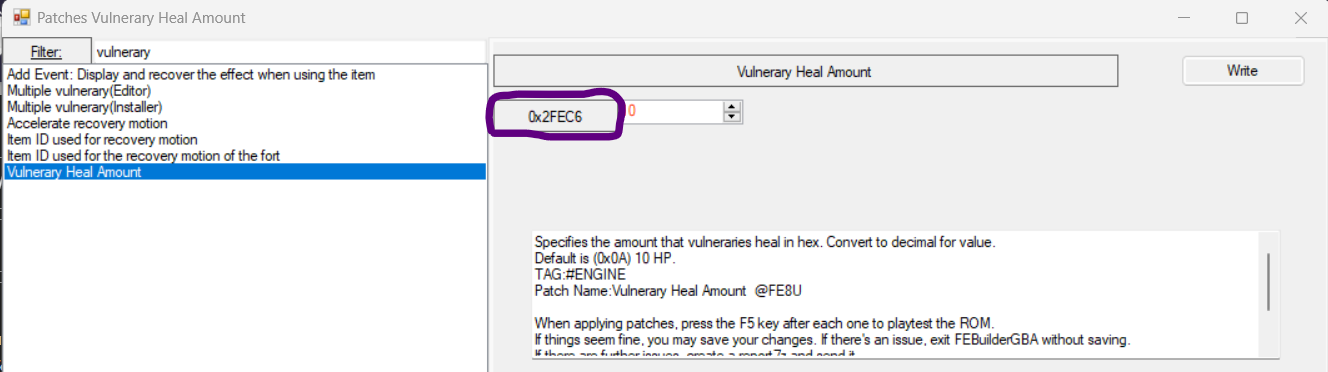
This patch accomplishes the same thing that we just did: going to address $2fec6 and changing the byte there to a different value.
We’ll be cross-referencing FEBuilder for addresses often, make sure you have a clean ROM on hand for that. The process sometimes gets more complicated than looking at Builder, though that’s outside the scope of this tutorial.
Convention: Improving flexibility with definitions
Our .event file works as intended, but it’s also not very readable. If I hadn’t memorized address $2fec6 from writing it a billion times for this tutorial, I wouldn’t have been able to tell at a glance that this code changes the amount of HP a vulnerary heals. We can make it easier for other readers by adding definitions and comments:
#define allows you to refer to a specific value with a one-word character string, much like a variable in other coding languages. Comments are just messages to the reader that aren’t parsed by Event Assembler.
Definitions are immensely helpful in buildfiles, both for readability and flexibility. If I changed my mind and wanted vulneraries to heal 14 HP instead of 7, I’d only have to change the definition rather than the value next to BYTE. This is much cleaner and efficient when we need to refer to a specific value in many different places.
It’s highly recommended to use definitions and comments liberally.
Bonus project: Changing luck cap
I love low% crit rates, so I hate it when characters have high Luck. In fact, I want to make it so characters have a maximum Luck stat of 7. Want to play around crits reliably? Well, too bad.
See if you can follow the previous steps and make the change yourself. It’s the same exact process with the sole difference that there are multiple addresses you need to change the value at. I’ve included a walkthrough here too if you’re stumped or just want to follow along, but I highly recommend you try it yourself first.
Walktrough
Step 1: Find the addresses
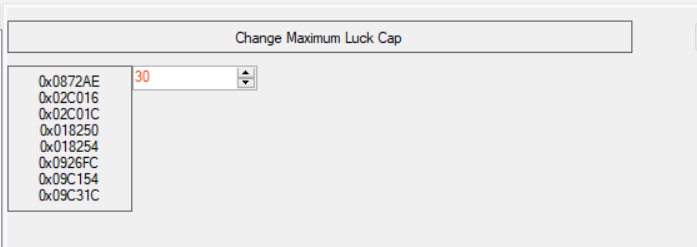
I go into FEBuilder’s patch menu, search “luck cap”, and see that these are the addresses that determine what the luck cap is.
Step 2: Create the .event file.

I create an appropriately named file,
PUSH and POP, and then set the byte at each address.
Step 3: Make it clean and readable.
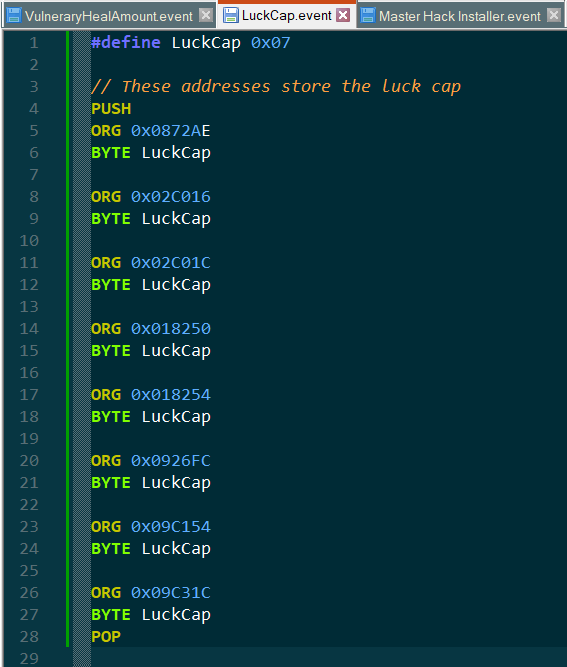
Since each of these addresses need to have the same byte value, it’s better to use a description here rather than the raw value. I also commented the function of these addresses and added whitespace between each individual byte edit for clarity.
Step 4: Include the file.

Changing the luck cap also falls under the engine hack category, so I’ve chosen to
#include it just under our vulnerary healing amount edit.
Step 5: Build the ROM and test.
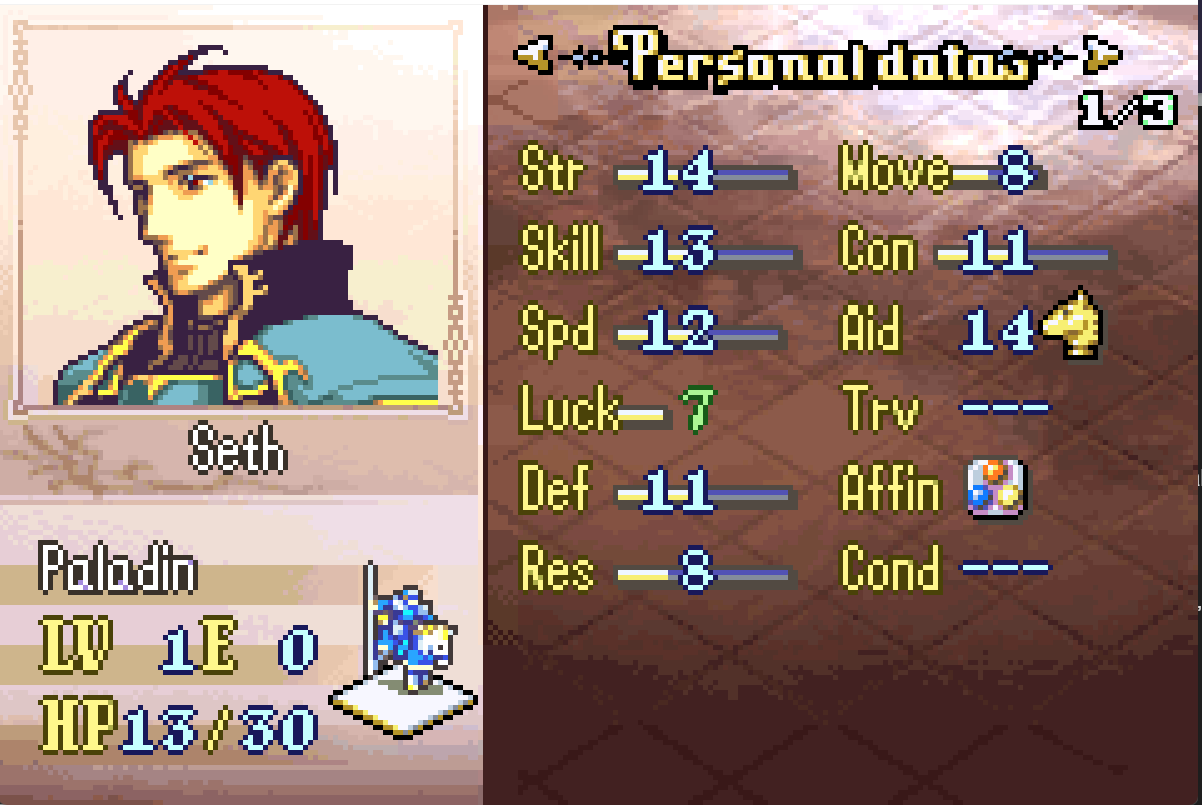
If you’ve followed the steps correctly and got no stray errors when building, just open up Seth’s stat screen and see that his luck cap is indeed lowered to 7. Hooray! Joshua is going to have a field day critting him to death.
You’ll notice that for a lot of changes you want to make to the ROM, the process is similar. You find the address of the thing you want changed, you PUSH, POP, and ORG to that address, and set the bytes there to the values you want.
This is the matrix. The ability to look at the ROM and know where exactly you need to go to make changes is the essence of how buildfiles work. Every piece of data in the ROM, both within FEBuilder’s editors and not, is at your fingertips should you know where to look. It’s a level of freedom that you don’t get anywhere else, and it’s one I find immensely satisfying to work with.
Closing Words
This tutorial isn’t meant to stand on its own, but rather act as a companion piece to Contro’s buildfile tutorial, the most complete and comprehensive of the ones I linked to earlier. It covers file structure, Event Assembler commands, and graphics editing in great detail. It was by far the most helpful resource when I was starting out, and I cannot recommend it enough:
I hope this short little tutorial whetted your appetite for learning buildfiles and helped you see into the matrix for how they work. I love their workflow so much more than FEBuilder and I want to make learning resources for it as accessible as possible. If any people would like more specific tutorials, I’m always happy to oblige. My name is Dragz, and thank you so much for reading.