One of the coolest aspects of ROM hacking is the possibility of adding custom classes for the characters in your project. If you’re like me and know next to nothing about coding, then we are in luck because FE Builder lets us do this without any coding knowledge. This tutorial will (hopefuly) cover all the steps required to fully integrate a custom class into your hack. I’ll be using a clean FE 8 ROM and assets from the ultimate repository so that you can follow along.
PART 1 : Setting up
Adding New Classes vs Replacing Old Ones
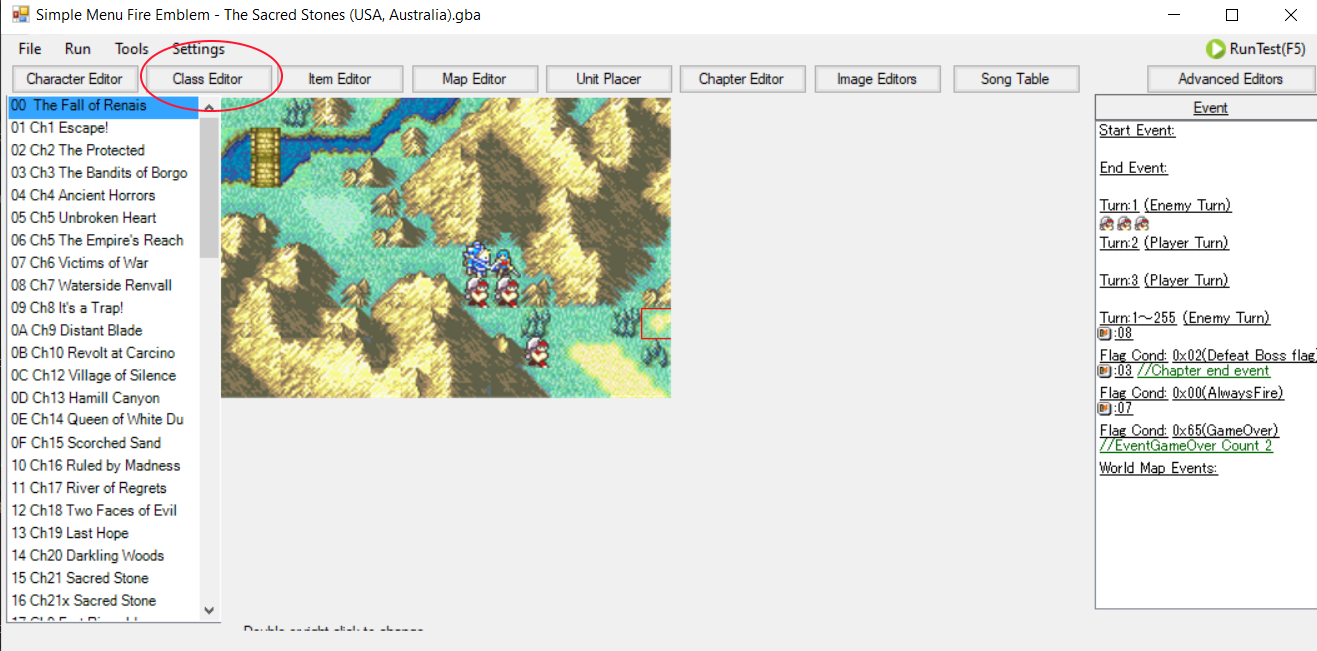
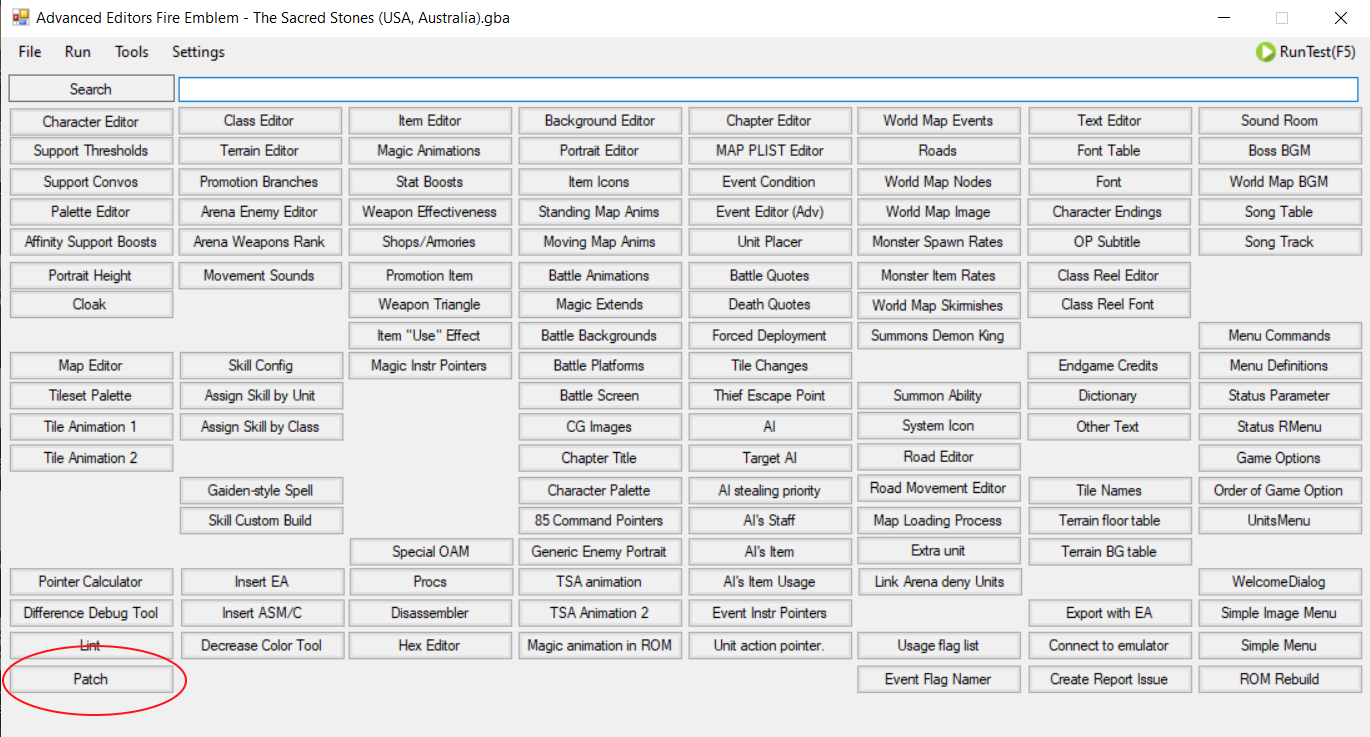
Start by opening up your ROM with FE Builder. You’ll be greeted with this screen.

Open up the class editor by clicking its button.
In the class editor screen, you’ll see a column to the left containing “slots” that range from 00 to 7F. These contain all the classes used in the vanilla game, as well as some unused ones.
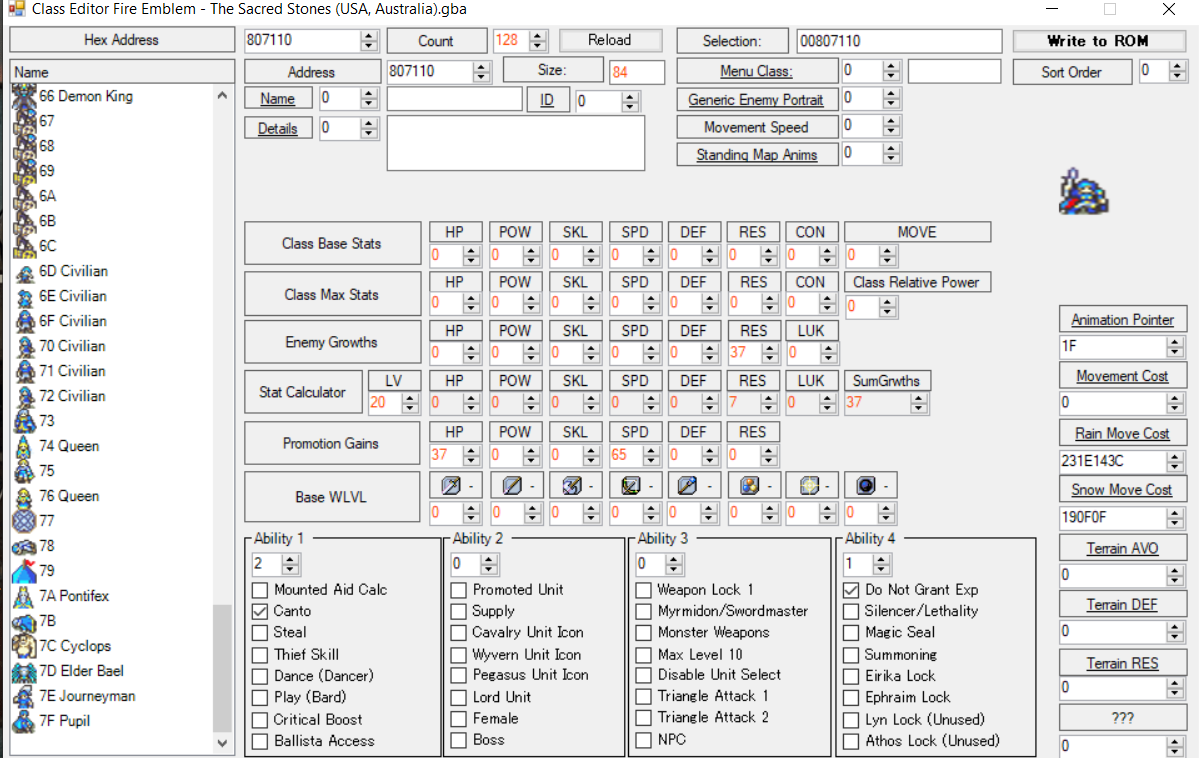
These “slots” are hexadecimal values that when converted to decimals result in a total of 127 available classes (slot 00 shouldn’t be edited at all). It is very important to mention that this number should not be extended, as doing this may cause nasty glitches within the game. Therefore, it is recommended that you always replace one of the vanilla classes with your custom class. I’m gonna quote the creator of FE Builder himself about these possible side effects:
That being said…
It is possible to extend the amount of available class slots to 255 by applying a patch found in the “Patch” section of the Advanced Editors. This is not entirely safe, but from personal experience, I’ve been using this for a long time and I have yet to run into any of the problems 7743 mentioned. It’s up to you if you want to take the risk. For the purpose of this tutorial, I’ll briefly demonstrate how to expand the class list, but I will continue the tutorial replacing one of the vanilla classes. If you don’t want to expand the class list, then go ahead and skip to the second part of the tutorial.
In order to expand the class list, go back to FE Builder’s main menu and hit the “Advanced Editors” button. Then go to the “Patch” section.

In the patch menu, search for the “exmodular” patch. Then select either of the first two results and hit the “Write” button on the top right.
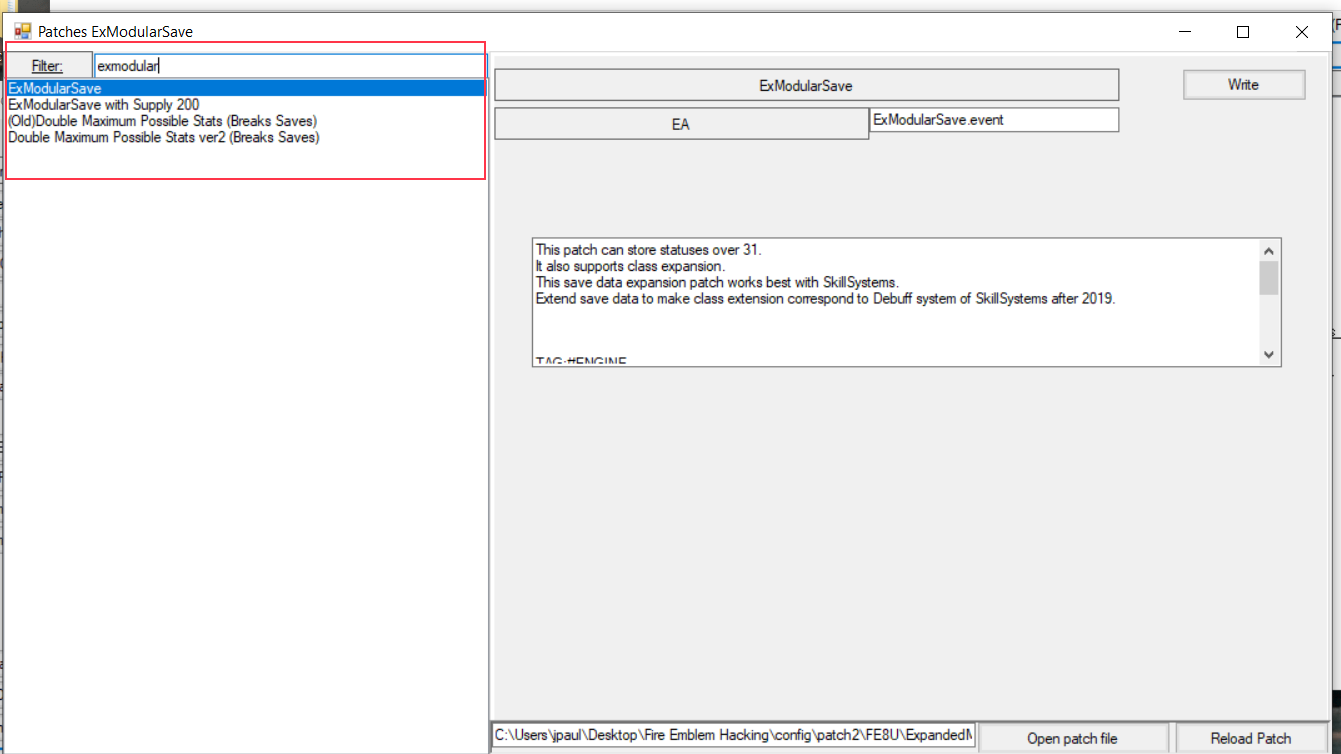
If you also intend to use the (very) popular skill system patch, then it’s worth mentioning that the latest version of it already comes with the ExModularSave patch integrated, so you don’t need to apply the latter twice.
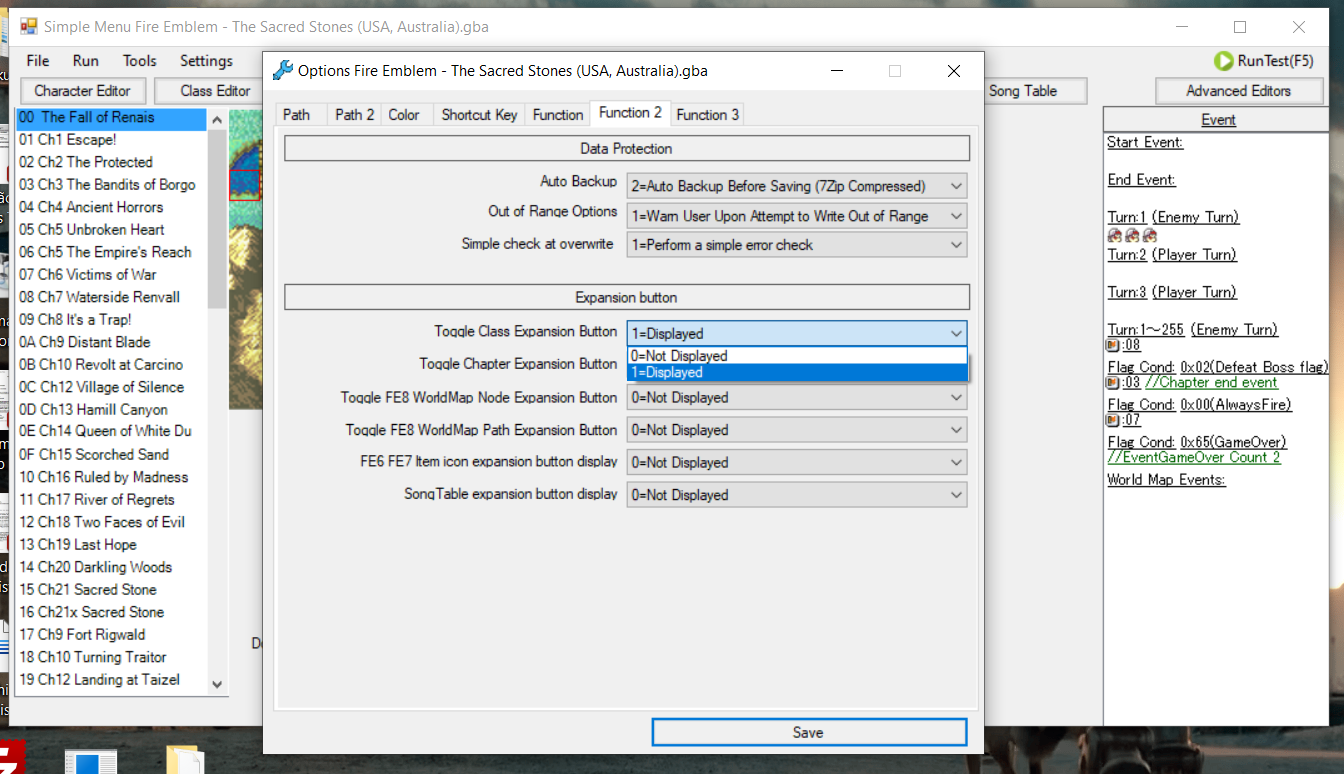
Now that the ROM is patched, you can more safely extend the class list. However, FE Builder natively hides that option from the user. In order to use it, open up the Settings menu of FE Builder and hit Options. Then go to the “Function 2” submenu and set “Toggle Class Expansion Button” to 1=Displayed.
Now, go back to the class editor. You’ll notice that there’s a new button at the base of the class column. Hit it, and say yes to the warning.

On the next screen, make sure that the “Total number of new data to allocate” is set to 255, then hit the big button in the center.

If everything was done correctly, the new limit of the class slots should be FE (255), and now you should have a lot more available class slots to work with without having to sacrifice any of the vanilla classes.
PART 2 : ADDING THE CUSTOM ANIMATIONS
Importing Battle Animations
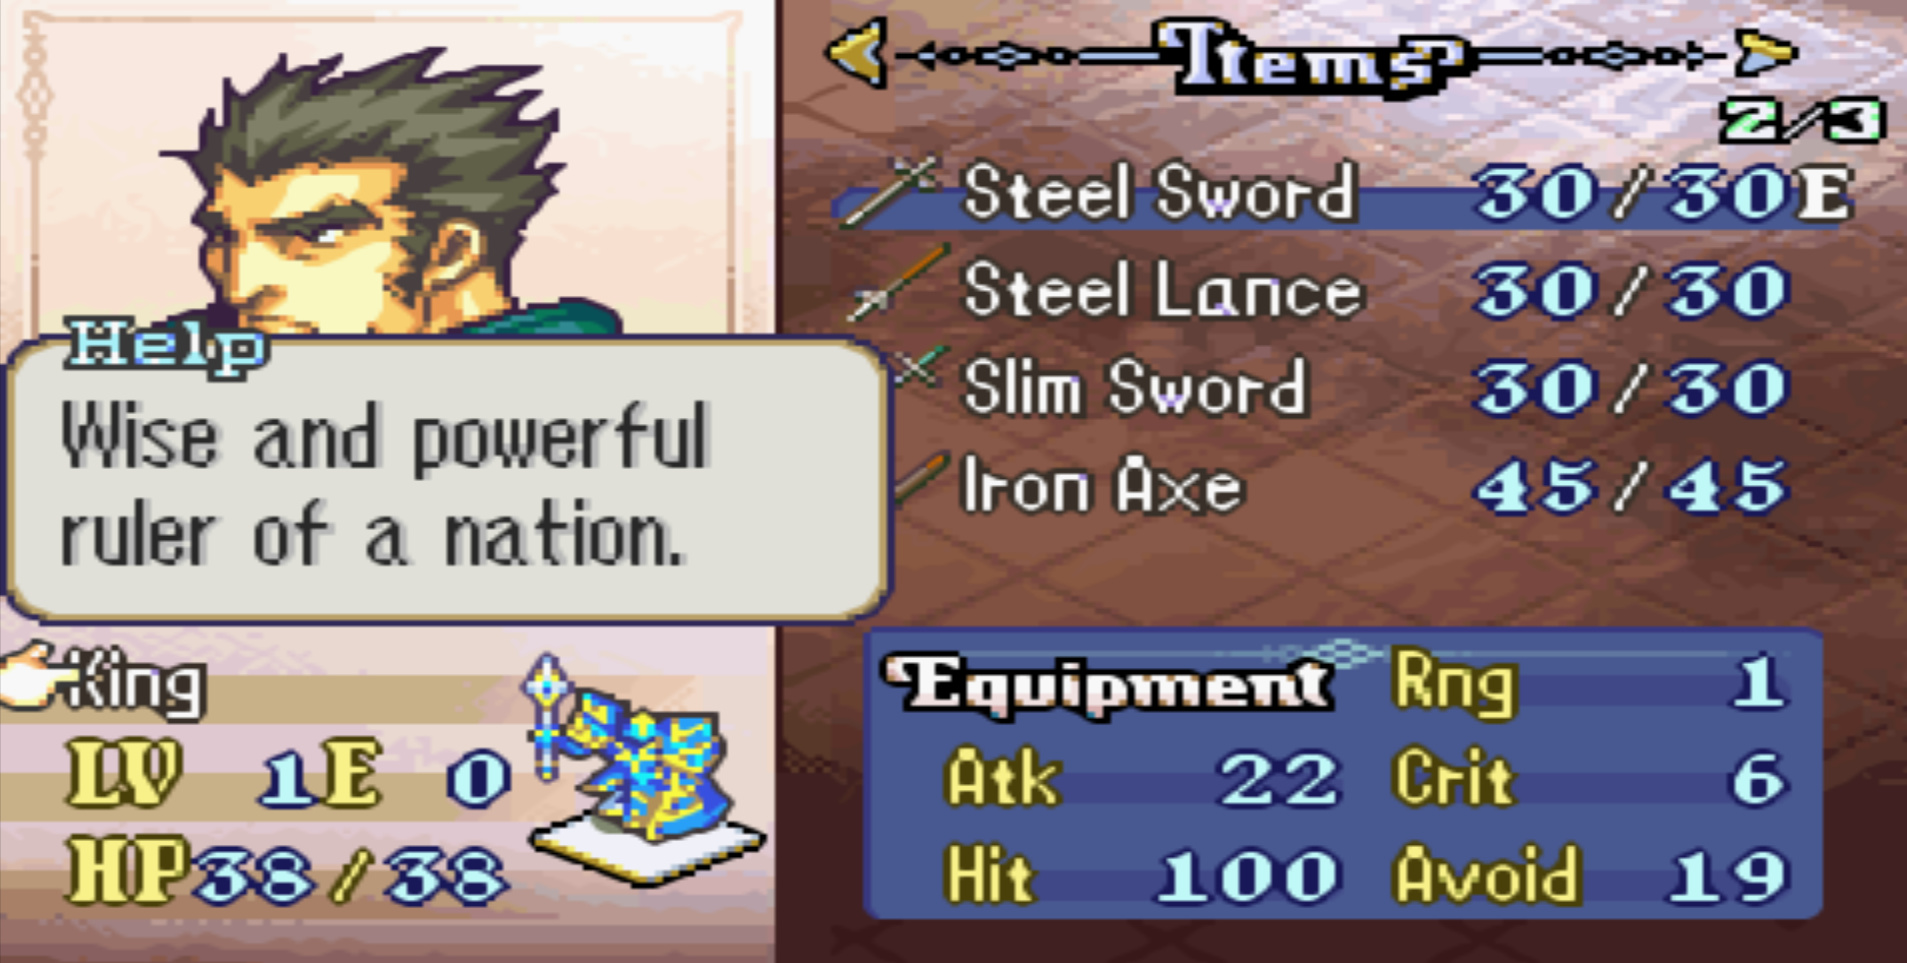
For this tutorial, I’ll add Zephiel’s King class to FE 8. Let’s start by adding his battle animations. Here’s a link for Zephiel’s battle animations in the repo:
https://drive.google.com/drive/folders/1nk5Hai_08RR-vXJ-SCSmv5enXPVv2CJ8
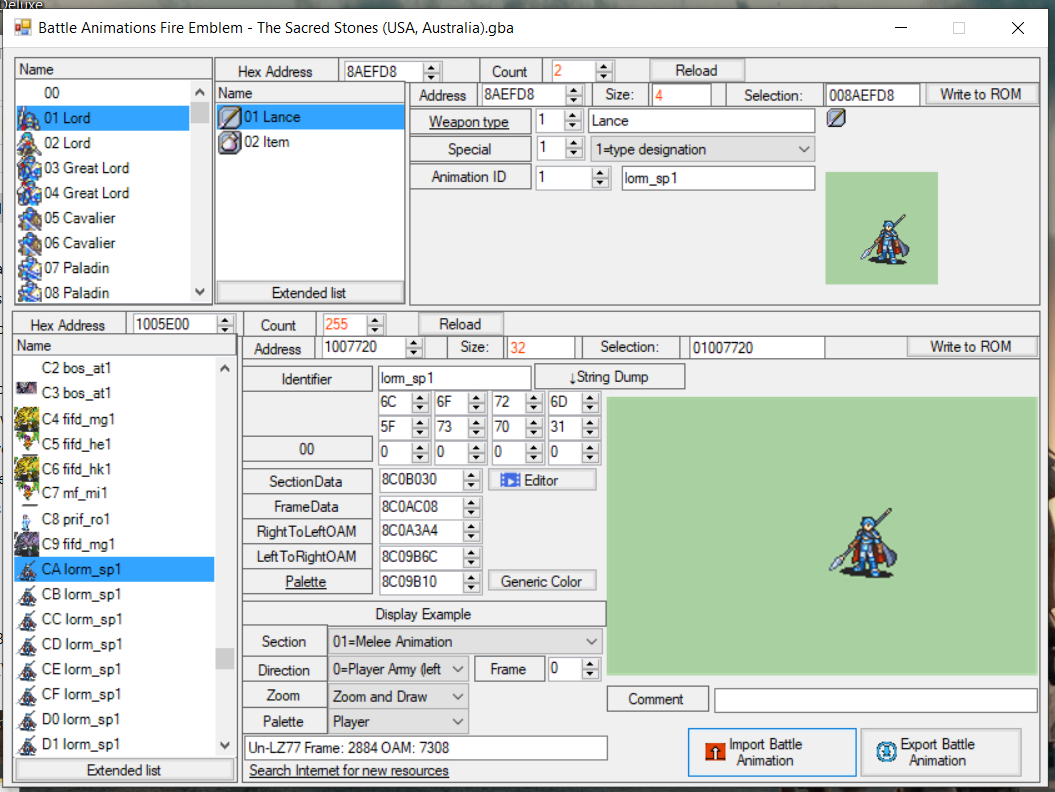
Find and open the “Battle animation” editor in the Advanced Editors section. You should see this screen.
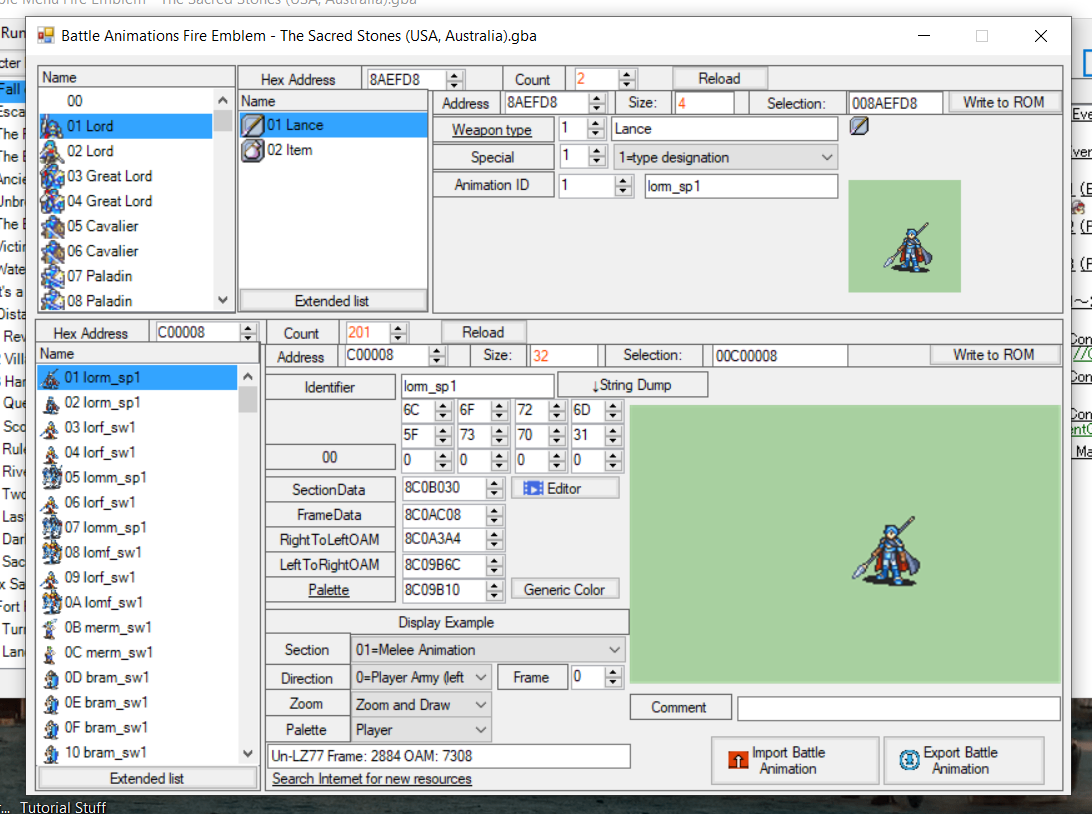
The top left column is the list of classes in your hack. The bottom left column stores all the individual battle animations in your hack. The top center column instructs the game on when to use which animations. You can also see a preview of the animation here. Let’s add the Zephiel animations we just downloaded to the ROM. Go to the bottom left column and extend it to 255. Then find the first free slot, which should be CA. Select it and click “Import Battle Animation”.
FE Builder can import battle animations with either .txt or .bin extensions. The .bin format is generally preferred over .txt, so choose them whenever possible. We are interested in 6 of the Zephiel animations: the sword (1), the lance (2), axe (3), hand axe (4), legendary sword (8) and unarmed (8). Import the .bin files of each of these animations to a different slot of the bottom left column. You should see the following screen after you’re done.

Palettes
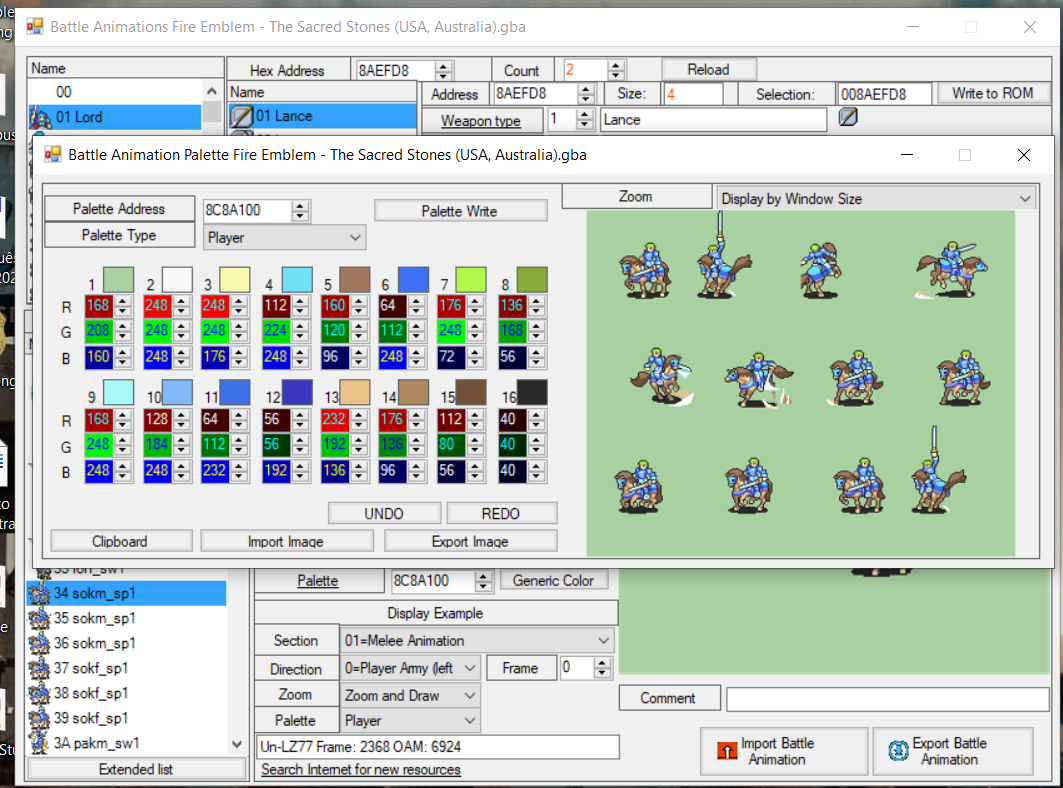
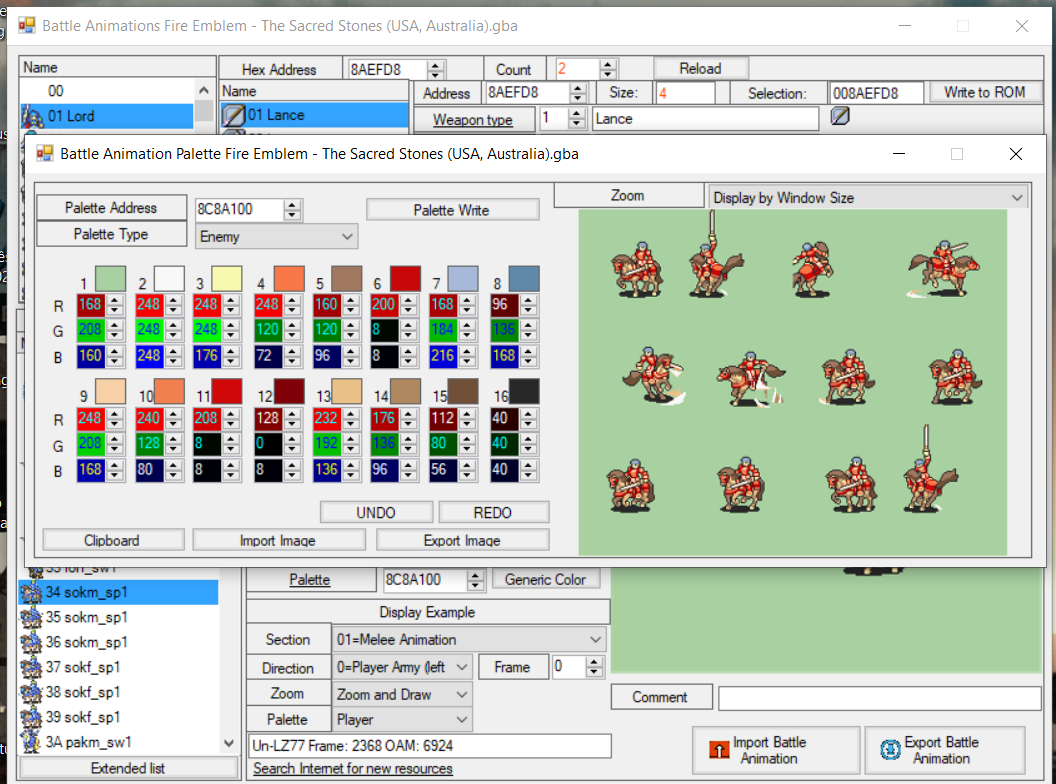
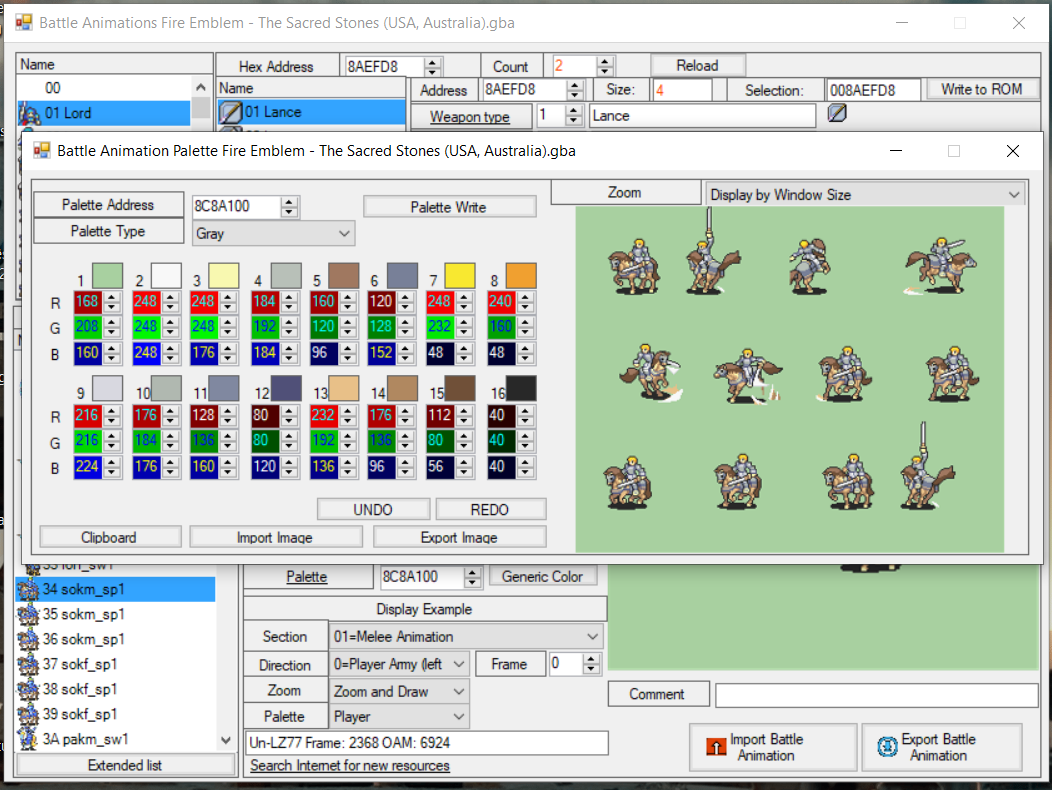
At this point, it’s important to talk about faction palettes. In this same editor you can find the option to edit the palettes of the four main factions for each animation. To do so, click the underlined “Palette” button near the center of the screen.

Here, you can change the palettes of generic units belonging to the four possible factions (Player, Enemy, NPC and Gray). Any character assigned to the class using the animation currently selected will use the corresponding palettes of their factions, as long as said character doesn’t have a specific palette scheme. In FE8, a character specific palette overwrites the generic palettes defined here. Since Zephiel’s class is exclusive to him (meaning that no generic units use it), the palettes of all factions are the same. So, I’ll use the vanilla cavalier class to ilustrate the palette differences between the factions.

For the purpose of this tutorial, it won’t be necessary to assign different palettes for our custom class, so you can just leave Zephiel’s animations as they are. With this, the animations are already in the ROM, but now we need to create the class that will actually use them. To do that, go back to the class editor.
PART 3 : ADDING THE CLASS
Class name and description
In the class editor, select the class slot in which you want to add your class. I’ll be using the slot 73, which contains the class used by Fado in the prologue. In this screen, there are several important things to edit.
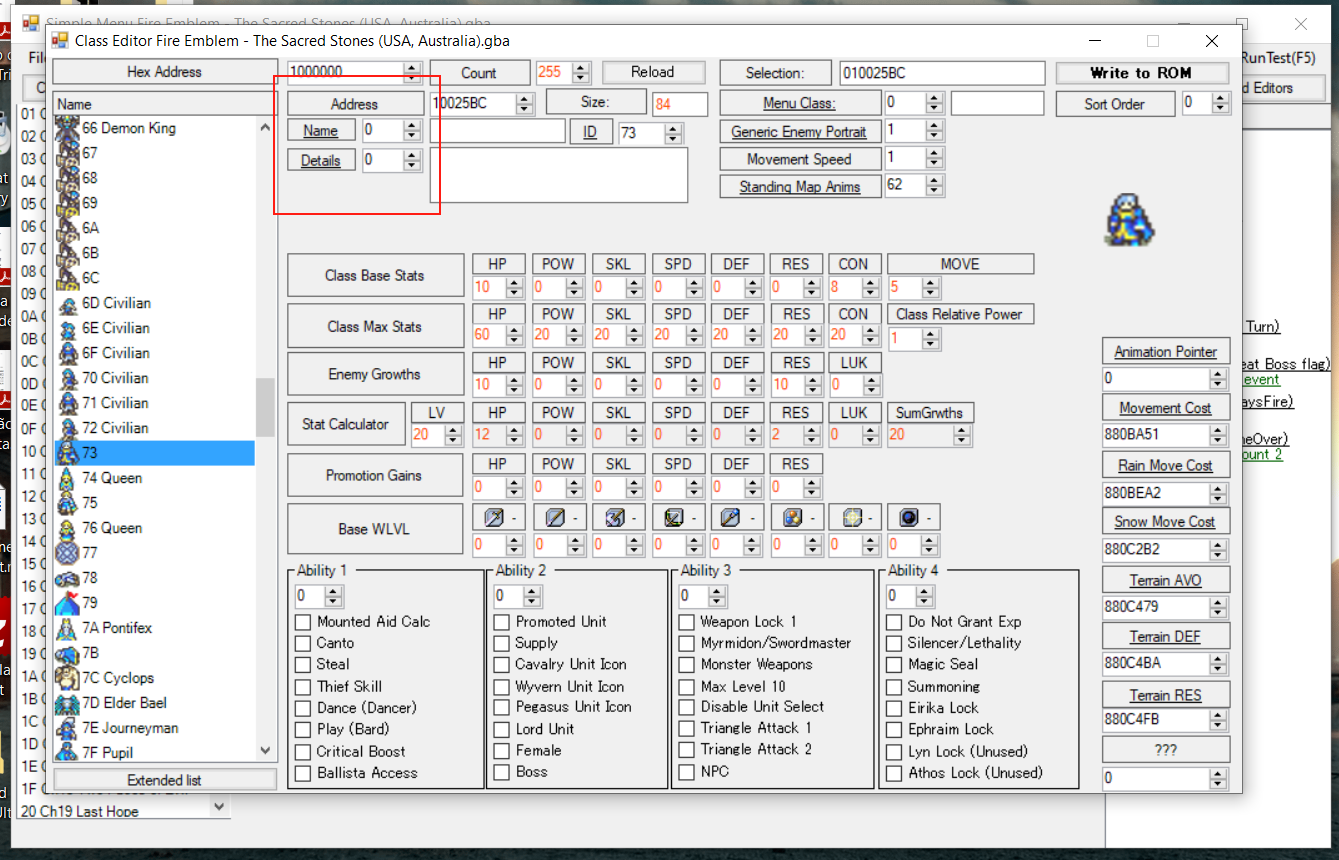
Let’s start by naming our class and giving it a description. Click the underlined “Name” button to be taken to the text editor.
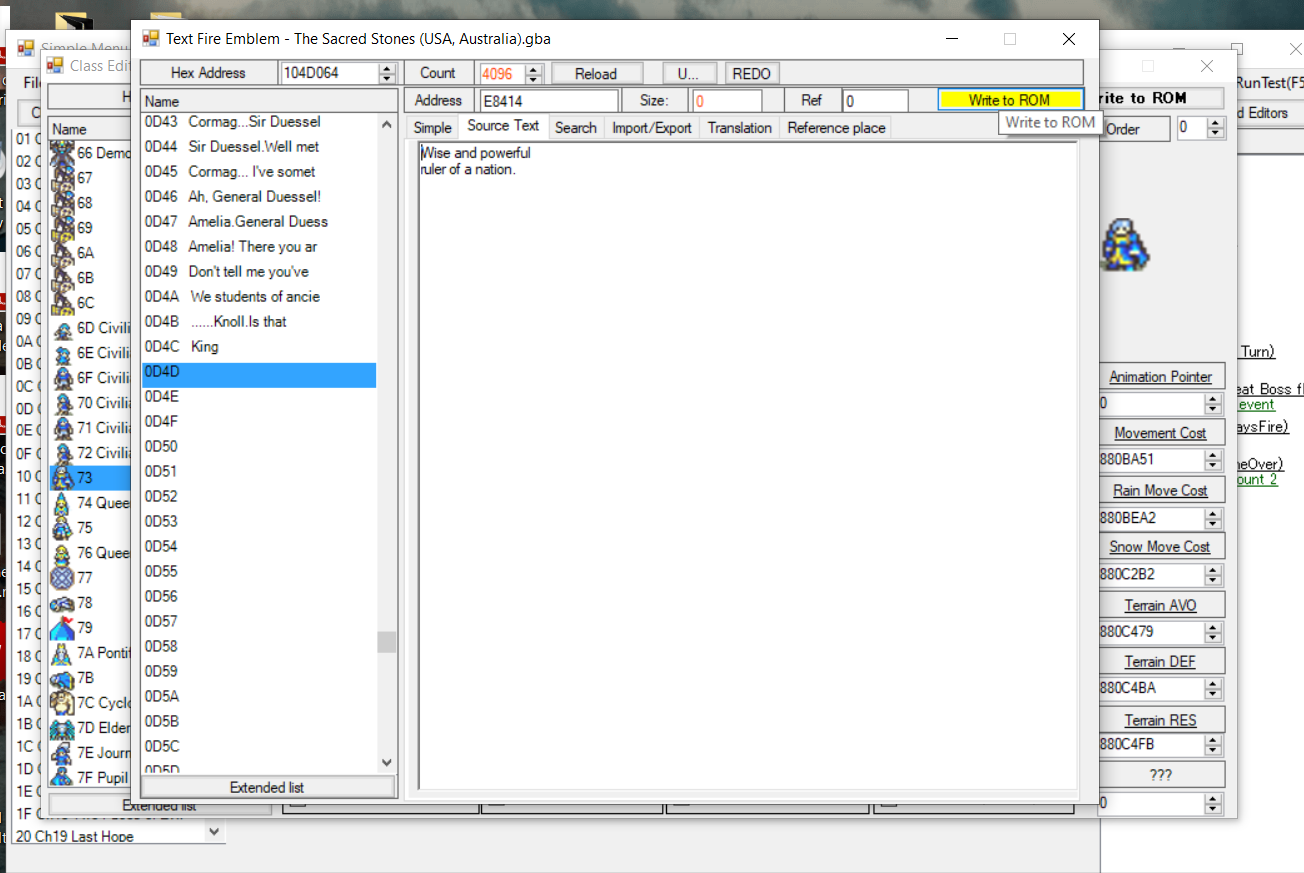
Here, expand the text list and select a slot to type the name of the class. Then type it and remember to hit the “Write to ROM” button in order to save it. Then do the same with another slot for the class’s description. While typing, keep in mind the fairly limited spacing FEGBA allows. If you do go over the limit, FE Builder will notify you so you can make corrections. You may also be required to apply the Anti-Huffman patch, so just agree to it if prompted.

With our texts done, go back to the class editor. By the right side of the “Name” and “Details” boxes, type the corresponding text slots which you just edited. Remember to write to ROM afterwards to save your changes.
Class Stats I
Now, let’s take a look at the options in the top right corner. In “Menu Class”, you should input the base class of your custom class. I want the King class to be considered a promotion of the Knight class, so I should type the Knight class slot here, which is 09. If your custom animation is a base class, then you should input the slot of the promoted class of your custom base class instead. “Generic Enemy Portrait” will take you to yet another editor where you can set the class card that will be displayed by generic units using this class. A character with a specific portrait will overwrite this image. I’m just gonna use the General’s class here, which is 77. “Movement Speed” determines how fast the class moves in the map while in-game. There are only two values, 1 and 0. 1 is for slow classes, such as knights, generals and druids. 0 is for everything else. I want the King to move slowly, so I set it to 1.
Map Sprites and AP data
Click the “Standing Map Anims” to be taken to a new editor.
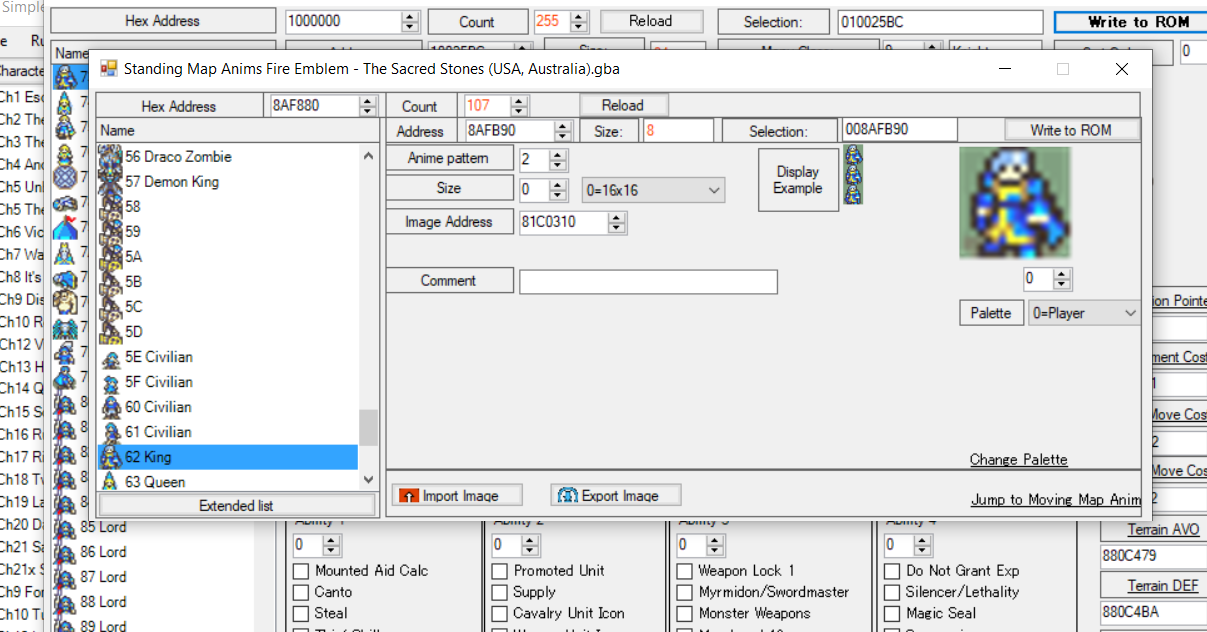
Here’s where you can set the map sprites for the class. You can safely extend this list to 127, but extending beyond that will require you to use the “Extended Moving Map Animation List” patch from the Patches section. The preferred format for map sprites is .png. Here are Zephiel’s map sprites, taken from the repository:
![]()
![]()
The larger image is the moving map sprites, while the smaller is the standing map sprites. Let’s use the editor to import the stading map sprites to the ROM. The map sprites are automatically written to ROM upon importing, so no need to hit the button. Afterwards, click the “Jump to Moving Map Anim”.
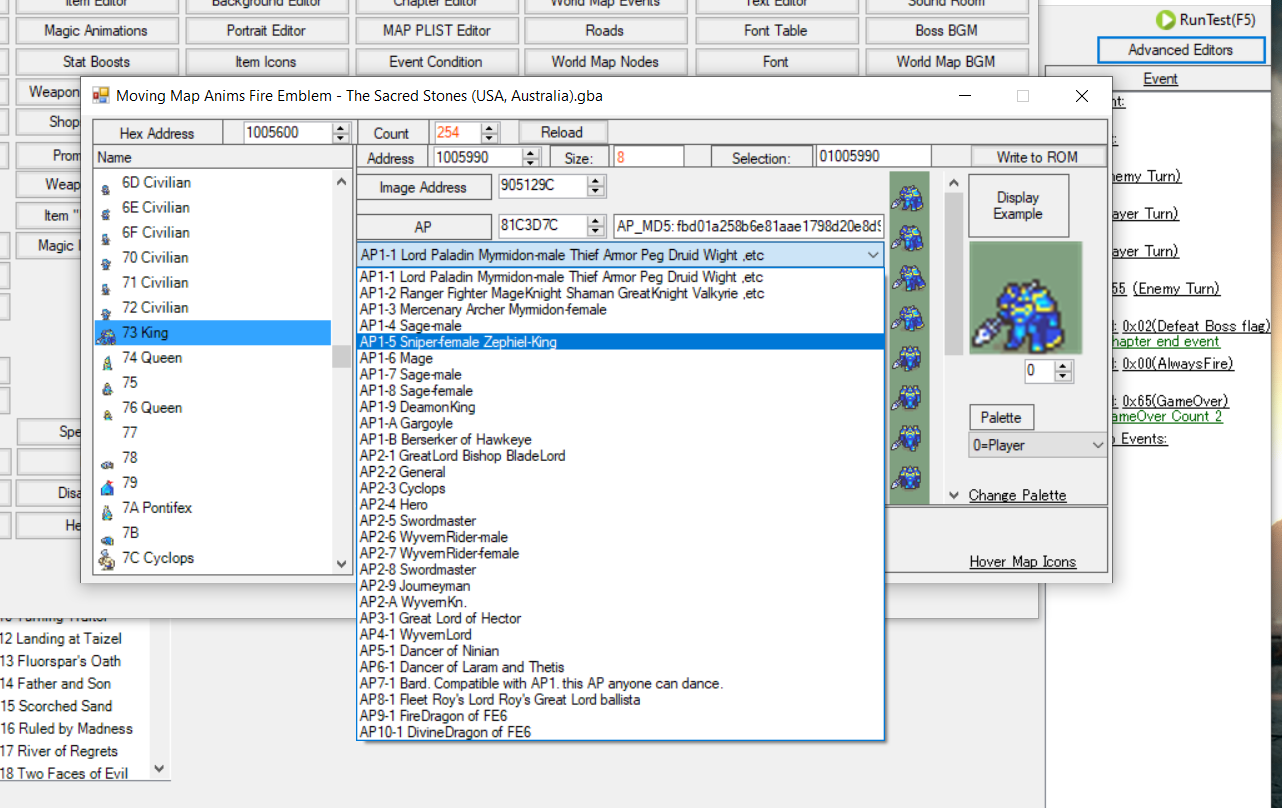
In this new editor, the list to the left mirrors the class list, so you don’t have the option to extend it. Just hit the “Import” button to import Zephiel’s moving map sprites. Importing moving map sprites is a little trickier than the standing map sprites, and that is because you must pay attention to the AP data that is gonna be used for them. To understand its importance, let’s compare the moving sprites of the Paladin and of the Wyvern Knight.
![]()
![]()
Notice how the Paladin’s sprites look okay, but the WK’s look broken? That is because they use different AP data, which correctly display them while the game is running. Most vanilla classes and custom map sprites made by the community use the Paladin’s AP data, which is AP 1-1. Some classes, like the Wyvern Knight, use specific AP data (WK uses AP 2-A). Zephiel is one such case, so after importing his moving map sprites, be sure to select AP data AP 1-5 from the drop-down menu.
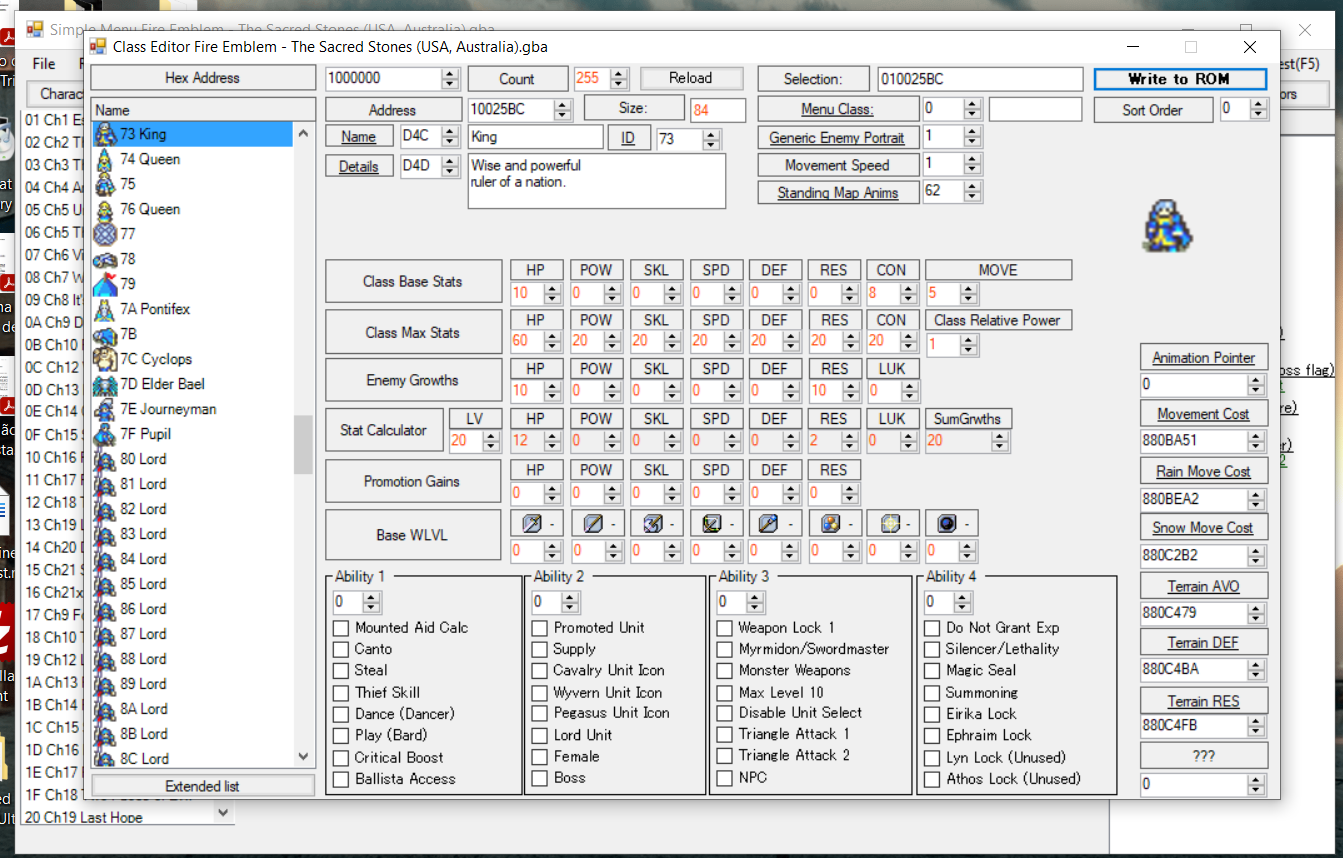
The custom class should have its map sprites displayed correctly in-game now, so let’s go back to the class editor. The only thing left from the top right corner should be the “Sort Order” field. This is where you define the position of this class when the player calls for the unit list while in-game. This is a hexadecimal value as well. I want the King to be displyed close to the General, so let’s just copy the latter’s sort order, which is “D”. If you’ve been doing everything correctly, your screen should be looking like this.

Class Stats II
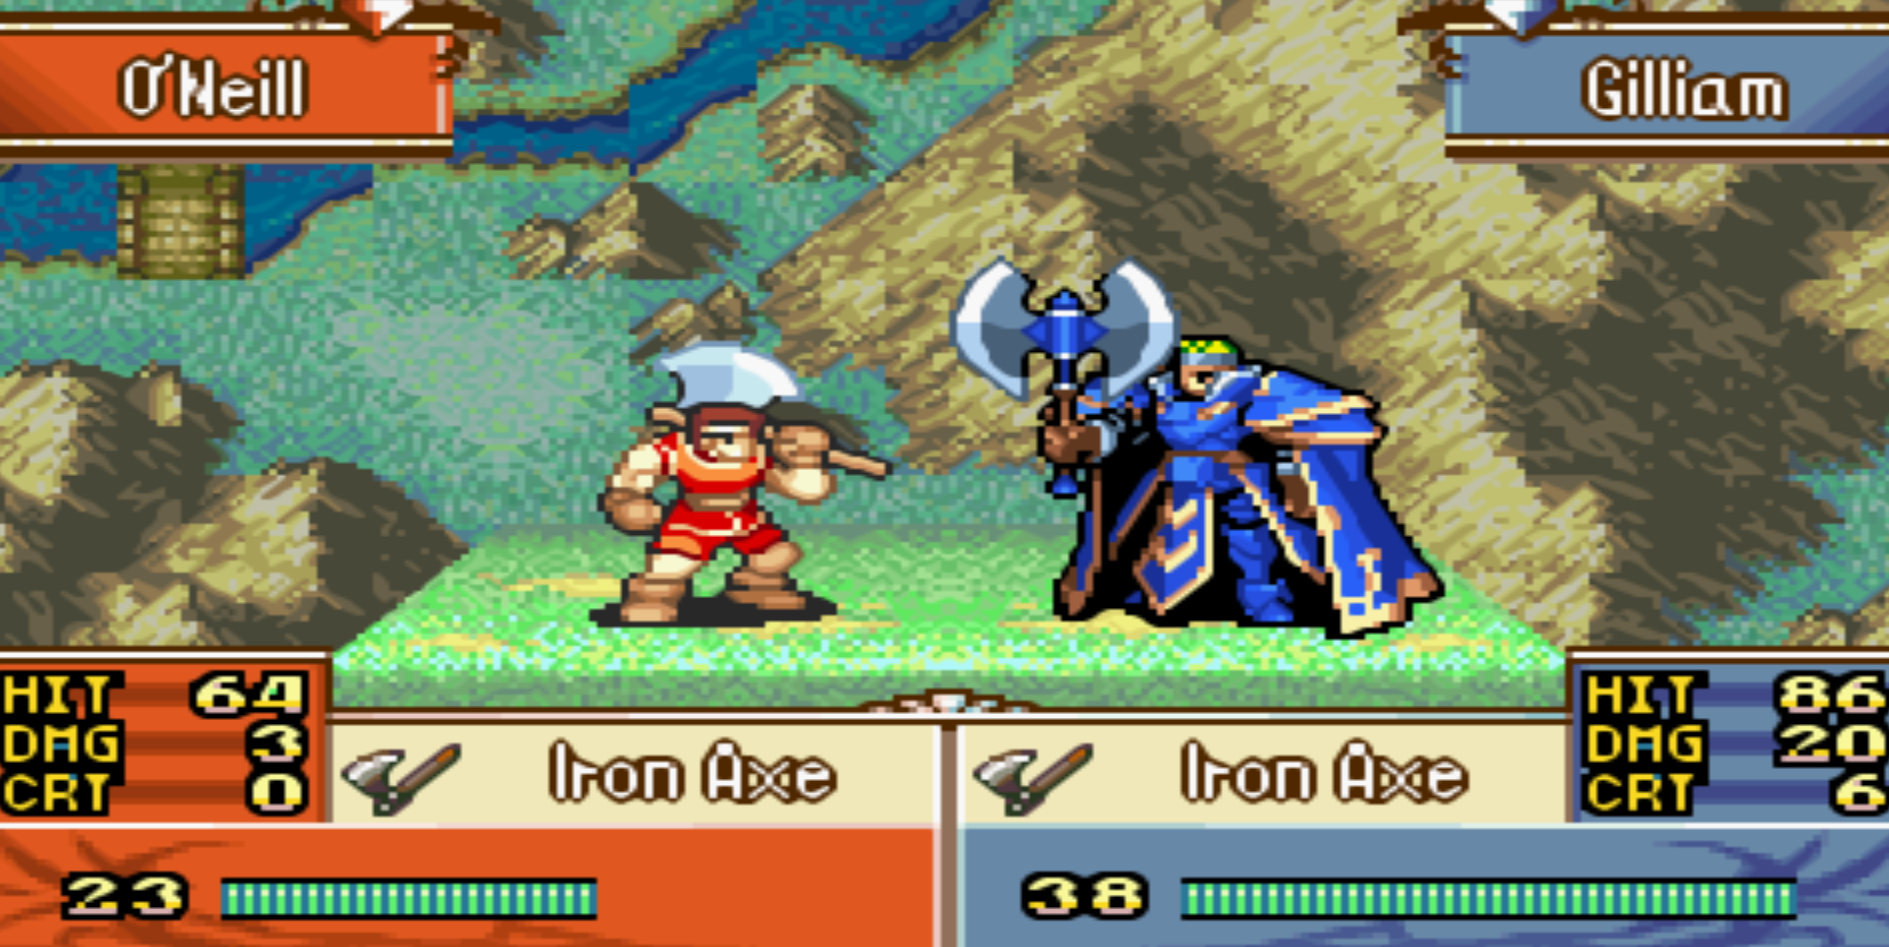
And now, we can mess with the numbers in the center of the screen. They are pretty self-explanatory, so there’s not much I can add. On top of that, hovering your cursor over them will also give you a brief explanation of each. Pay attention to the The “Class Relative Power”, as it determines how much EXP your class will gain/yield in relation to others. As a reference, most classes use the value “3”. The “Promotion Gains” determine how much stat points a unit will receive upon promoting INTO this class. Lastly, the Base WLVL. This determines which type of weapons the class can use. 0 points in a category means the class cannot use that weapon. 1 to 30 means E rank. 31 to 70, D rank. 71 to 120, C rank. 121 to 180, B rank. 181 to 250, A rank. 251 to S rank. NEVER ALLOW A CLASS TO USE PHYSICAL WEAPONS ALONGSIDE MAGICAL WEAPONS WITHOUT A PATCH. If you do it, the game will get confused and won’t know whether the class has Strenght or Magic stats, and you will encounter many bugs in-game. Remember which animations we included for our class back in the first step? Swords, lances and axes, so be sure to give any rank in these three categories for the class. Also fill in the stats however you desire, but remember to respect the limits for max stats and whatnot.

The bottom part of the editor allows you to assign vanilla skills and some other things. They are also self-explanatory and you can just hover your cursor over them if you need an explanation. In this particular case, the “Promoted Unit” box is the only one that interests us, so go ahead and check it. Next, the animation pointer and movement cost colum to the right. Let’s skip the animation pointer for now and discuss the other options. The “Movement Cost” allows you to set how the terrain will influence the class’s ability to move. If you click it, you’ll be taken to an editor to do it. While you could make a custom movement type for your class, it is generally a much better idea to simply copy the existing movement data of a closely related class. We’ll shamelessly copy and paste the General’s movement data onto that of our King class (which is “880B88A”). “Rain Move Cost” and “Snow Move Cost” are irrelevant in FE 8 since weather conditions were removed from the game, so you don’t need to worry about them. Terrain AVO, DEF and RES are the bonuses granted to non-flying units while in defensive titles such as fortresses and thrones. They are already the same as the General’s, so no need to modify them. The last option is currently unknown and should be left alone.
Animation Pointer
Now, back to the “Animation Pointer”. This is where you associate the class with the custom animations you imported back in the first step. Click it.

You’ll be back at the battle animations editor. Do notice that the top center column is empty. That is because there are currently no animations associated with the class. Let’s fix that, shall we? First, click the “Extended list” button of the top center column. This time, however, choose to allocate “8” new data.
The column should be filled with 8 slots, all saying “01 Sword”. Select the first slot of the top center column. In the “Animation ID” field, input the bottom left slot to which you previously imported Zephiel’s Sword animation. In my case, it was slot CA. Write to ROM afterwards. You should see something like this:
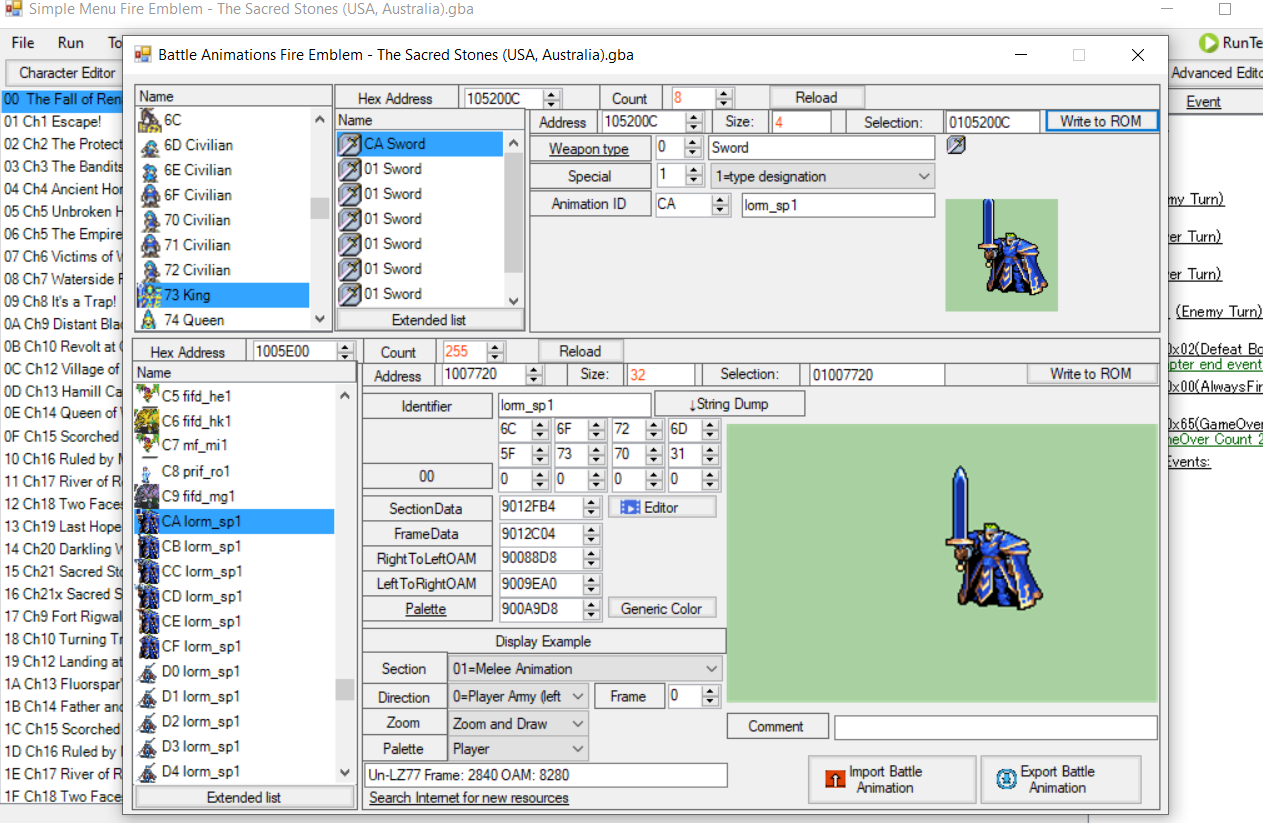
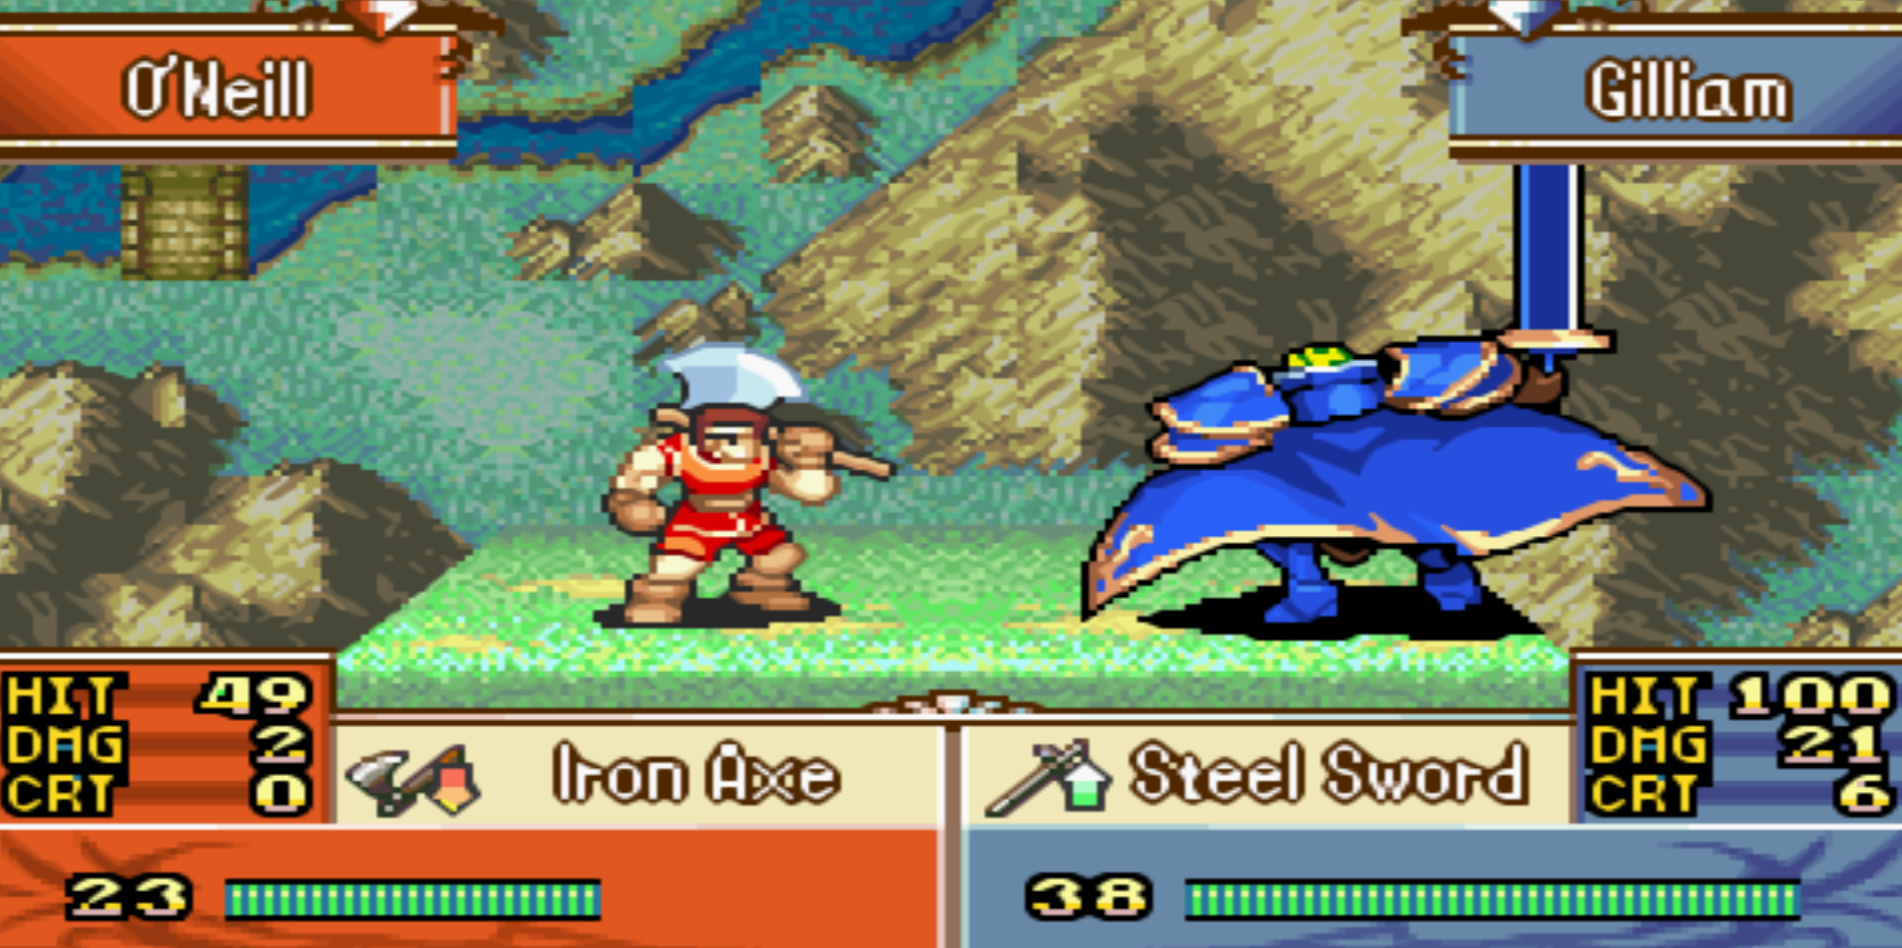
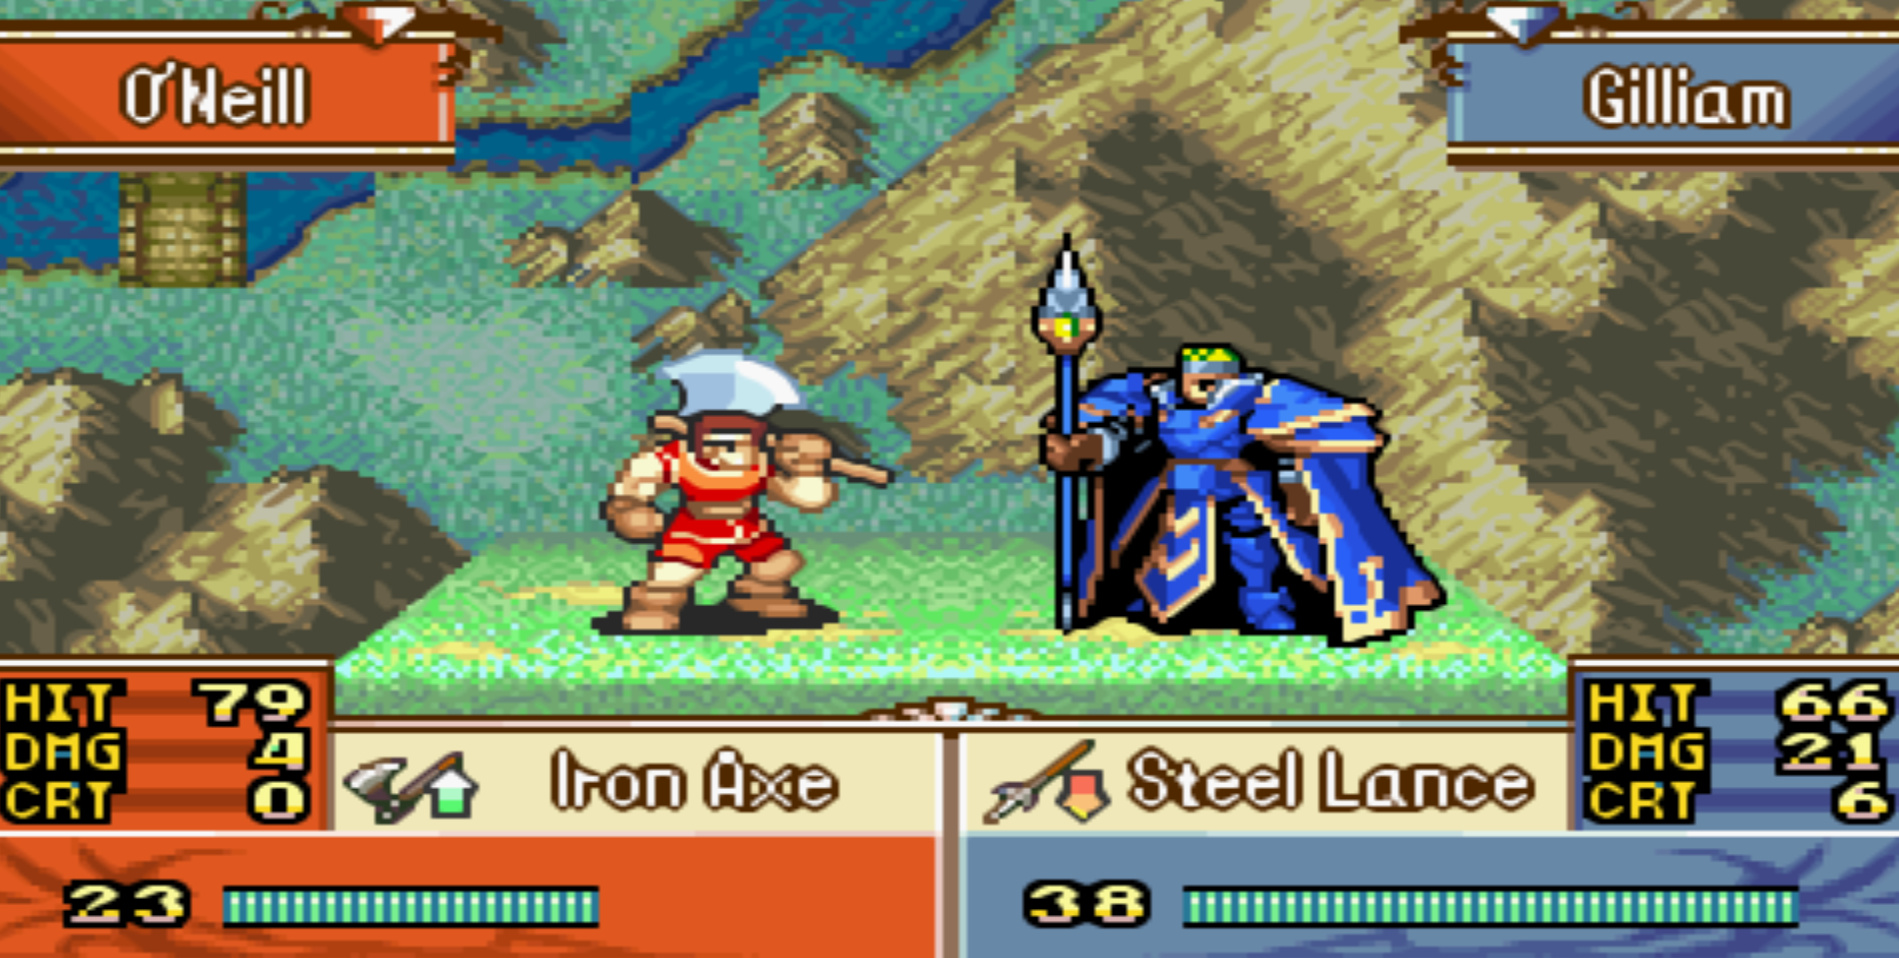
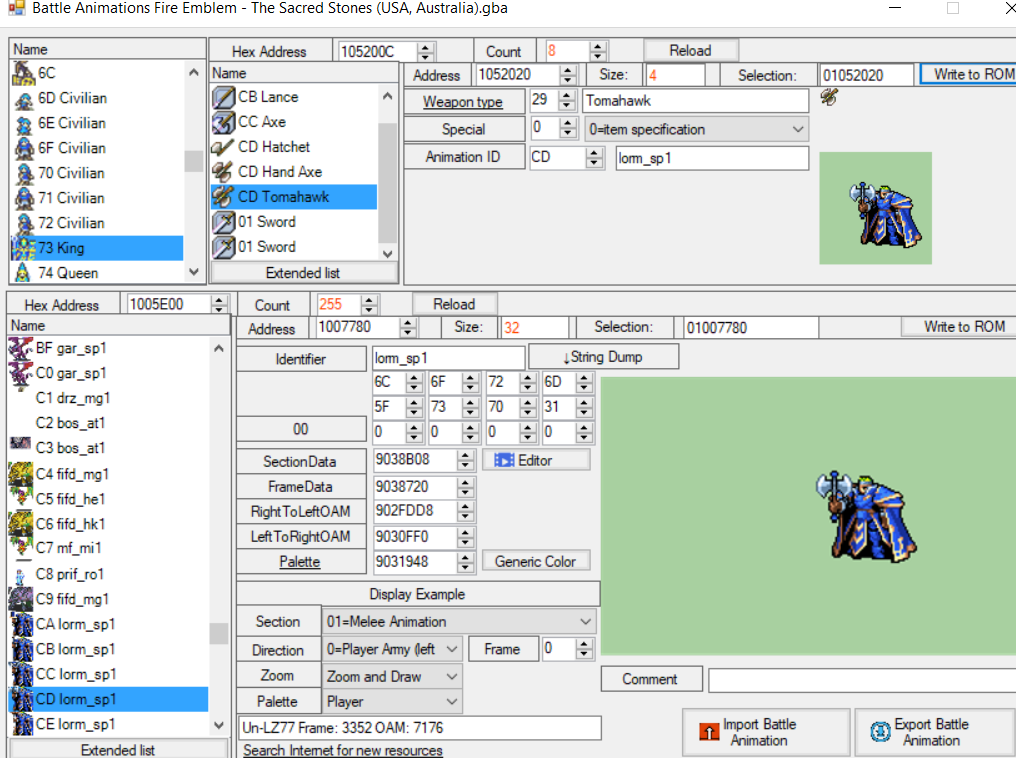
What we just did was telling the game to use the animation in the slot CA whenever the King Class uses a sword. Let’s do the same for the other weapons now. Go to the second slot of the top center column and this time, change “Weapon Type” to 1 - Lance. Then input the slot where the lance animation is located and write to ROM. Now, the axes. Axes are a little trickier because they use different animations for melee and ranged axes. In the third slot of the center column, set “Weapon Type” to 2 - Axe and the corresponding animation in the bottom left column. Write to ROM. Time to set up the ranged axes. Go to the fourth slot of the top center column. This time, however, start by assigning the animation ID. Input the slot where the Hand Axe animation of the King is located. Then go to the “Special Field” and set it to 0 = item specification. Now go to “weapon type” and input 2C.

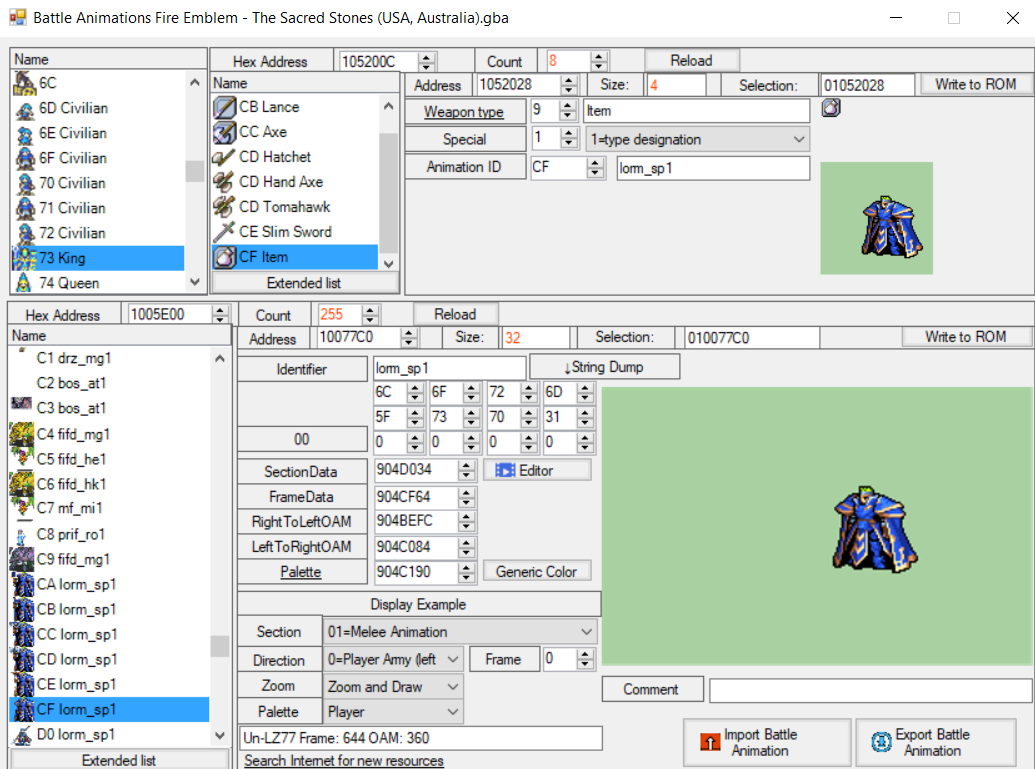
Now do the same thing for the next two slots of the top center column, but set the Hand Axe (item ID 28) for one and the Tomahawk (item ID 29) for the other.
There, the axes are all done. It is always necessary to specify the Hand Axe animation for every ranged axe in your hack, because they must use the same animation for both melee and ranged combat situations. We are almost done here. As anyone who played FE 6 recalls, Zephiel has a neat unique animation that he uses for his legendary sword, the Eckesachs. The way you set up unique animations with a specific weapon is similar to how you set up the animations for the ranged axes. For this tutorial, let’s set things up so the King will use the Eckesachs animation when using the slim sword. Do it the same way you did with the ranged axes. Slim sword’s item ID is 02. Remeber to always write to ROM. Finally, use the last available slot from the top center column to set up the unarmed animations (Weapon Type 9 = Item).
Aaaaaaaaand we’re done here. Close the battle animations editor. Now, be careful here. Upon returning to the class editor, the Animation pointer will still be set to 0. Before doing anything else here, simply select a different class and then return to your custom class. Now you can see that the animation pointer is preserved and you can safely do anything else, if necessary. If you attempted to make any modifications while the animation pointer was still set to 0 and wrote to ROM, everything you just set up in the battle animations editor would go to waste. We are all done with the class editor, so go ahead and close it. Just as a reference, the King class should look like this.

PART 4 : FINISHING TOUCHES
Map Movement Sounds
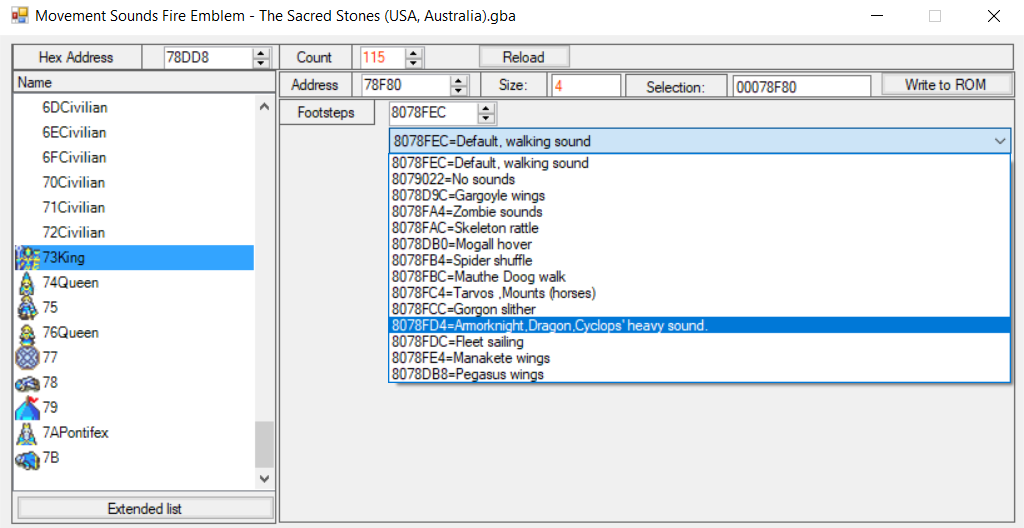
The work is nearly completed, but there are still some things you need to do in order to fully integrate the custom class into the game. Open up FE Builder’s Advanced Editors and go to the “Movement Sounds” editor. Once there, find your custom class and choose what sound it should make when moving on the map from the drop-down menu. I’m choosing the Knight’s/General’s sounds for the King.
Weapon Effectiveness
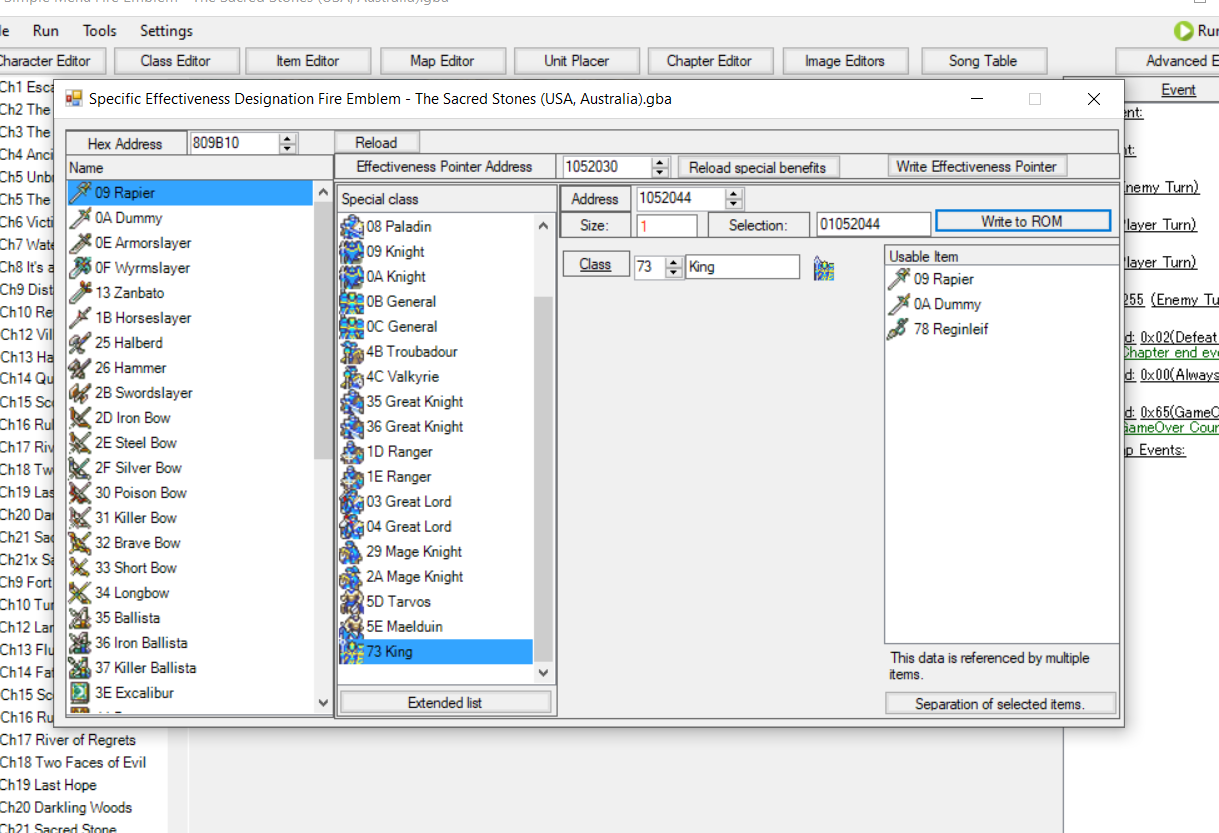
Now, if your custom class is special in the sense that it is an armored/cavalry/flying/monster class, then you will want this to be reflected on the weapon effectiveness of the special weapons. In our case, I want the King to be considered an armored class, so we need to go to the “Weapon Effectiveness” editor and include the King class in the lists of all the weapons that are effective against armored units, such as the Rapier and the Armorslayer. To do that, simply extend the lists of these weapons in this editor and include the King class.
Class Promotion
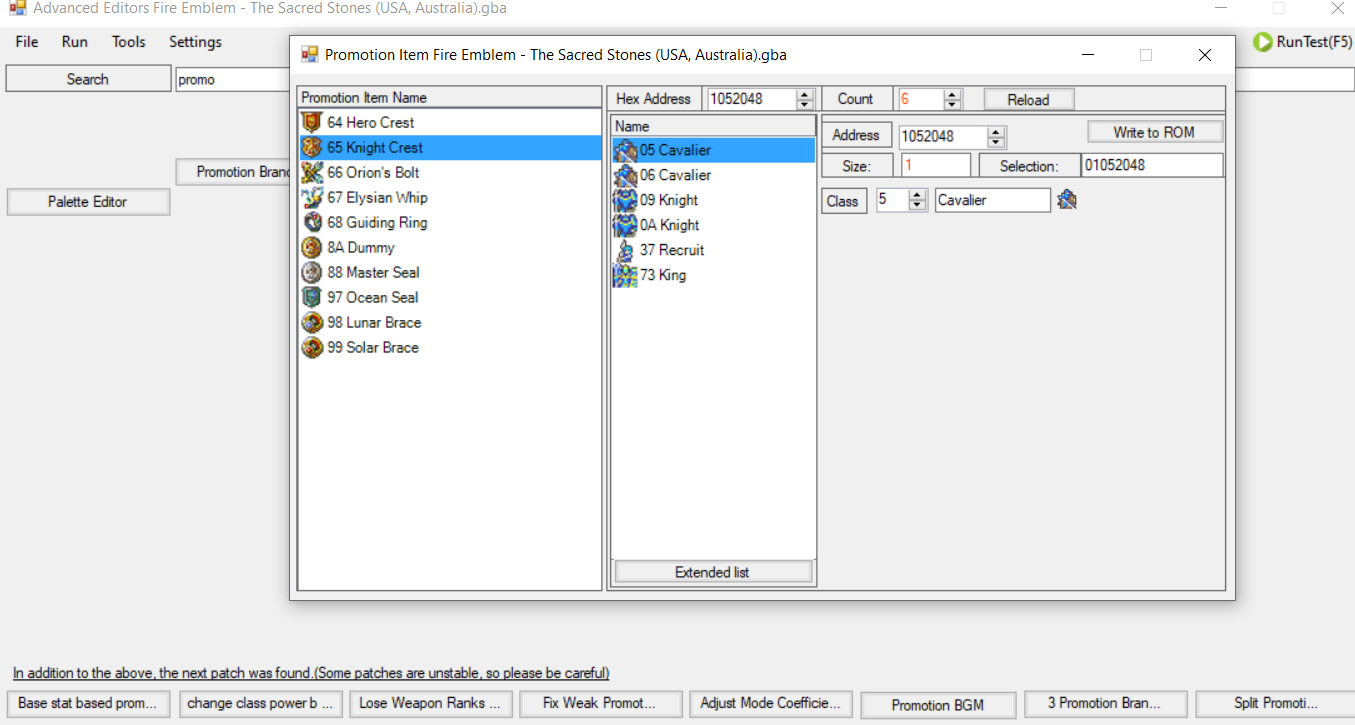
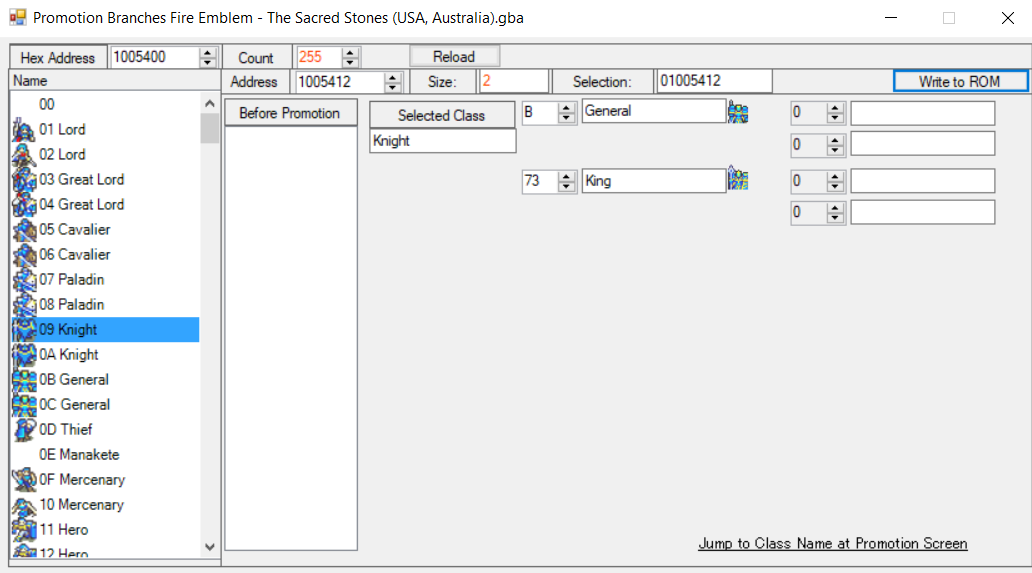
If your custom class is standalone, meaning it is neither a base class nor a promoted class, then you’re pretty much done. If not, then there’s still a couple things you must make. Let’s assume the King is intended to be a promotion to the Knight. In order to set this up, I would need to go to the “Promotion Branches” editor. Once there, find the base class your custom class is intended to promote from and set it up.
If your custom class is intended to be a base class, then you must also set up which promotion item will allow it to promote. Go to the “Promotion Item” editor in order to do so. Then just extend the list of the appropriate item(s) and include your custom class.