UltraxBlade's #febuilder-help FAQ

How do I make it so this dialogue only plays if this character is alive?
How do I make a village check who’s visiting?
How do I make a gaiden chapter with a turn limit to unlock?
How do I make it so X happens when Y is the case?

How do conditionals in events work?

I’ve explained conditionals so many times that I almost want to make a video on it, but I don’t know how to make videos and don’t quite have the energy. So I’ll grab one of my more in-depth examples from Discord, answering “Does anyone know how to write it so an event happens only if a certain unit visits a house?”

Alright, so, let’s start with the general idea. What you want to do is:

Check if the visiting unit is that specific unit
If they are, do the special thing
If they aren’t, do something else

This kind of thing, where what happens depends on some condition, is done in events with conditional branches, which generally take the following form:

Get the value of something
Compare the resulting value to something else, if the comparison holds true skip to a Label
    If the comparison was not true, this part will run
Label to skip to

Or, when you have two different cases instead of just "do the thing or don’t do the thing:

Get the value of something
Compare the resulting value to something else, if the comparison holds true skip to First Label
    If the comparison was not true, this part will run
    Skip ahead to Second Label
First Label to skip to
    If the comparison was true, this part will run
Second Label to skip to

In this case, the value you want to check is the ID of the active unit. There’s a command for “Check if active unit matches specified ID”. This command, like any other “get this value” or “check this condition” command, will store its result in Memory Slot C – specifically, it will store a 0 there if the active unit does not match, or a 1 if the active unit does match. All yes/no “check” commands should return 1 if the check is true, or 0 if the check is false. If you’re ever unsure, Builder includes notes on each such command detailing its return cases when you hover over its description in the event editor:

Next, you need a branch command to check the result and determine whether or not to skip ahead. There are a lot of these – BEQ (branch if equal) and BNE (branch if not equal) are the most common. These commands compare the values in two different Memory Slots. Most often, you will compare Slot C, the result of the previous get/check function, with Slot 0, which always has the value 0. So, if Slot C equals Slot 0, the result was 0, and the active unit does not match. When you need to compare Slot C with a nonzero value, you can use the “Imm” variants of these commands, Imm BEQ, Imm BNE, and so on, which directly compare Slot C to a specified value.

Finally, you use Labels to mark where in the event to skip to. Each label must be unique within the event – you can only have one Label 0, Label 1, and so on in each event, but multiple separate events can each have their own Label 0.

In addition to skipping to a label when a certain condition is true, you can also unconditionally skip to a label with GOTO, the command to go to a label.

So, with that, we have:

Check if active unit matches [Unit ID of the special unit]
BEQ if [Slot C] == [Slot 0] go to [Label 0], else execute following
    [Whatever happens if that unit is the one visiting]
Label [0]

Or, if you want it to do something different when another unit visits instead of doing nothing:

Check if active unit matches [Unit ID of the special unit]
BEQ if [Slot C] == [Slot 0] go to [Label 0], else execute following
    [Whatever happens if that unit is the one visiting]
    GOTO [Label 1]
Label [0]
    [Whatever happens if that unit is NOT the one visiting]
Label [1]


This example I screenshotted from my hack, doing exactly the situation described above, also sets and checks a Flag to make sure it doesn’t give the item twice by putting a conditional block inside a conditional block, since it’s in a house that can be visited multiple times. You can also reference the village in Chapter 2 of vanilla FE8, which has a different result if Eirika visits it vs if anyone else visits it.

Here’s another example from my hack: a yes/no branch for a gaiden chapter, requiring a certain character to be alive and a certain flag to have been set during the chapter.


When Caitlyn is alive and Flag 10 is on, it gives you a choice to go to the gaiden chapter, displaying a textbox with the [Yes] command in it.
image
[Yes] and [No] are largely interchangeable commands for putting a yes/no choice in text, the only difference being that [Yes] has the cursor start on the “yes” option while [No] does the opposite. In this event, when the player says yes, it sends them to the gaiden chapter without the world map. When the player says no, or if they didn’t meet the requirements to get the option in the first place, it sends them to the next main chapter, with the world map. Note that they can’t both use the world map, as once you send the player back to the world map, the actual next chapter they enter is determined by the next World Map Node, not by the “goto next chapter” command.

In general, it is often worth looking for and referencing places in vanilla that you know have a similar condition to what you want. FEBuilder also has a set of Event Templates that include various simple conditional structures. If you have more questions, stop by the Discord and I’ll probably be around.

4 Likes

How do I change music (or run other events) in the middle of a conversation? The heck is a [LoadOverworldFaces]?

In Builder’s Event Templates, you should be able to find “execute events side-by-side during a conversation to change music”, which is the most basic such structure. Just start typing it out to search the list.

It should give you something that looks like this:

To make a conversation where the music changes once, use that template. Set the text entry to the one you’re using, set the music to what you want before the change and after the change, and in the conversation text, add [LoadOverworldFaces] where you want the music to change.

To change music more than once in the same conversation, here’s a more detailed explanation of how it works.

[LoadOverworldFaces] is a text command, included in text, like [A] or [ToggleSmile]. What it basically means is “stop the conversation here and continue the running event”. You combine it with certain structures in the event, such as the one in the template, to make things happen during the conversation.

The normal dialogue command is actually multiple commands in one: TEXTSTART, TEXTSHOW, TEXTEND, and REMA, in that order.
TEXTSTART tells the game “get ready to start a dialogue conversation” (as opposed to a textbox with TUTORIALTEXTBOXSTART or other text display)
TEXTSHOW makes the text actually appear.
TEXTEND is where the text stops and the event resumes.
And REMA is what clears the text/portraits/etc from the screen.

There is, however, one other command: TEXTCONT, continue/resume text, which resumes an active conversation that was paused by [LoadOverworldFaces].

The general structure of an event with a conversation using [LoadOverworldFaces] is as follows:

events before conversation
TEXTSTART
TEXTSHOW [Text ID]
TEXTEND
event after first [LoadOverworldFaces]
TEXTCONT
TEXTEND
event after second [LoadOverworldFaces]
TEXTCONT
...
TEXTEND
REMA
events after conversation

Each time you hit a [LoadOverworldFaces] in the conversation, it returns to the event at the next TEXTEND, and then goes back to the conversation at the next TEXTCONT
When the conversation’s finally over, you put REMA after the last TEXTEND as always to clear the conversation from the screen.

The “execute events side-by-side during a conversation to change music” template is this, set up for one [LoadOverworldFaces]. The first time the conversation stops, it changes the music then resumes it. The next time it stops, it ends the conversation and clears the text.

If you don’t get all that, just stick to using the template. All you have to know with the template is “put [LoadOverworldFaces] in the conversation where you want the music to change”.

4 Likes

How do I import music from the Music Repo?

First, you’ll need to install two patches: Native Instrument Map 2 (NIMAP) and Drumfix. Once you’ve installed those patches, download the .s file of the song you want from the repo (not the .ogg, that’s just a preview for you to listen to, you want the .s). Then, in Builder, go to Song Table → Song Track Editor, and find either an empty track or a song you’re willing to replace. Select it, then click “import music”, and select the .s file. Builder will ask you what instrument set to use, and if NIMAP is installed will offer that as the default. All music in the repo is formatted for the NIMAP, so just click the confirmation button, and the song is imported!


To add it to the Sound Room in-game and change the song’s name, you then go to Song Table → Sound Room Editor and add it as an entry in the list.

What about the “import music from another ROM” tool?

It is generally advised not to use this for actual music, as importing music with this function will copy over the entire instrument set of that song along with it, eating up large amounts of memory space. (It is, however, useful if you need to import sound effects that don’t have a close enough equivalent in the base ROM.) Repo music using the NIMAP takes up much less space as the NIMAP instruments are already in the ROM. But if you must, it’s found in “tools”, and the way it works is fairly simple: it’ll show you the sound table of your ROM and the ROM you’re importing from. You select which entry to import from the other ROM, and which entry to replace in your ROM, and click “import”. You’ll have to check the sound table of the other ROM yourself to figure out what’s what.

Note: DO NOT USE THIS TO RIP MUSIC FROM HACKS. Directly taking assets from other people’s hacks without their permission is art theft.

4 Likes

What FEBuilder patches are considered quality-of-life?

First of all, my honest recommendation is to install the SkillSystem and remove skills, as SkillSys comes with so much quality-of-life built in that I honestly can’t even remember all of it off the top of my head until I notice it’s missing in a non-SkillSys hack. While most of it is available standalone, not all of it is, and tracking down the individual patches can be annoying. But aside from that:

General QoL:

  • ModularMinimugBox – Allows you to add information like stats and inventory to the minimug box display when hovering over a unit. The exact information it shows can be customized by editing the installation files, and you’re encouraged to do so, but there are a handful of solid defaults in Builder.
  • HP Bars with Warnings (included in SkillSys)
  • Battle Stats with Anims Off (included in SkillSys)
  • Check danger zone with Select (included in SkillSys)
  • Show how much HP is healed with staves
  • Nullify move range of units with stationary AI is included with SkillSys, but is not available as a standalone Builder patch. Its standalone non-SkillSys version can be found here and installed manually with Insert EA.
  • Set default text speed to fast
  • Turn off autocursor by default
  • OPENING_CUT – disables everything before the title screen (health and safety warning, Nintendo/IS logos, and opening animation). These can also be disabled individually if you for some reason want to keep part of this.
  • Various patches to reduce lag and fix bugs
  • Check growths on statscreen isn’t a standalone patch in Builder outside of SkillSys, but it can be installed standalone if you want to, you just have to install it yourself with Insert EA. This is also bundled with being able to see who a unit can talk to on the stat screen.
  • Adding Casual Mode as an option – I advocate strongly for designing around Classic Mode, but support adding Casual Mode as an option for casual players. Giving the option is as easy as installing the patch and it doesn’t take away anything to include it for the people who want it.
  • Add a game option to disable staff and dance animations
  • Show weapon stats of monster weapons
  • Not a patch, but including in item descriptions actual numbers for things like how much a Vulnerary heals for
  • Hold A to speed up battle animations (warning: one version of this patch is known to be a bit glitchy, test it out and see if it causes any unwanted side effects in your ROM like jank in spell animations or slowing base animation speed)
  • Hold L to skip battle animations
  • While not inherently a quality-of-life bonus just by installing it, the “display multiple escape markers on map” patch can be used to create visual indicators for all sorts of things on maps (including but very much not limited to actual thief escape points), which in the right situations can be very helpful for communicating information to the player.

Typing #ESSENTIAL in the patch list search bar will also come up with a bunch of useful and important fixes.

There’s a handful of other things that are mechanical changes, but people usually like and generally don’t hurt:

  • Convoy expansion to 200 (this is part of ExModularSave, and therefore included with SkillSys)
  • Talk doesn’t use your action
  • Support doesn’t use your action
  • Stealing with a full inventory
  • If you have supports, changing how supports work in some way, such as increasing the support gain range or changing it to FE9-style per-chapter gains or just making them grow faster. There’s a lot of different ways you can go, but most people agree vanilla GBA support gains are too slow/restrictive and could use improvement. (To do FE9-style, find the patch to set support gain range and set it to “whole map”, it will change it to trigger once at the start of the chapter for being deployed together.)

And others that are more significant changes, which some people could consider to be QoL but have serious design implications you have to build around:

  • Thracia trading, being able to trade multiple times in one action - makes item management more flexible. Too flexible, potentially, one unit can completely rearrange and swap around the inventories of everyone adjacent to them all at the same time.
  • Moving force-deployed units, instead of them always being in the same place – a nice feature for more “normal” levels where the lord/forced units are just grouped with everyone else, but it prevents you from designing levels around certain units starting in specific places, ex. the lord getting separated from the main army. (Well, it doesn’t make it impossible, but you have to do some shenanigans where you prevent them from being deployed and then load them onto the map after preps. There’s a more updated version of move force-deployed units that lets you toggle it per-unit, but that version’s not available as a Builder patch, you’d have to insert it yourself.)

Oh, and if you’re willing to do a bit more work to install it and set it up, give Danger Radius and Droppable Item Marker a look. But it requires installing it with Insert EA, as it’s not a Builder patch, and you have to edit the fog palettes of all your tilesets. (Well, you don’t have to, but highlighted enemy ranges showing up fog-colored is weird. It comes with a script to process palettes easily for Buildfile users, but it doesn’t work nicely for FEBuilder.) Vesly has also made a version that adds a stealable item indicator as well, which can be found here – if you want Danger Radius alsongside it, you’ll have to install Danger Radius first, then change the Installter.event file for DisplayObtainableItem to have True instead of False towards the bottom for using Danger Radius.

Another non-Builder patch: Convoy Partition and Item Combination by Tequila, which allows you to merge uses of duplicate items by holding L while depositing them in the convoy. (It also comes with functions to partition the convoy between multiple parties if you need that, but the QoL feature is the item merging.) To use it, you do need to change some values in the .event config file, particularly if you’re using SkillSys, to make sure it has the proper address for the convoy and the correct number of items in it.

Some notes on installing Convoy Item Combination in Builder

If you’ve installed EMS or anything else that messes with save structure, you’ll need to make sure to change the address in the .event file for where the convoy is to match where it is in your ROM. If you have the wrong address, your convoy will end up getting wiped.


To find the correct address, run your ROM from Builder to open it with the debugger. Go into the game, then in the debugger, under the “Etc” tab, find “Supply”, and check the address on the upper-right of the list. That’s the address you need to have in the .event file.

If you’ve installed a version of EMS that expands the convoy, you’ll also need to change the values for how many items can go in the convoy. (Note: installing the convoy partition hack won’t change the amount of things in the convoy can be saved, so you’ll need EMS first to go above 100 total.) If you’re just using the hack for item combining, just specify a single full-convoy partition like this:

You may find that the colors for the “L+R: Combine” graphic on the convoy screen get screwed up. To fix this, at the end of the .event file, comment out the #incbin s and uncomment the #incext s, like this:

Once that’s all set up correctly, in Builder, go to “Insert EA” under the advanced editors, select the .event file, install it, and test to make sure it’s all functional. (Make sure your convoy doesn’t disappear after you do things in-game!)

7 Likes

My Chapter Start Event is acting weird. It’s not showing units moving, the camera’s jumping around instead of scrolling, and it’s skipping things.

You probably have the chapter set to start faded to black in the Chapter Editor, and forgot to include a “fade screen in from black” at the start of the event where you want it to start showing things happening.

But the screen isn’t black?

Some things in events can force the screen to show while the game still thinks it’s faded out, resulting in this issue as the game tries to skip through the “faded-to-black” event.

4 Likes

How do I go to the next chapter WITHOUT the World Map? The game’s freezing when I try!

To go to the next chapter without the world map, all you have to do is use the “go to next chapter without world map” command in the previous chapter’s End Event, and specify the chapter ID to go to. However, the vanilla game is hardcoded to only allow going to specific chapters without the world map. Luckily, as you might expect, there’s a patch to fix it. Search for “MNC2 Fix” in the patches list. There are two versions, one that disables skirmishes and one that doesn’t.

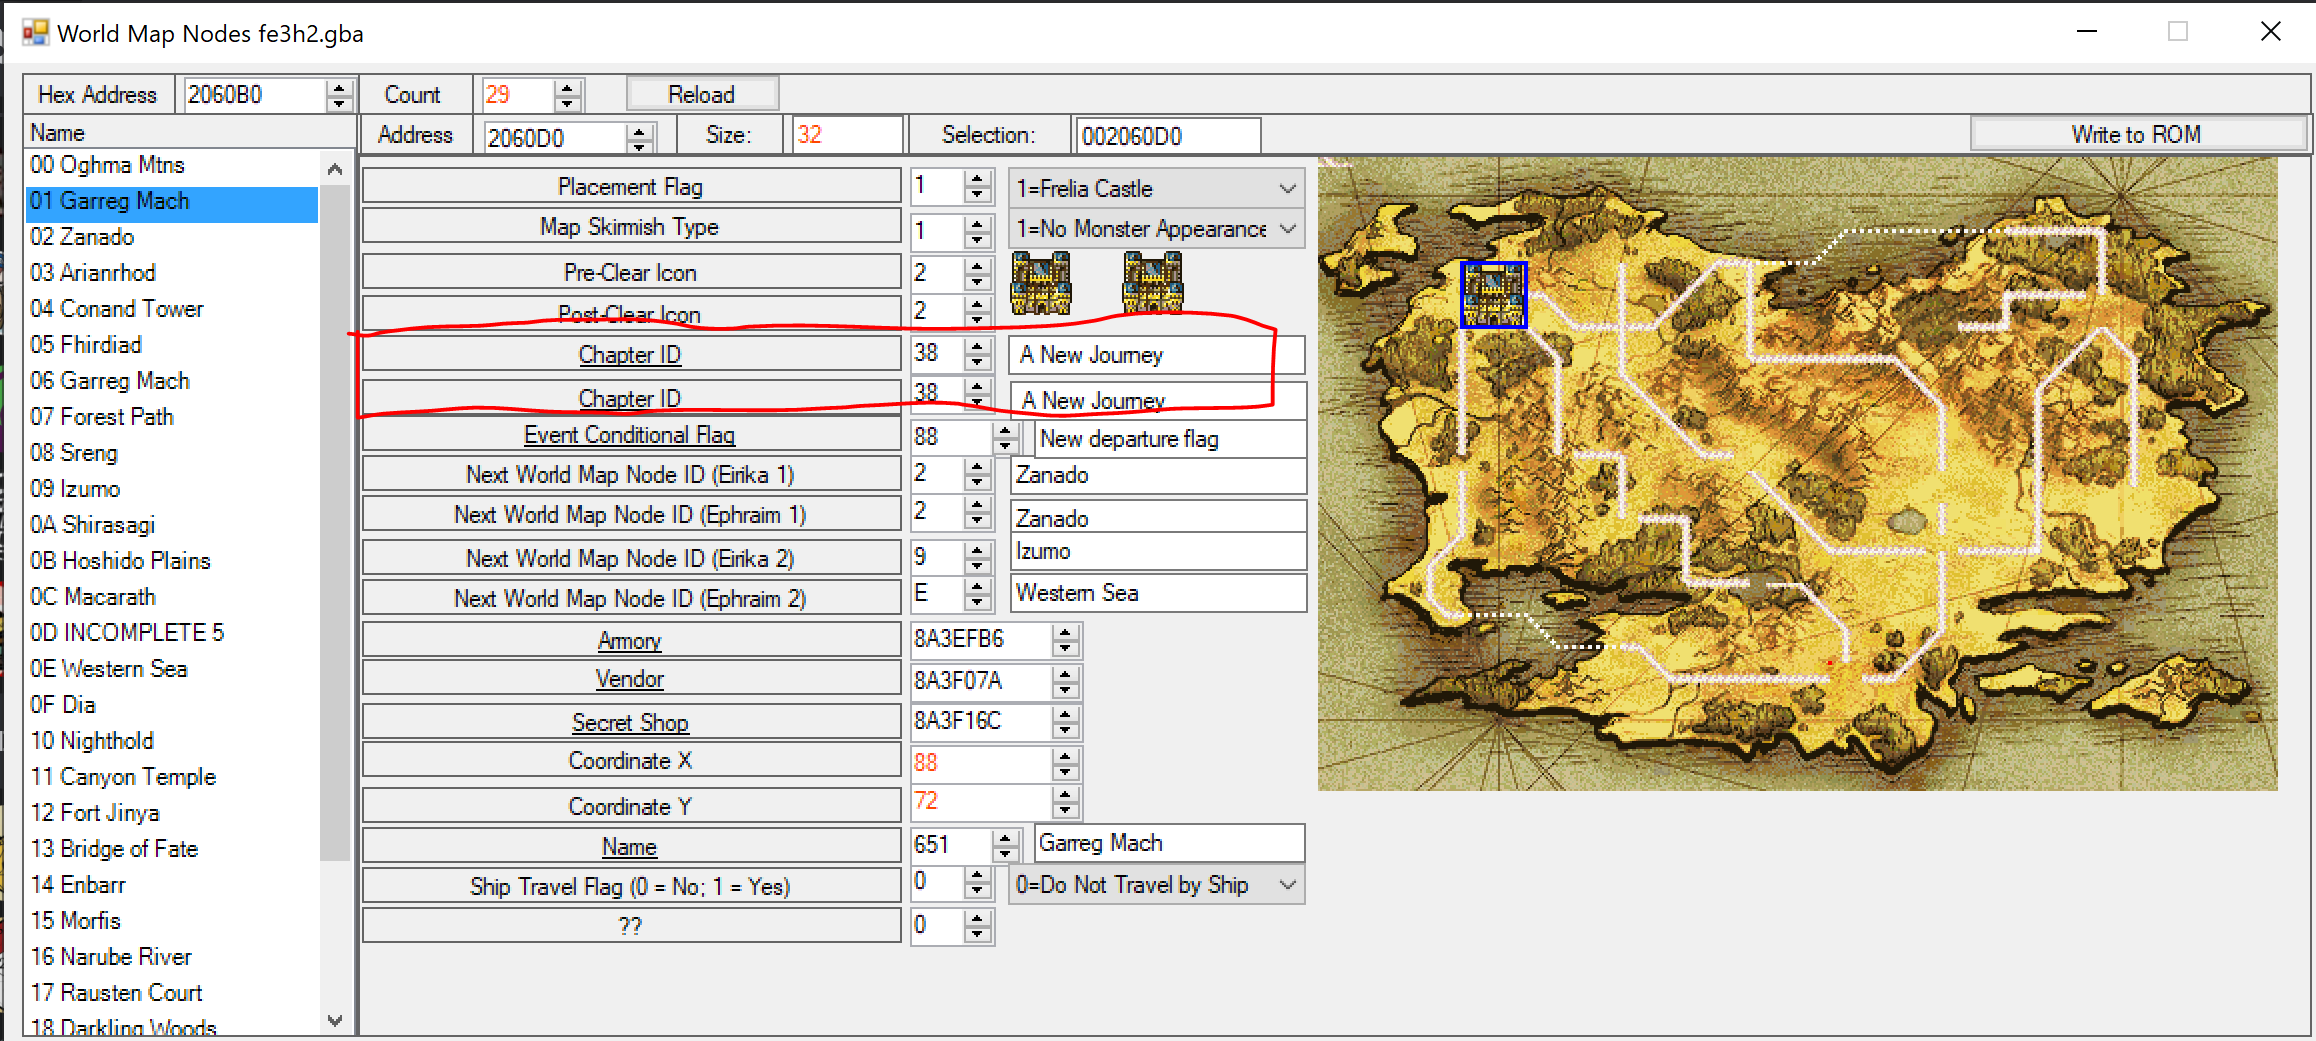
How do I go to the next chapter WITH the World Map? It’s not going to the chapter I want!

To go to the next chapter with the world map, use the “go to next chapter with world map” command. However, while this command takes a chapter ID, that chapter ID doesn’t actually determine what the next chapter is. When using the world map, the next chapter is determined by the chapter ID set for the World Map Node you enter. In the World Map Nodes editor, you’ll find that each node has two chapter IDs. The first is used for pre-routesplit and Eirika Route, the second is used for Ephraim Route.

If the current chapter was entered without the world map, you will likely need to use the version “go to next chapter with world map based on designated base”, which specifies which world map node the player appears at when returning to the world map.

I have a gaiden branch set up, but it’s going to the wrong chapter.

Both versions of the “go to next chapter” command do not actually end the event and go to the next chapter, they only tell the game what to do once the event ends. Therefore, if the game sees one “go to next chapter” and then another “go to next chapter”, it will go to whatever is specified by the last one it saw. You need to make sure that your conditionals for the gaiden branch are skipping the alternative chapter’s “go to next chapter” command, for example:

CHECK_FLAG
BEQ if [slot C result]==[slot 0 always 0] goto label A, else:
    [result if flag is on]
    go to next chapter without world map [gaiden]
    goto label B
label A
    [result if flag is off]
    go to next chapter with world map [main chapter]
label B

This would go to the gaiden chapter if the flag is on, or the main chapter if the flag is off. The “goto label B” here is the important part, causing it to skip past the other “go to next chapter” after the command to go to the gaiden.

It is also worth noting that, as mentioned above, when going to a chapter with the world map, the chapter is determined by the next World Map Node and not the command, so barring complex world map eventing that I’d rather not get into, you cannot go to different chapters with the world map based on the end event’s conditional, so you will usually have to have at least one side of the branch (usually the gaiden) go to the chapter without the world map.

3 Likes

Units in my event aren’t loading, aren’t moving where I tell them to move, and/or have weird duplicates appearing when they move.

You’re probably missing an ENUN command after one of your move or load commands. ENUN is the command that tells the game to wait until units finish moving before continuing the event. If units start moving, or load in with a movement path, and the game tries to keep doing other things before they finish, weird things can happen and your events will not work. FEBuilder has an option for “move+ENUN” as one combined command, and similar for various loads, or you can put in ENUN by itself.

How do I make multiple units move at once in a cutscene?

So, this is basically the opposite of the above issue. You’re using Move+ENUN for each individual move, so the game waits for each individual move to finish before starting the next one. To move multiple units at once, put multiple Move commands in a row without ENUN, then put a single ENUN at the end. There is a limit of 4 units moving at once. Any more should begin moving after one of the previous ones stops, but can sometimes have issues, so it’s better to only move 4 at a time and put ENUNs in between.

6 Likes

Is it OK to use this asset I found in someone else’s hack? (ANSWER: Not without permission!)

See here for the full FEU credits policy.

See here for the full FEU usage permissions and plagiarism policy.

To rip assets from someone else’s hack, whether it be art, music, maps, code, anything, without their permission is art theft and violates FEU’s plagiarism policy. If you see something in someone else’s hack that you want to use, check the Resource Repository. Anything in the Repo is Free to Use (F2U) so long as you credit its creator. If it is not in the Repo, you can try asking the artist/the creator of the hack, but until you receive permission to use it, all assets you see must be assumed not allowed.

Is it OK to edit this asset I found in the Repo? (ANSWER: It depends.)

See here for the full FEU credits policy.

See here for the full FEU usage permissions and plagiarism policy.

All assets in the Repo are Free to Use (F2U), but cannot be assumed Free to Edit (F2E). There are, however, exceptions:

  • A F2U asset that is not F2E can still be freely recolored, so long as you are not making changes beyond the colors.
  • All Animations in the Repo are Free to Edit by default.

For other resources, as before, ask the artists. Many are, in fact, openly F2E or willing to give permission by request, but simply aren’t labeled. You just can’t assume as such without asking.

How should I credit the creators of art and code assets in my WIP project? I don’t have end credits yet!

See here for the full FEU credits policy.

See here for the full FEU usage permissions and plagiarism policy.

Don’t worry, you don’t need to add credits in your hack itself before the end credits are reached. A credits document linked from your hack’s page alongside the download link is perfectly sufficient. The important part is that you credit everyone whose work you used. It’s also nice to credit people who helped you with the process, even if they didn’t directly make things. Like someone who helped you with a design issue, or who showed you how to do basic ASM. Or maybe the guy who answered all those FEBuilder questions for you on Discord, he seems pretty cool.

How do I check what patches I have installed in FEBuilder? I realized I’ve been forgetting to credit their creators!

See here for the full FEU credits policy.

See here for the full FEU usage permissions and plagiarism policy.

While people give more attention to crediting art, code assets should be credited too, including all of the many patches you install through FEBuilder. I highly recommend keeping your credits document up to date as you go, so you don’t need to go back and dig up every patch you’ve installed to compile it later. But if you’ve been forgetting, typing an exclamation point ! in the patch list search bar will show all the patches you’ve installed.

Do note: FEBuilder’s check for whether a patch is installed searches for a particular signature at a certain place in the code of your ROM. That signature is often the same for different versions of the same patch, so all the versions read as “installed” even though you only installed one of them. So don’t be surprised if you see multiple versions of the same patch pop up as “installed” when searching this way.

4 Likes

My character’s portrait is getting cut off at the edges when I import it.

Your portrait is likely getting cut off by what’s known as the hackbox, an area of the portrait image that isn’t actually usable normally. Here’s some standard templates that show it:

correct portrait alignments image portrait template

Those areas in the upper-left and upper-right of the portrait box can’t actually be used in vanilla. But if needed, there is a patch to allow you to exceed the hackbox by a bit:

Patch Name:Exceed The Portrait Hackbox By 4 Tiles @FE8U
Author / Source:tiki [FE7] Exceed the Portrait Hackbox Compatability:aera

How does the Exceed Portrait Hackbox patch work?

The exceed hackbox patch doesn’t fully eliminate the hackbox, but it allows you to go a bit outside of it. Specifically, it gives you two extra 16x16 squares you can position outside its bounds. Here’s how you set it up, using an example from my hack.

(Note: installing this patch does not have any negative effects on preexisting portraits, nor does it require making any changes to their settings. There is a field you have to enable on a given portrait for it to use the exceed tiles in the first place, which defaults to off.)

You have to break the area that clips out of the hackbox into two 16x16 tiles aligning to an 8x8 grid, much like how mouth and eye frames do. You know how there’s an unused space in the bottom-right of a portrait image? You put those two tiles there.

image

Once you import the portrait, set “mug_exceed” to 1 to make them appear and access the settings to move them around. Set the coordinates so they align as needed.


And there you go! Your portrait now fits where it previously couldn’t.

Worth noting: you can extend a portrait to the right with this! It won’t show in Builder’s preview, but you can place the tiles out of bounds to extend a portrait to the right of the hackbox.

Also, an exciting piece of tech: the coordinates the patch uses are actually read as signed values in 2’s complement. What that means is 255 is -1, 254 is -2, 253 is -3, and so on. This means you can actually extend up and left too!


Hair extension added with two tiles at Y=254, aka Y=-2

7 Likes

Thank you so so much for this. I could kiss you right now. This is a godsend.

3 Likes

I’m having trouble understanding the AI settings in the Unit Placer. How do I make an enemy rush you, wait until you’re in range, not move at all, steal treasure, run to escape, etc.?

In the Unit Placer, you’ve probably noticed how each unit has multiple different components to their AI.
AI1 and AI2 define how a unit will attack and move. Usually, AI1 controls attacking, and AI2 controls moving. AI1 will always take priority over AI2, so if you have AI1 set such that the unit will attack anything in their range, they will move to attack something in their range even if AI2 says “do not move”. If AI1 does nothing, the game then defaults to AI2.
AI3 has two components: healing AI, which controls when an enemy will switch to healing mode and seek out healing, and targeting AI, which determines how a unit chooses who to attack.
AI4 has to do with whether or not enemies are fully stationary, and determines whether a unit in healing mode will run away or not.

Now, I won’t go over every single AI setting here, but generally speaking, the important ones are:

AI1
“chance of action 100%” means they’ll move to attack anything in their range, or take other actions available like using staves. This is the most common AI1 setting.
“chance of action 100% attack only if adjacent” means they’ll only attack if they can do so without moving. This is mainly used for stationary enemies. If you put it on an enemy with a moving AI2, the result will be that they either move OR attack, but not both.
“do not act (move only)” means they won’t attack at all. Use this for units who are moving towards objectives without attacking, like running thieves.

Anything with chance of action less than 100% and greater than 0% should probably be avoided, it causes the enemy to have a random chance to do something or not do something and is very frustrating to the player as a result. (“Why did that enemy not attack me last turn but attack me this turn?!”)

For the love of Naga do not use “attack if in half range”, it’s extremely deceptive. Enemies on this AI will only attack if there is a target reachable within half their movement range – HOWEVER, if there is such a target, they will move to attack anyone within their full movement, not just the unit(s) within half range. There is no way for a player to naturally tell that an enemy will only move once you’re within half their range, and even if they know that, they likely won’t know that getting within that range will cause the enemy to move full move to attack.

AI2
“move towards enemy” is aggressive AI, and will rush towards you.
“do not move” is “wait in place until AI1 tells me to do something”. Combining it with attack-only-when-adjacent AI1 is how you make stationary enemies, while pairing it with the normal “chance of action 100%” is how you get enemies that wait until you’re in range.
“if possible to attack in 2 actions, move towards enemy” will cause them to only become aggressive once they can reach a target in 2 turns from their starting position.
“wait one turn, then set AI2 to 00” will stand still for one turn (unless AI1 says to do something), then switch to rushing the player.
Most of the rest here are self-explanatory – go after villages and chests, move to destroy walls and snags, run to the escape point, etc. Remember that AI1 takes priority, so an enemy set to attack will prioritize attacking the player over breaking walls or stealing treasure.

A note on “move to escape point”: this obviously requires an escape point on the map. Escape points for enemy units and NPCs are set separately on a per-chapter basis. You can find the escape points editor linked from the Chapter Editor, in the bottom-left corner.

AI3 Healing AI
The thresholds you set here determine when healing AI activates and deactivating. Each setting has an recovery mode activation threshold and a return/deactivation threshold, with healing mode activating once a unit falls below the activation threshold and deactivating once they’ve regained enough HP to be above the deactivation threshold. Enemy healers will only heal targets who have activated their healing AI, and enemies will only use Vulneraries if their own healing AI is activated. Enemies with activated healing AI will run away towards sources of healing, or run away to use their healing items, only if they can get out of the player’s range while doing so.

AI3 Target AI
These change how the enemy prioritizes who to target when they have multiple targets in range. The parameters can be tweaked if you know what you’re doing, but my honest recommendation if you don’t have a specific reason for messing with this to just use the standard one, setting 08 “PrioritizeLowHP” (formerly labeled as “PrioritizeDamage (Standard)”), which is the typical “target the unit I can do the most damage to” behavior you’re used to in the GBA games. There’s more detailed documentation out there if you want to get into the details.

AI4
In short: use “Retreat” if the enemy can move, use “Don’t Retreat/Boss AI” if the enemy can’t move.

“Retreat” is used for normally-moving enemies, and will cause them to retreat towards healing when AI3 healing AI activates. They will retreat towards healing tiles or enemy healers, or simply run away while trying to use a vuln. However, they only retreat if they can get out of the player’s range while doing so, hence why you don’t see enemies constantly running away when on low health.

“Don’t Retreat/Boss AI” is for stationary enemies ONLY. It causes enemies to not retreat towards healing when their healing AI activates, but still be targeted by healers and use healing items without running away. It’s also what’s used to nullify movement range display with SkillSys – setting AI4 to this setting with SkillSys installed makes an enemy entirely unable to move or be moved, and will display as such when checking their range. Without SkillSys, it doesn’t fully prevent moving, but setting it for a moving enemy has weird and unpredictable results including not attacking, so you should not to set it for an enemy that isn’t stationary.

Common combinations:
“Rush the player”: AI1 chance of action 100%, AI2 move towards enemy, AI4 retreat
“Wait until something’s in my range”: AI1 chance of action 100%, AI2 do not move, AI4 retreat
“Stationary, never move, attack things that get close”: AI1 chance of action 100% attack only if adjacent, AI2 do not move, AI4 Boss AI
“Steal treasure then run away, no attacking”: AI1 do not act, AI2 attack villages/treasure then move to escape, AI4 retreat
“Attempt to destroy villages, but attack if there’s a target”: AI1 chance of action 100%, AI2 attack villages/treasure then move towards enemy, AI4 retreat
“Escape without doing anything”: AI1 do not act, AI2 move to escape point, AI4 retreat
“Stand still and do nothing”: AI1 do not act, AI2 do not move, AI4 Boss AI

5 Likes

The text box in this conversation is glitching out. It’s extending off the edge of the screen and wrapping around, and the text isn’t all showing up. What’s wrong?

This kind of error is usually caused by exceeding the maximum text width. Usually, Builder will give you a warning when your text is getting too long, so please, as with any warning Builder gives you, listen to those warnings when they show up. However, actually exceeding the maximum width on one line isn’t the only way to exceed the maximum width. My most likely guess for what’s actually happening for you is that you have a character talking twice back to back from the same position, without closing the text box in between. What does that mean? Here’s an example:


In this edited version of FE8’s opening, Seth speaks twice in a row from the same portrait position in two separate “character talks” commands, resulting in the screenshot above. The game doesn’t actually close the text box in between, and instead tries to continue the next text right where it left off, exceeding the maximum width in the process. The game looks ahead to calculate the text box width based on the longest line before it closes, and this doubled-up line spills over.

You may be thinking “well, I don’t have anything like that going on. Why would I ever split it into two text blocks like that?” Well, it’s a little trickier than that. These all produce the same result:


Gilliam’s portrait here is being loaded in the same position as Seth’s.

None of these actually close the active text box. Only having a different position speak or erasing the active position’s portrait (not moving to a different position, not loading a new portrait in that slot, specifically erasing that position with the erase command) will do it inherently. However, there is something you can do to tell the game to close the text box: [CloseSpeechSlow]. The [CloseSpeechSlow] command can be inserted in text, usually at the end after the [A] wait for button press, to close the active text box, like so:

And now it works properly!

4 Likes

How do I make weapons only usable by one unit/class? How do vanilla weapon locks work?

There are two methods of making weapons restricted to specific characters and/or classes: the vanilla weapon locks, and the WeaponLockArray patch included with SkillSys. Let’s start with the vanilla method.

On every weapon, unit, and class, you’ll find checkboxes at the bottom for various “locks”. Eirika lock, Ephraim lock, etc. You can check any number of these for a given item, unit, or class. There are seven of them in total:

  • Eirika Lock, which by default is used for the Rapier and Sieglinde, and for Eirika’s Lord and Great Lord classes
  • Ephraim Lock, which by default is used for the Reginleif and Siegmund, and for Ephraim’s Lord and Great Lord classes
  • Lyn Lock, which is unused in vanilla FE8 but fully functional
  • Athos Lock, which is unused in vanilla FE8 but fully functional
  • Weapon Lock 1, which is unused in vanilla FE8 but fully functional
  • Myrmidon/Swordmaster Lock, which by default is used for the Shamshir, and for the Myrmidon, Swordmaster, and Assassin classes.
  • Monster Lock, which by default is is used for monster weapons and monster classes.

Monster Lock has additional hardcoding to it, however. First of all, it hides weapon stat displays, which can be fixed with this patch:

Patch Name:Monster Weapon display fix @FE8U
Author / Source:Brendor FE8 Monster Weapon Display Fix

It also, however, disables Hammerne use, regardless of whether the “disable Hammerne” checkbox is checked, and WEXP gain, regardless of the weapon type or set WEXP value.

Any weapon with one or more locks checked can only be used by a unit that has those same locks set somewhere between their unit data and their class.

So, for example, here I have the Twilight tome with the Eirika Lock and Ephraim Lock checked. It can only be used by a unit who has both Eirika Lock and Ephraim Lock checked on either their unit data, class, or both. (Can also be one of the locks set on the unit and the other set on the class, I think, so long as they have both when combined.)


Here, this unit, Elys, has no locks set to her character data. However, her Lord class has both the Eirika Lock and Ephraim Lock checked. Therefore, as long as she is in that class, she can use the Twilight Tome.

Usually you’ll only need to use one lock at a time. Ex. vanilla just has Eirika’s prfs locked to Eirika Lock, with the lock set for her classes. But if you need a lot of different prfs, you can combine the different locks to get more different combinations (I currently use two at a time in my hack, so Eirika-Ephraim, Eirika-Lyn, Ephraim-Lyn, and so on). If you need even more than that is where the patches come in.

I need more weapon locks. How does SkillSys WeaponLockArray work?

The SkillSystem includes a function called WeaponLockArray, which can be accessed from the patches list. It allows you to create as many different weapon locks as you could possibly need, with the ability to define locks for character sets or class sets, as well as “hard” variants (only the specified characters/classes can use it) and “soft” variants (other units can use them but require a weapon rank, while the specified characters/classes can use the weapon as if it were rank E).

Be warned that WeaponLockArray is broken in some older versions of SkillSys. If you’re using an older version it may not work at all, and soft weapon locks may still be nonfunctional even in the current Builder SkillSys version. The multiple locks method described above always works and should give enough locks for most hacks.

NOTE: The “Show Prf only” checkbox in the Item Editor must NOT be checked when using WeaponLockArray to lock a weapon, otherwise the weapon will be unusable. Don’t ask me why, I don’t know.

To lock a weapon with WeaponLockArray, you first have to create data for a weapon lock. With SKillSys instealled, find “WeaponLockArray SkillSystems” in the patches list to bring up the editor. Choose one of the “EMPTY” slots in the array and click “Allocate New” to create new data. Once data has been created, you can click “WeaponLock” next to the address to get to the editor for that entry.


Within that editor is where you set the specifics. The first entry defines what type of lock this is. Enter a 0 for soft character lock, 1 for hard character lock, 2 for soft class lock, or 3 for hard class lock.

The rest of the entries in the list are the IDs of the units or classes you want to be able to use this weapon.

Finally, back in the Item Editor, in the bottom-right, you’ll find a field to set the ID of which WeaponLockArray entry to use.

If you have a version of SkillSys with functioning WeaponLockArray, the weapon will now behave according to the lock data you set up.

Can I apply weapon locks to items and staves as well?

Yes, with this patch:

Patch Name:Enable Locked Weapon Prf constraints on staffs and items as well. @FE8U
Author / Source:7734 Originally by Tequila, jjl2357

Do note that this will not work for Lockpicks, and by extension it may not work for keys. But it does work for staves, dancer rings, and standard items used with the Use command. I also do not know if this works with WeaponLockArray or only with vanilla weapon locks.

7 Likes

My custom class is playing the wrong sound when it moves, how do I fix it?

In the Advanced Editors window, you’ll find the Movement Sounds editor, which has a list where you can change the footstep sounds of each class. However, vanilla doesn’t actually read from this list in a way that’s easily understandable and editable. Apply the following patch to fix it:

Patch Name:Fix PlaySoundStepByClass HardCode @FE8U
Author / Source:7743

Once you do that, go to the Movement Sounds editor, click Data Expansion to expand the list, and set the footstep sounds for each class accordingly. Beware: some of the vanilla classes will be set incorrectly in the list after applying the patch, so double-check to make sure it’s all set right!

5 Likes

I’m having trouble finding a patch in the patches list. What’s the name of the patch? (Tips for using Builder’s search function.)

Please. I don’t have patch names memorized. No one does. When I give you the exact name of a patch, I’m using the search function to find it, which means you could just use the search function yourself. But since people seem to struggle with this frequently, here’s some tips:

  • Search for relevant keywords, like “support”, “supply”, “event”, “background”, or “heal”. The search function in the patches list searches both names and descriptions, so you don’t need to match the exact name. Focus on using words that you know will appear in it.
  • Keep your search phrases short. The search function looks for things that match everything you tell it, and it doesn’t necessarily recognize synonyms. If you can’t find a conditional support-preventing patch with a search like “prevent support”, cut the word “prevent” and just search “support”. A less-restrictive search will find more results, while still narrowing the list down to a length you can scroll through. (You’ll find that the patch in question is called “prohibit support”, in this case.)
  • Try a few times with different keywords. Just because it doesn’t come up the first time doesn’t mean it’s not there, it might just mean you searched for the wrong keyword. Try different words related to what you want. (Of note: a good amount of FEBuilder was translated from Japanese to English through machine translation, hence some oddly-phrased names that can take a few tries to hit.)
  • As you get more familiar with the patches, you may start to notice patterns in how they’re named, such as anything that adds an event command having “Add Event” at the start of the name, or all of the patches that fix spell animation sound effects starting with “fix sound”. You can use those as search terms.

Additionally, next to the search bar is a button labeled “Filter”, which allows you to filter the list to only show patches with certain tags. You can also run these searches by typing the tags manually as part of your search.

The tags are:

  • ! for already-installed patches.
  • #IMAGE for images, like the stat screen background. Certain standalone images are accessed and inserted from the patches list instead of other editors.
  • #SOUND for audio, like setting the background music for various parts of the game.
  • #ENGINE for patches that modify the game engine – this one’s not too useful as a search because it applies to so many things.
  • #EVENT for patches that add event commands.
  • #ESSENTIAL or #ESSENTIALFIXES for patches that apply important bug fixes and the like, most of these are things you should just install in general.

If you really can’t find a patch that you know exists, ask and someone can probably help you find it, but it saves everyone’s time if you can find it yourself.

5 Likes

I hear certain flags have special effects when enabled with SkillSys. Which flags do what? Which are safe for me to use?

Global Flag 0xEE disables pop-up damage numbers in battle animations.
Global Flag 0xEF enables Fixed Growths Mode, which removes randomness from player leveling.

While not included in all versions of Builder’s default SkillSys, one version of the Casual Mode patch uses Global Flag 0xB0 to enable Casual Mode, and I hear the GitHub version of SkillSys bundles this in.

Also not a SkillSys function, but there is a patch that uses Temporary Flag 0x27 to make green units hostile to the player, so if you’re considering wanting that functionality in your hack, avoid Temporary Flag 0x27 as well.

Aside from that, any flag named “Temporary Flag XX” or “Global Flag XX” is unused in vanilla, and I can’t remember any other major patch conflicts – but of course, make sure to check patch descriptions.

5 Likes

How do I change chapter titles? I changed the chapter title, but it’s still showing the vanilla title in the chapter intro.

The vanilla chapter titles are stored and displayed as image files, so whatever you type as the “chapter name” in the Chapter Editor is not actually used for them by default. You could edit those images if you want to do something fancy… but if you don’t want to take forever and don’t mind using the vanilla chapter title font, there’s the Convert Chapter Titles to Text patch.

There are two versions of the patch. Version 1 will just display whatever you’ve set for “chapter title” in the Chapter Editor and only whatever you’ve set there, meaning if you want chapter numbers you have to include that there. Version 2/2.1 will also add in the chapter numbers, with an editor in the patches list where you can designate specific chapters to display something else in place of the numbers (ex. “Prologue” or “Final”).

How do I change the prologue to instead say chapter 1? I’m using chapter titles as text but it won’t show the number.

Chapter titles as text v2/2.1 has an editor where you set alternative displays instead of numbers for specific chapters. By default, it starts with entries for prologue and final. Find the patch’s editor in the patches list to change/remove these entries.

5 Likes

What do the different unit load commands do?

As you may have noticed, there are quite a few different unit load commands in the event editor, and they all do slightly different things. Most of these commands use one of three different load types: LOAD1, LOAD2, or LOAD3, which you’ll see in parentheses at the end of the command description.

LOAD1 commands are generally used for loading units who are actively involved in gameplay. It’s used for loading player units who join the party, and enemy/NPC units who start on the map. The primary LOAD1 command is “Load units and move. If player unit, join party (LOAD1+ENUN)”.

LOAD2 commands are generally used for loading specific units in cutscenes. Player units loaded with LOAD2 will not join the party (though of course, it won’t remove units who are already in the party), so it’s useful for when you need to show blue NPCs. The primary LOAD2 command is “Load units and move (LOAD2+ENUN)”.

LOAD3 is a bit different, and its name in FEBuilder, “load player units for cutscenes”, is a bit misleading. Like the other LOAD commands, LOAD3 takes in a unit group, but the units loaded will not actually be the ones shown in the Unit Placer. Instead, LOAD3 will load the first X units of the player’s current party, based on recent deployment order, in order of the slots in the Unit Placer list. This can be useful for cutscenes where you need to show a large group of the player’s units but don’t need to specify which ones in particular.

In most cases, you will use variants of LOAD1 and LOAD2 to load groups of specific units. If you are loading units to appear on the map in gameplay, or if you want units appearing in a cutscene to join the player’s party as new recruits, use LOAD1. If you are loading units purely for cutscene purposes, use LOAD2.

The one other load command to be aware of (which probably uses one of LOAD1 or LOAD2 internally, but I don’t know the specifics) is the “Load reinforcements” and “Load reinforcements (Hard mode only)” macros. These commands should be used in all cases where you load enemy reinforcements during a map. The big thing that sets them apart from the other load commands is that, as units load in with these macros, the camera will automatically pan to show where they’re loading. This may seem like a minor detail, but it’s extremely important to do for the player to be made aware of reinforcements showing up. If you’re thinking “haha I’ll not do that to make it a surprise”, no. Stop. Don’t. That is simply bad design. The reinforcements are visible information anyway, don’t make your game intentionally obstructive to the player’s ability to play.

How do I make the camera pan to show reinforcements as they appear?

See paragraph above.

How do I make a unit appear in map events even if they died?

There’s a table you can find in the patches list called the “IsSethLArachelMyrrhInnes Table”. Any unit included in this table will be loaded with LOAD2 even if dead. It got the name because those four units – Seth, L’Arachel, Myrrh, and Innes – are the units in vanilla FE8 who display this behavior.

(For dialogue-only scenes, nothing in the text engine checks the living status of the unit a portrait belongs to, so you don’t need to do anything special there unless you want a unit to not show up when dead, in which case you’d need a CHECK_ALIVE conditional and alternate text entries.)

4 Likes

FEBuilder got stuck on the wrong language, how do I change it back?

The buttons are still in the same place even if you can’t ready them, so follow along with these images.

  1. Open FEBuilder and open a ROM. If you’ve already done this before, you know which button to press even if you can’t read it, but if this is your first time you’ll want the second button on the launch screen, which will prompt you to choose the ROM file with your computer’s file explorer (which should already be in your language):

  2. On FEBuilder’s main menu, navigate to the Options window from the Settings dropdown. Settings is the last of the four menus at the top of the screen, above the top row of buttons, and Options is the first choice in it:

  3. In Options, go to the final tab, Function 3, where you’ll find the setting for FEBuilder’s display language as the first choice in the bottom section. Change it to your preferred language, then click the save button at the bottom:

  4. Close and reopen Builder for the change to take effect.

5 Likes

Is there a place to see all the commands I can use in text/dialogue?

Yes, right-click in the Text Editor and click “Script Notation”. It’ll bring up a searchable and categorized commands list much like the one for the Event Editor.


10 Likes