Greetings! I’ve been a composer for 20 years, and in addition to working on various game soundtracks on my own time (including the soundtrack to my own romhack), I’m currently on the music team for another romhack, Hearts that Bleed, which you may have seen on here. Not only have I contributed a handful of songs to the soundtrack, but I have been helping the rest of the music team in terms of optimizing and cleaning up their MIDIs.
To this end, I wrote up an instructional document for the other composers to use, but one of the lead devs suggested I post it here as a tutorial… so here’s that! I hope it helps you as much as it’s helped my fellow HTB composers.
Before you begin, keep in mind that this tutorial was based on an instructional doc written for composers writing original pieces for a fully original soundtrack, not from the POV of someone looking to insert/port MIDIs from other games or that other people have already written and prepped.
What you'll need
In addition to Anvil Studio, you will need mid2agb and a DAW (digital audio workstation), or some kind of MIDI editor that lets you view a list of all MIDI events. I use Logic Pro, but that is mac-only and not free. I’ve heard good things about Reaper, so that might be worth looking into. But because of differing DAWs (and thus differing interfaces), the precise steps might be different. The purpose of this is to outline what needs to be done, so that you can know what to look for in your MIDI editor/DAW of choice and have a better idea of how to achieve the same results.
Step 0: Polyphony
This is probably the most important bit for how your song will sound in-game. With the 16 instrument 12 note patch, you will be able to assign up to 16 instruments, but you will only be able to have 12 notes playing at once (your polyphony). When writing a song with GBAFE in mind, BE SURE TO NEVER HAVE MORE THAN TWELVE NOTES PLAYING AT ANY GIVEN TIME, or tracks will start getting cut off and not play.
Step 0.5: General Tips
This is more of a “things to keep in mind for the purposes of orchestrating and instrumentation” than anything else.
Due to the polyphony issue outlined above, you’ll generally want to avoid doubling (the same notes) across multiple instruments unless you have the room and/or you deem it necessary for the “spirit” of the song.
Similarly, unless you’re dealing with piano (or another keyboard instrument), strings, or drums, you’ll generally want to avoid having instruments play multiple notes simultaneously. Triple stops on strings are a thing, obviously, but I tend to advise to keep realistic playing capabilities for an instrument in mind (though “realistic” is, of course, entirely relative). This is, again obviously, less of an issue when you’re not writing for real instruments and instead for GBAFE, but it’s just a stylistic thing I like and/or tend to insist on. It also helps with keeping your total polyphony down, and you generally don’t need to play chords/multiple notes within an instrument that’s normally monophonic if you can use multiple different instruments to outline/play a chord instead (plus, that just sounds better anyway).
Also, and I WILL touch on this again later, use a drum kit for as much of your percussion section as you can! This will save you MOUNTAINS of headache when it comes to getting your songs ready for insertion! Things like tambourines and the like can be their own tracks, but if something you want to use is in a kit, USE THE KIT! With a kit, you can be more assured that your percussion voices will be internally consistent.
Related, but I HIGHLY recommend using the kick drum in the drum kit for your bass drum part, if you aren’t a stickler for that deeper booming sound. This will save you the trouble of having to fix the Sleigh Bell Problem™ manually (I will address this next)!
And speaking of drum kits, drumpart 124 has more of a rock feel whereas drumpart 127 has more of an orchestral feel. This is especially evident in certain voices, especially bass drum(s).
Step 0.6: The Sleigh Bell Problem™
Certain bass drum voices are assigned to a sleigh bell in drumpart instruments for some godforsaken reason. I don’t know why. For easy reference, note C3 (MIDI number 36) is a working bass drum (bass drum 4) in drumpart 127. If you encounter the Sleigh Bell Problem™, shift all your sleigh bell notes to C1 in your MIDI editor/DAW of choice, and for some reason, Anvil and FEBuilder will interpret it as a C3. If this doesn’t work, you’ll have to edit the problem notes yourself. Bam. Problem solved.
Step 1: Events

Here’s a screenshot of what Logic Pro’s interface looks like. See the four icons in the upper right? The first of those opens the event list for the currently-selected track, so you’ll want to look for something similar. The event list itself is outlined in red here.
MIDI events can include notes, obviously, but they also encompass things like instrument assignments, controller events like reverb and pan, and various other things that are basically irrelevant. Of particular note, though, is…
Step 2: Channel Assignments
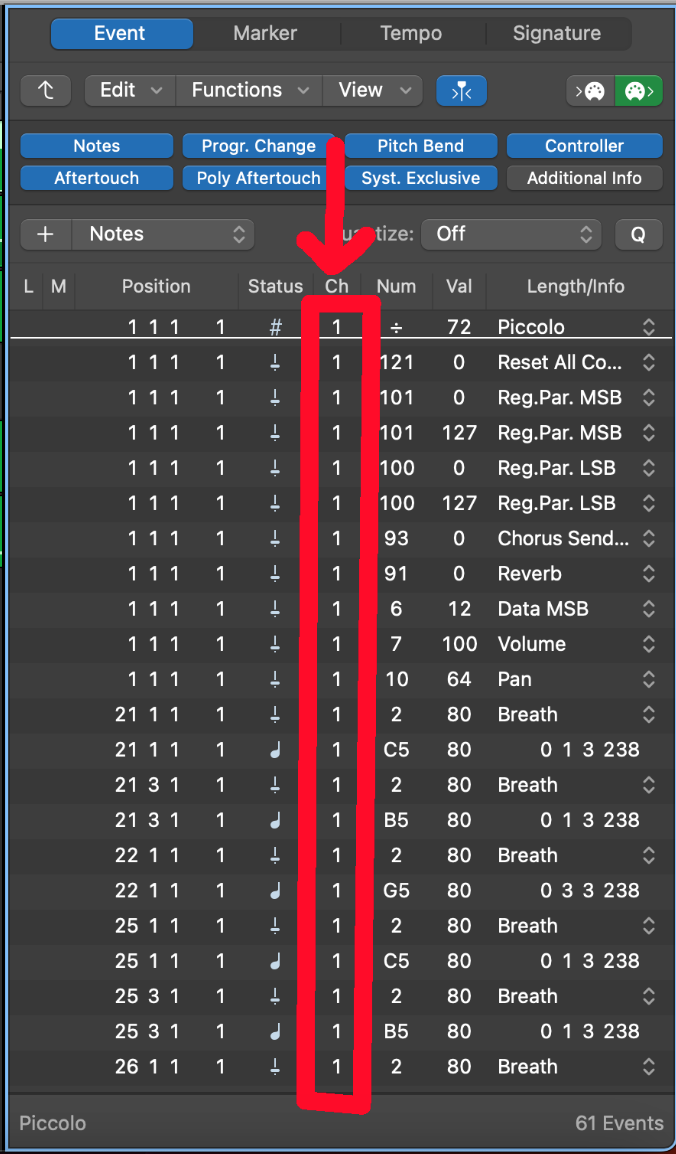
This column here indicates what MIDI channel all of these events actually correspond to. Sometimes, by default, it will be the same as the instrument order, but sometimes there will be extraneous channels assigned to a given instrument (and, in rare cases, multiple instruments per channel), and we DO NOT want that, as FEBuilder wants one instrument per channel when assigning instruments in the FEBuilder track editor.
Your objective, then, when managing channel assignments, should be to ensure that EACH INSTRUMENT HAS ONE CHANNEL ASSIGNED TO IT, AND THAT A GIVEN CHANNEL ASSIGNMENT NUMBER IS ONLY USED FOR ONE INSTRUMENT.
Step 3: Initial Prep
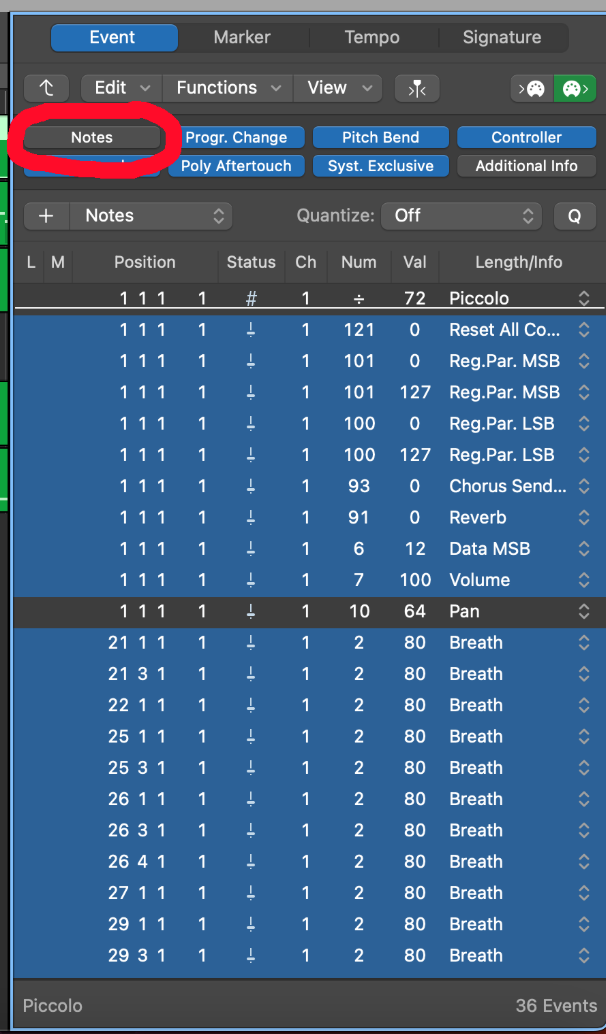
The first thing you’ll want to do in the event list is to get rid of all your extraneous events—stuff you won’t need when importing. FEBuilder only cares about instrument assignment and pan (and reverb and volume, but those are handled by the game engine and have nothing to do with the values assigned in your MIDI events). Start by selecting everything except your notes, your instrument event (called “Program Change” in MIDI terms), and your pan event, and DELETE IT. It will often be easier to do this if you (assuming your MIDI editor of choice has the option) select an option to hide note events, so you can more freely select unnecessary events that might be in-between.
If, of course, you write a song that relies on events such as pitch bends, then obviously keep those. But the fewer extraneous events you have to deal with, the easier it will be to troubleshoot if something doesn’t sound as expected.
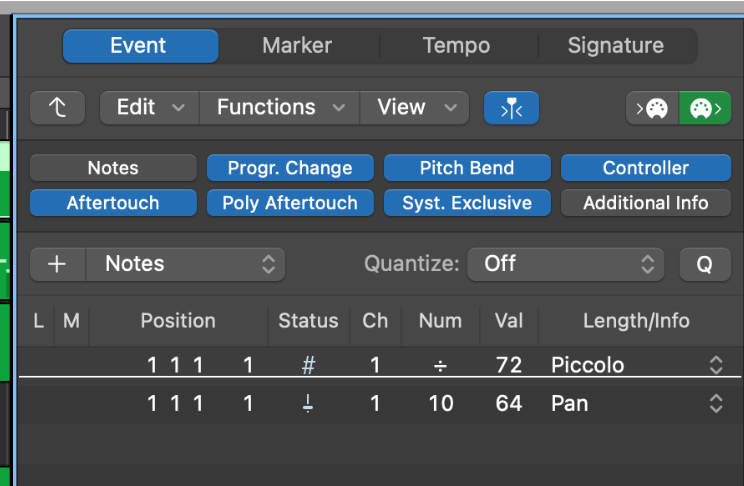
After you’re done with this, your event list, minus notes, should look like this:
Step 4: Note Value (including panning)
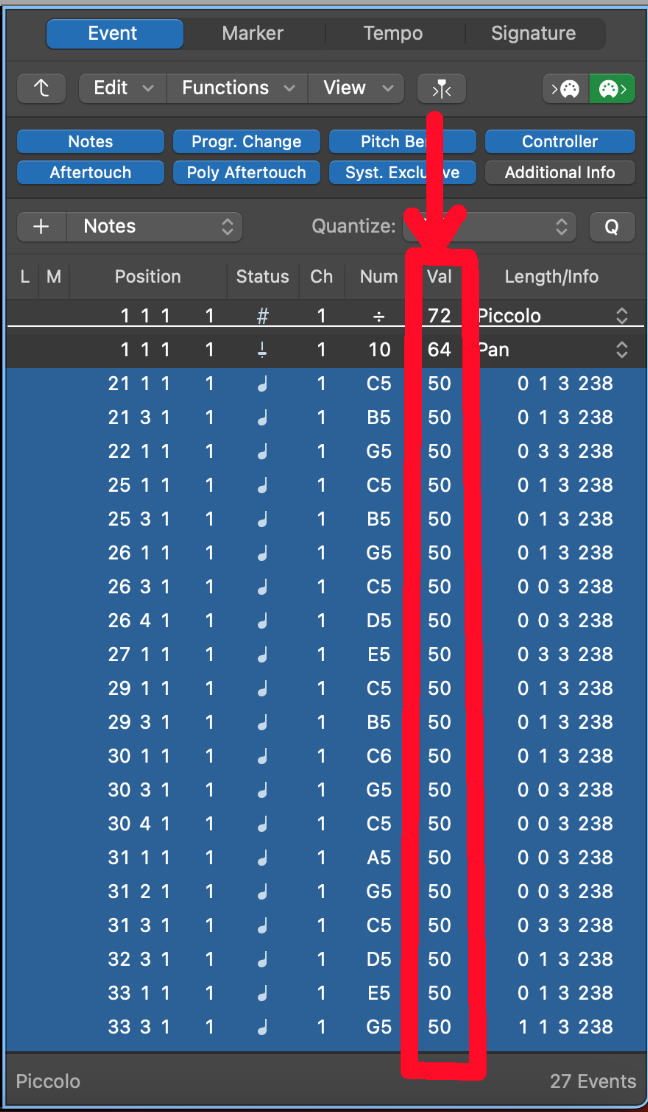
Next, take a look at this column. This is for the VALUE of your events, and generally, this will go from 0 to 127. For instrument assignments (Program Change) events, this will correspond to the instrument itself.
For pan, it will correspond to the pan position, with 0 being hard left, 64 being center, and 127 being hard right. You can manipulate this from within FEBuilder, but I like to do it in my DAW, before exporting the final MIDI. Panning is (obviously) pretty important, especially for preventing instruments from being muddied together, so consult an orchestra seating chart or use any method you wish to determine the optimal panning setup to suit your needs.
My general process for panning is to pan everything according to orchestral positioning, such as in this chart:
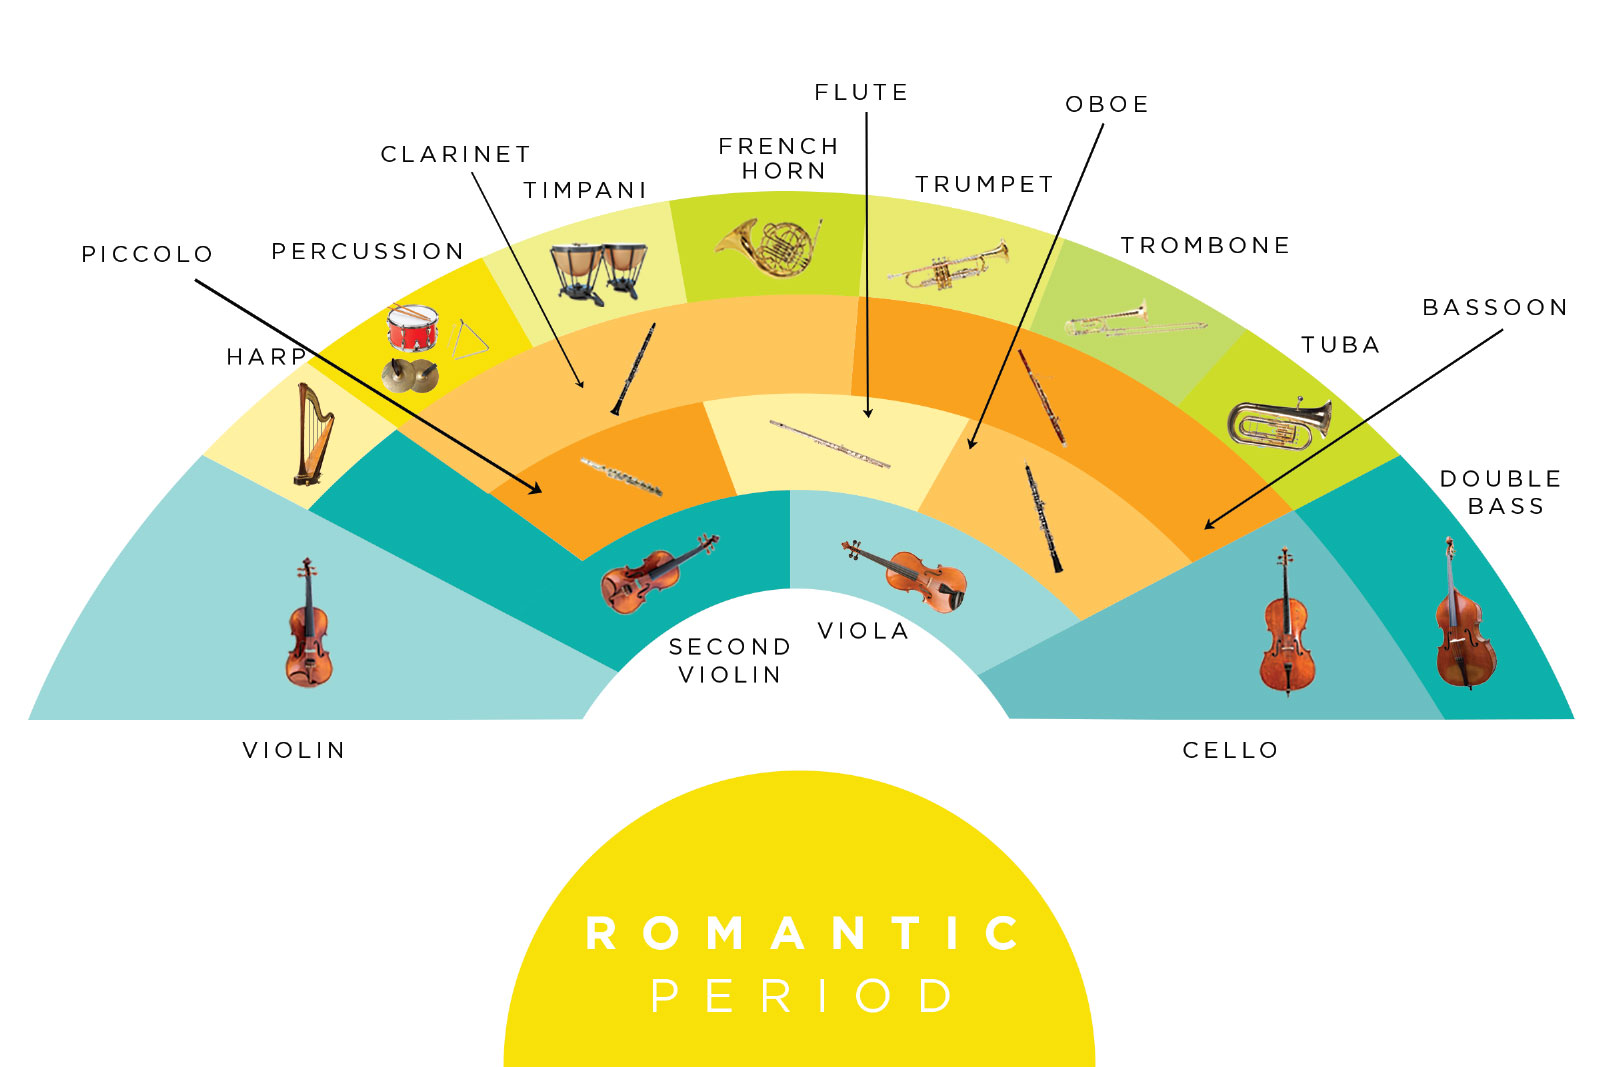
However, generally I like to modify this slightly, with piccolo and violin both being leftmost, then flute → oboe → clarinet → bassoon, timpani mid-right, percussion kit dead center, etc. Mostly this chart exists to give you a baseline for consistency’s sake. My general tip is that your leftmost panned instruments should be around 20, and your rightmost instruments should be around 100. Hard left/right pan (0 and 127) should only be done if you’re aiming for a specific (weird) effect. So, piccolo/violin around 22, flute around 35-40, oboe around 55, etc. etc. Use your best judgment according to what you think sounds good!
Anyway, importantly, for notes, the value corresponds to volume. When you import a MIDI into an editor, there will be a default value (if you haven’t set dynamics in your notation software), and generally, from what I’ve found, this is almost always 80 for mf. You’ll want to select all your notes and lower the baseline note value to ~50 (with percussion being around 55, just for audibility). By baseline, I mean your mf dynamic should be around 50. Weird things can happen in-game if notes are too loud, such as quantizing issues (which might also/instead come from somewhere else? I’d have to do further research), and I have no idea why.
You can, of course, skip this volume/velocity step and simply adjust in FEBuilder instead. I haven’t found any noticeable downsides to doing this. As long as you account for your track volumes in FEBuilder being around mid-70s on import (see the “Anvil” step), you should be fine (as in, you’ll have to take higher note values into account when adjusting volume; see the next paragraph). But you’ll still (OBVIOUSLY) need to keep dynamic ranges in mind. Notes shouldn’t be too far apart in terms of dynamic, because anything that gets lowered, whether it be note values in an event editor (by changing the values of all notes at once, as mentioned above) or volume in FEBuilder (I’m still not 100% sure on whether volume in FEBuilder is treated as flat or as logarithmically percentage-based like volume adjustment on actual audio is), lowers everything equally. Keep this in mind when implementing dynamics.
Also, this might be obvious, but track volume and note value are NOT the same thing! If you forgo note value adjustment in your DAW/MIDI editor, you’ll still have to account for that when adjusting levels in FEBuilder!
Step 4.5: Adding Events
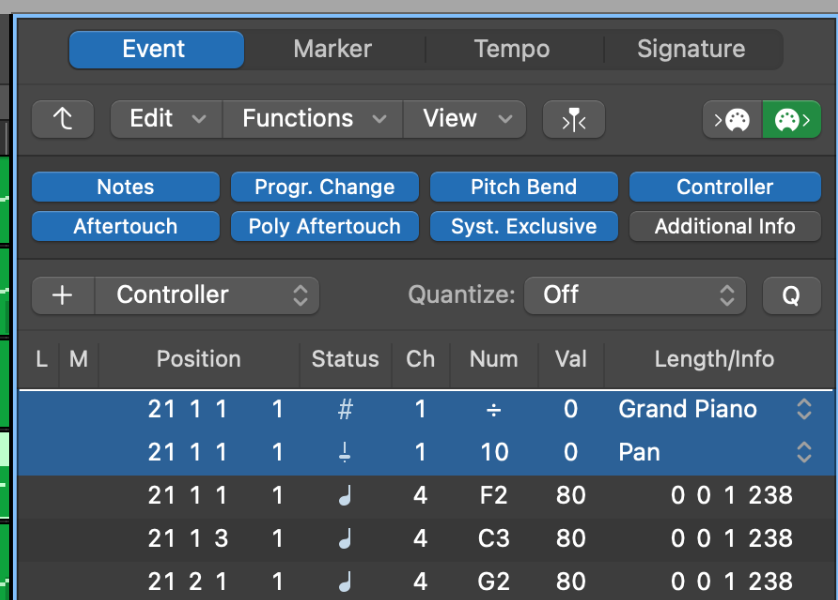
This might not be necessary depending on the notation software you use, but I use Musescore Studio and Musescore does this thing where it separates the RH and LH piano staves (and other keyboard instruments, like harpsichord and organ) into separate MIDI tracks and doesn’t put anything except for notes in the LH. You’ll need to add (in Logic Pro, it’s the + button in that screenshot) a pan event, which is classified as “Controller,” at the beginning of the list (which should be the position automatically if the playhead is at the beginning of the song) and set the value to whatever pan position you want, and if you want to change the instrument assignment within FEBuilder (which, unless you know you’ll want to keep it as the default grand piano, you’ll prooobably want to do), you’ll need to add a Program Change event (for instrument assignment). FEBuilder changes instrument assignments by editing the Program Change event directly, so without a Program Change event, FEBuilder can’t assign an instrument and will default to 0 (which is Grand Piano).
Step 4.6: MIDI Regions
This is one that’s bitten me in the ass a few times, so I figured I might as well caution you.
Remember how, in the last step, I mentioned how keyboard instruments (or anything with two or more staves) love to get separated into multiple instruments? In all but the first of those for each instrument (so, in the left hand for piano, harpsichord, organ, etc.), notes that are sufficiently far apart can get separated into multiple MIDI regions, each with their own event lists. This, of course, will depend on your MIDI editor/DAW of choice, but if it does happen, you may have to click on every MIDI region in a track to edit the events for each of them. When you follow the next step (step 5) for making sure channel assignments match the corresponding instrument’s position in the instrument list, if you neglect to correct the channel assignments for subsequent MIDI regions in a track, those notes will receive instrument assignment data from another channel’s instrument assignment (whichever channel corresponds to the channel assignment in that MIDI region), even if it’s not the instrument that the MIDI region is directly in.
Step 5: Channel Assignments, part 2
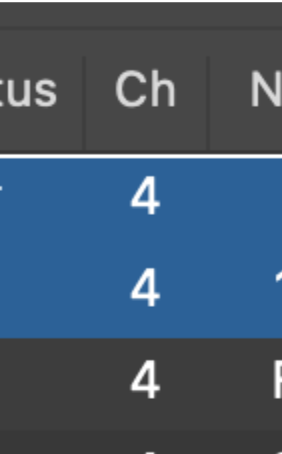
Remember earlier, when I said that you’ll want to make sure that each instrument corresponds to a single channel assignment and that each channel assignment is only used for one instrument? If you had to add any events as in step 4.5, this is where that matters. You’ll have to make sure that the channel assignments for your non-note events and your note events are the same—otherwise, FEBuilder will interpret certain things (like instrument assignments) as belonging to a different channel, and you won’t be able to edit instrument assignments properly in FEBuilder.
Step 6: Oh No
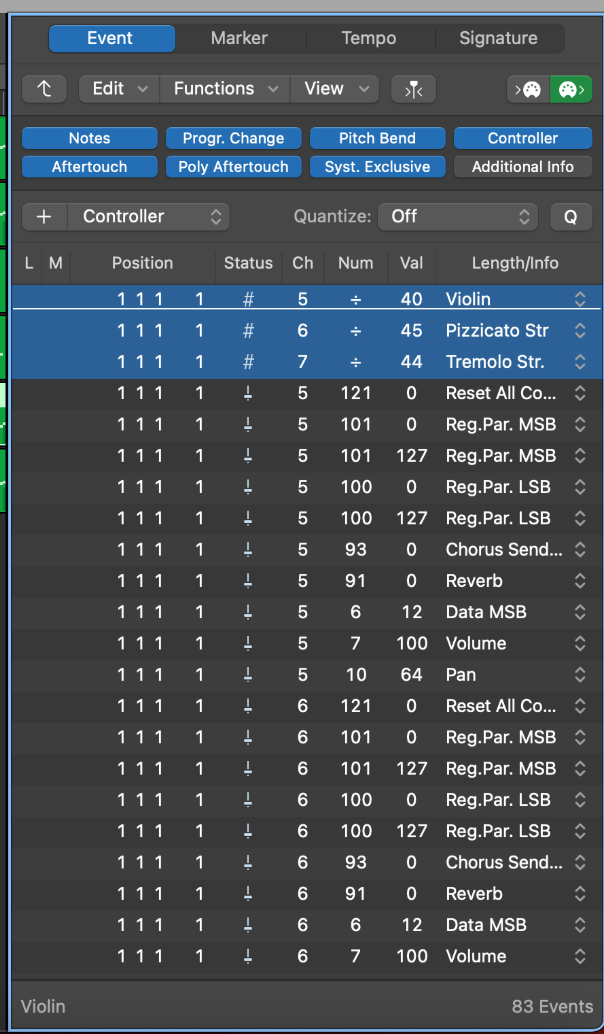
This is where it gets annoying.
Certain instruments tend to be exported from notation software with multiple instrument events (Program Change) assigned to them, each with their own channel assignments. YOU WANT TO AVOID THIS AT ALL COSTS.
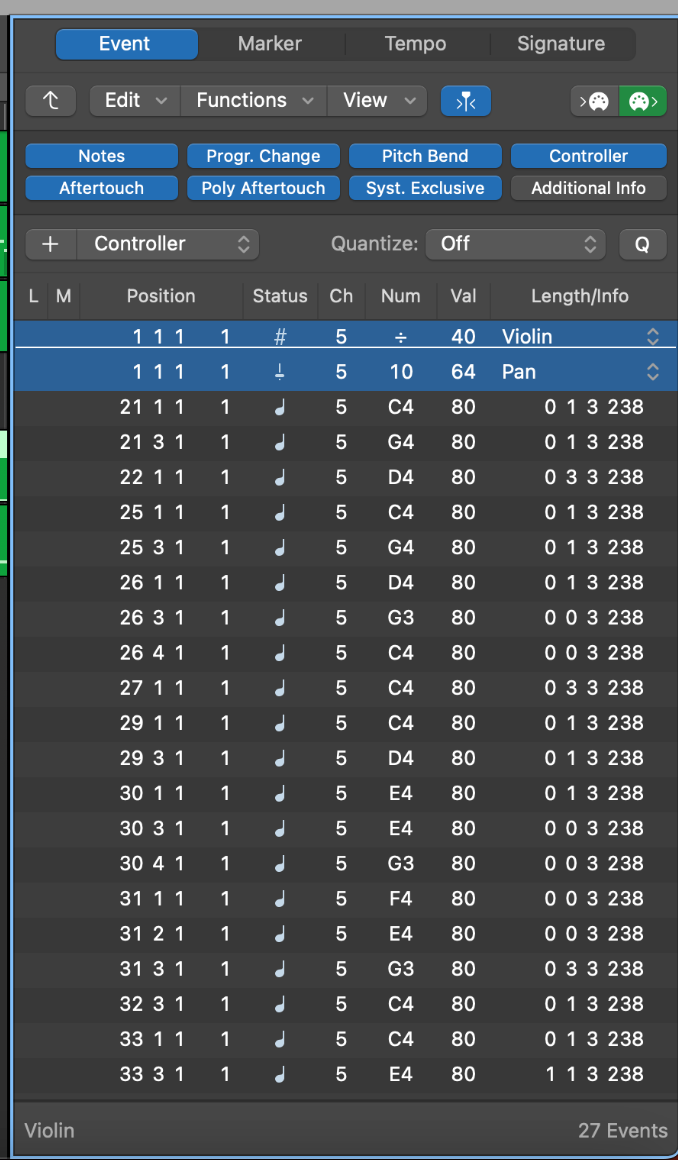
In order to AVOID THIS AT ALL COSTS, you’ll want to hide your note events (optionally), then select everything that DOESN’T SHARE A CHANNEL WITH THE FIRST INSTRUMENT IN THE LIST and DELETE IT, leaving your event list looking like this (you will, of course, also want to delete extraneous events as outlined in step 3). As mentioned in the previous step, the channel assignment for everything in the event list for a given instrument should be the same number, and this number should correspond to the instrument’s position in the instrument order. For this, you’ll want to CTRL+A to select all, and (again, I don’t know what specific interface you’ll have) drag the channel assignment up/down (or simply enter it for any of the selected events) to change it for everything you’ve selected.
Once you’re done with all those steps for all your instruments, export your MIDI. Congratulations! You’re now in the home stretch!
Step 7: Anvil
Once you’ve exported your MIDI from your MIDI editor/DAW, download Anvil Studio and open up your exported MIDI. You’ll want to make sure the option to edit an instrument track is selected, so that the musical staff for a given instrument is displayed on the bottom half of the screen.
The first thing you’ll want to do is SET YOUR LOOP CUES.
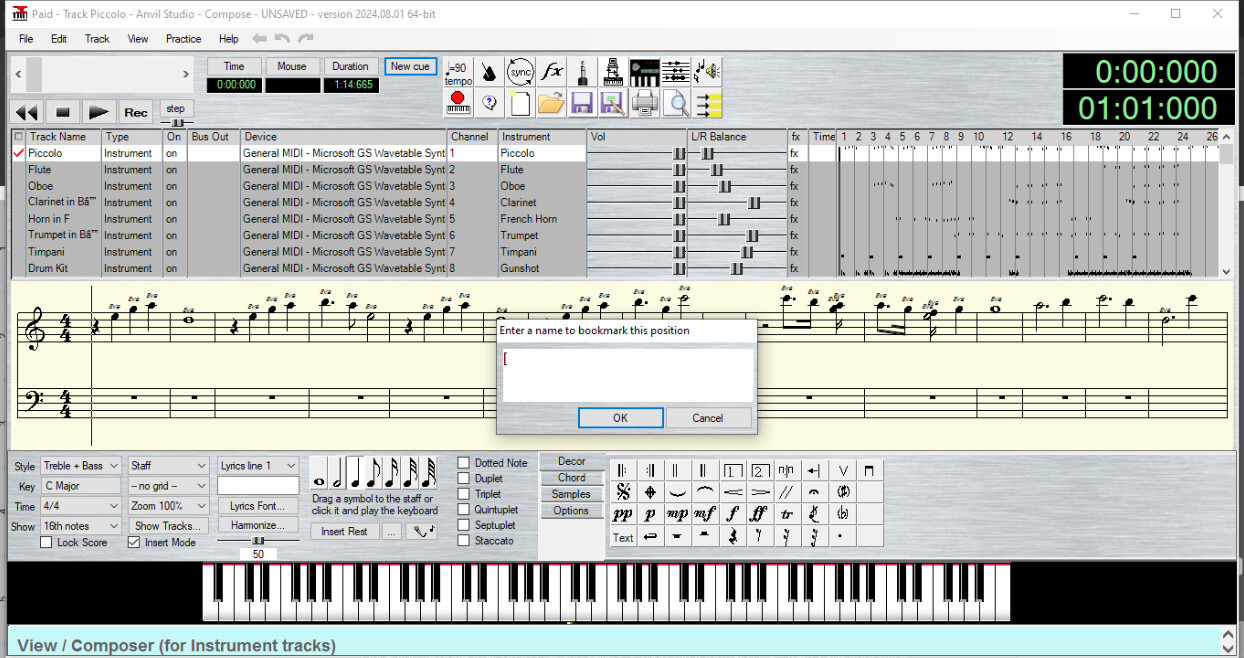
With the musical staff (or piano roll, or whatever you want to call it) displayed, click on the note where you want your loop to start, then click on New Cue at the top of the window, type [ (left bracket), then hit enter.
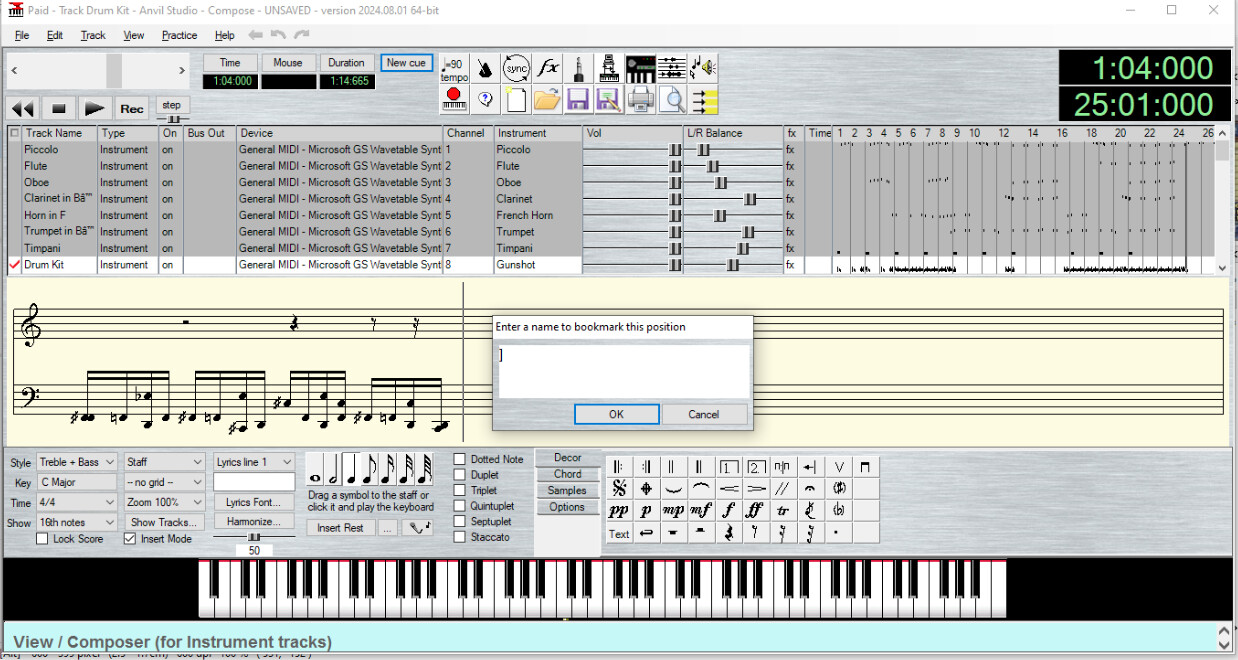
Next, click AFTER THE END OF YOUR LAST MEASURE (whichever instrument/s actually reach/es the very end; any of them will do) and NOT ON THE LAST NOTE, click New Cue again, type ] (right bracket), and hit enter.
As a warning, make sure that you’re setting the loop end cue at the end of a FULL MEASURE. If your last measure ends in a rest, Anvil will omit that rest, and when you try and place the cue, it will place it where the rest is, not after the measure. There are ways around this, such as by placing a 0-volume note where the rest would go and setting the loop cue after that, but it is better to simply account for this when writing your music.
Also, as another warning, if your loop end cue is on a tied note that lasts for longer than a measure, it will play nonstop throughout all subsequent repeats!
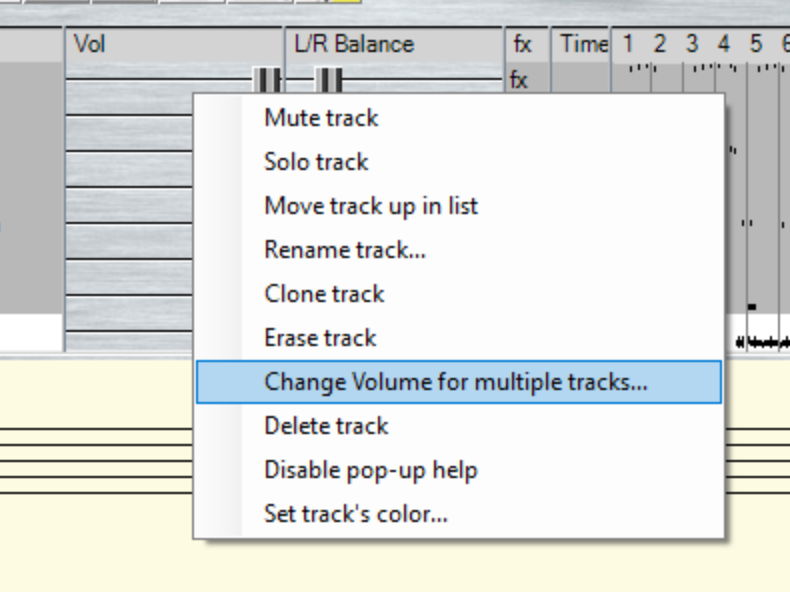
Next, you’ll want to right-click on your track volumes list and select “Change volume for multiple tracks,” then lower the volume for every track at once by around 70%. I’m not sure why this step is necessary, like mechanically-speaking, but this will give you a starting volume across all your tracks in FEBuilder of around ~74. Within FEBuilder, you’ll be able to edit track parameters, but I’ll get to that.
Once you’ve done that, go to File and select “Export MIDI format-0 file,” then save your MIDI. The filename should have NO SPACES!!!, to ensure that the next step works. Ignore the warning that Anvil gives you about not saving extra information like loop cues, just trust me on this. The loop cues are still there.
Also, and this is important for the FEBuilder step, but right-clicking on a (drum) note and selecting “properties” will let you manually set the note value according to the MIDI assignment. This is especially important for drum tracks because this list of MIDI numbers is consistent with the drumpart instrument lists in FEBuilder, so if something doesn’t sound right (like with the Sleigh Bell Problem), you can use the note properties menu in Anvil to manually set the note to the right sound in your FEBuilder drumpart list.
As a warning, also, MAKE SURE YOUR SONG DOESN’T END IN A REST. Anvil doesn’t like it when songs end in rests, and it will treat the rest position as the end of the song. This means that, when you go to place your loop end cue, it will not place the playhead after the end of the last measure but instead within the last measure after the end of the last note, regardless of how much of the measure is left. If there’s a gap at the end and you really like it that way, fill out the remainder of the measure with a note with a note value of 1 so that it’s inaudible. This will tell Anvil that there’s a note there, and it will let you place the loop end cue where it belongs.
Step 8: mid2agb
Next, download mid2agb and drag your newly-exported MIDI (from Anvil) into the mid2agb folder. Simply drag the midi onto the mid2agb executable and it will convert it to the .s (assembly source) format necessary for FEBuilder. FEBuilder offers the option to do it if you simply attempt to import a MIDI directly into FEBuilder, but I don’t think it works completely properly and would recommend using mid2agb externally.Step 9: FEBuilder
Well, here you go. You’ve gotten your MIDI exported, cleaned up, prepared, exported again, gotten your loop cues set up, and exported a third time, then converted to a .s file. This is the final step: importing your .s file into FEBuilder.If you haven’t already, install the NIMAP2 patch in FEBuilder. This (afaik) brings the instrument list in line with what general MIDI uses.
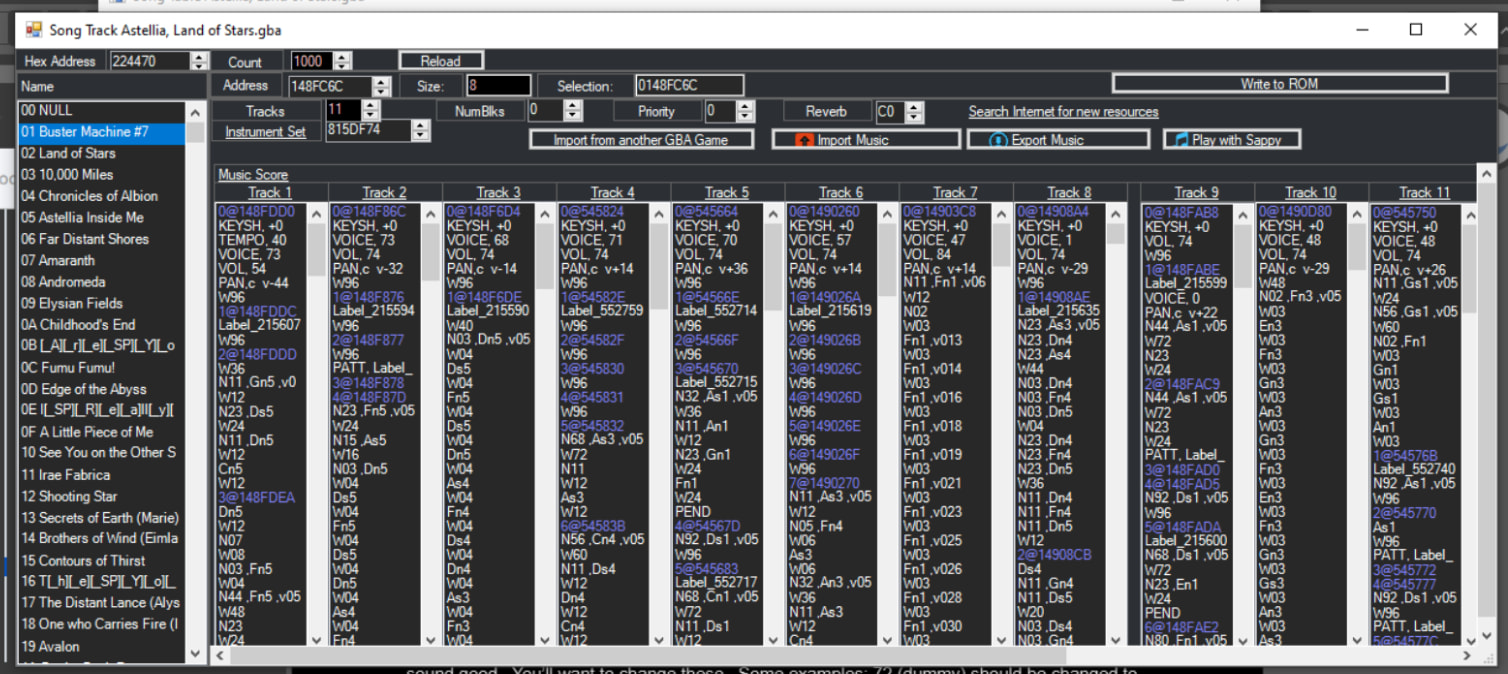
In FEBuilder, access the Song Table, then click on Song Track Editor. You will see an option to import music; click this and select your .s file.
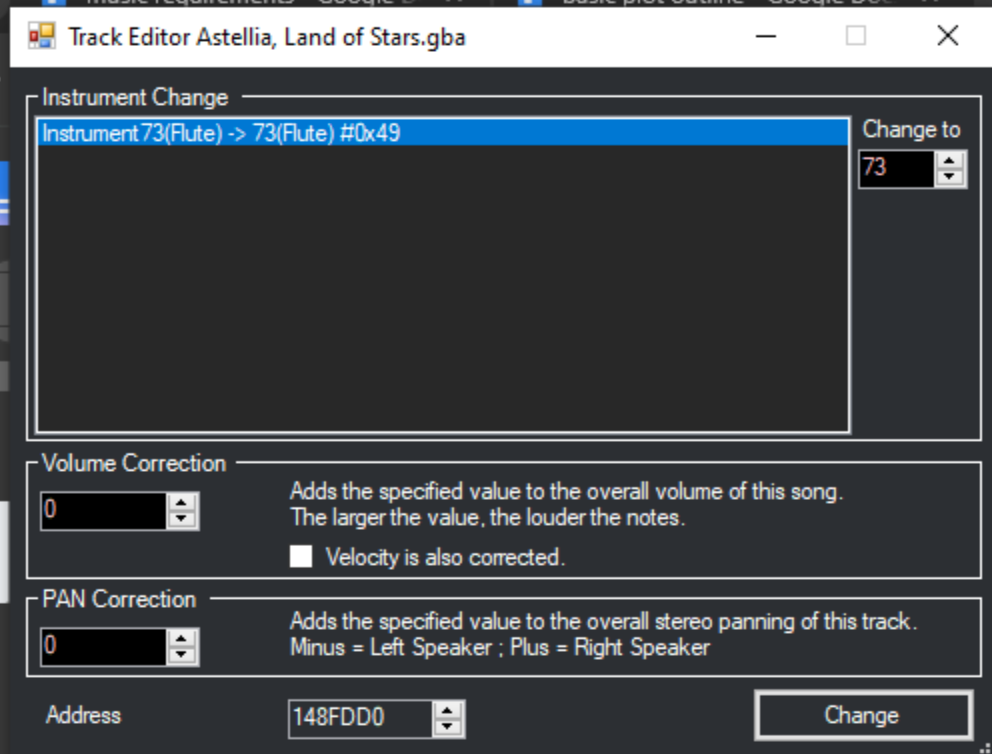
Next comes a bit of busywork. Some instruments in general MIDI correspond to dummy instruments in GBAFE, such as 72 (for piccolo), and some default NIMAP instruments just don’t sound good. You’ll want to change these (I’LL GO INTO THIS IN GREATER DETAIL LATER). Some examples: 72 (dummy) should be changed to 73 (flute), 56 (trumpet) should be changed to 57 (trombone), strings should all be changed to 48 (strings 1), and right-hand piano parts should be changed from 0 (grand piano) to 1 (bright piano). Beyond that, experiment with what sounds good to you.
In particular, though, if you use piccolo, click on the track editor (click “Track 1,” “Track 2,” etc. at the top of a given track) and lower the volume by around 25 (type -25 in the volume correction box). Instrument 73 is VERY shrill at high registers and will hurt your ears if you don’t do this step.
At the top of the Song Track Editor window, you’ll want to edit reverb. Remember a while back when I said that FEBuilder handles reverb internally? This is where that happens. Here, reverb goes from 0 to FF. Vanilla reverb (reverb off) is 80, but when you import a song, it gets set to 00. I like to set it to C0, but I’ll do D0 or higher for more atmospheric songs. In rare instances, I’ll set it to FF to really drive up the atmosphere. Though GBAFE reverb is weaksauce so don’t expect anything too powerful or noticeable.
Step 9.5: Tempo Correction
If you want to change the bpm of your track after you’ve imported it, you can do that!
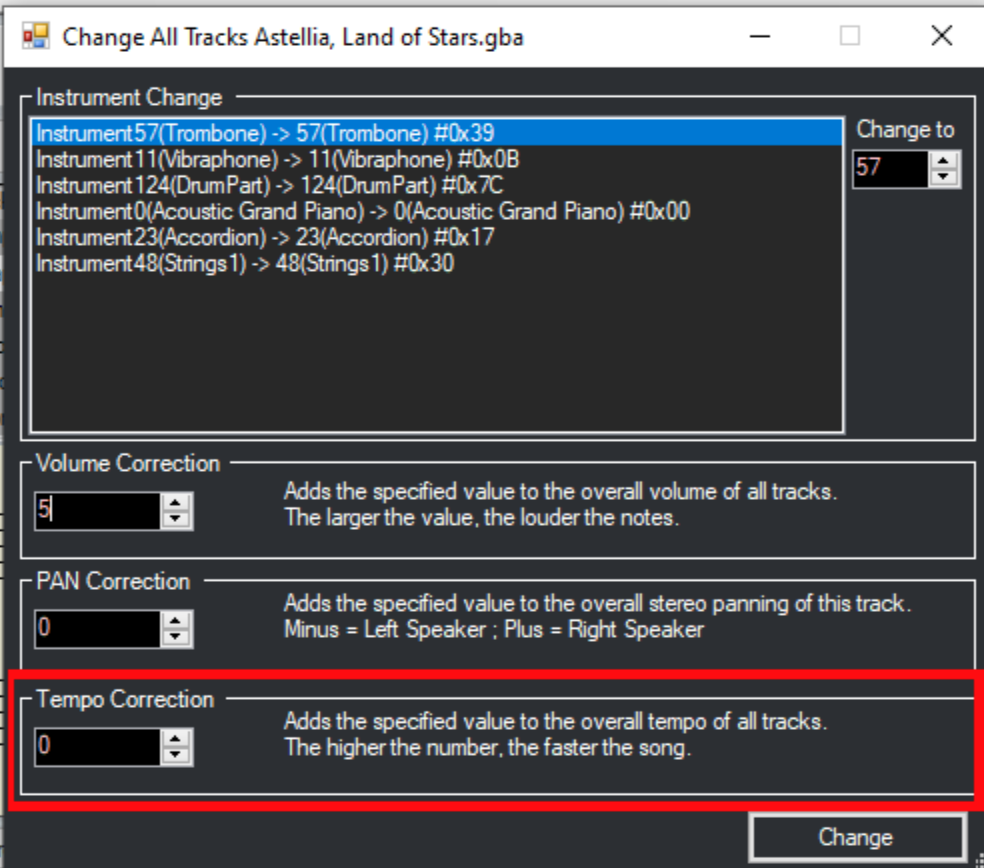
Keep in mind that FEBuilder processes tempo in increments of 4. What this means is that a tempo of 123 bpm and a tempo of 120.1 bpm will both be automatically set to 120 bpm.
Step 10: Test In-Game
The most important step will be to ensure your song sounds good in-game by testing it. To do this, press F5 to launch the emulator, then go to your sound room (install the patch that unlocks the full sound room to ensure you have access to all tracks right away) and play the song that you replaced.
You can also select the “Play with Sappy” option to have Sappy play your song within FEBuilder, but that doesn’t always work and also doesn’t always provide the most accurate representation of how your song will actually sound. There’s no substitute for testing in-game.
In all likelihood, you’ll need to do a few passes of this—i.e., of adjusting volume levels in FEBuilder, then going back into the sound room in-game—before it sounds just right.
But once it does (and this bit is specifically only for if you’re like me and doing music for someone else’s project), click the “Export Music” button, select the “.s” option for file type, and export. This will give you an importable file with all the settings you just painstakingly ironed out, which you can send to whoever will actually be doing the importing on their end.
Congrats! You’re done!
Bonus: Instrument Tips
Here’s where I talk about various tips with regards to instrument choice in FEBuilder that might make your songs sound better or cleaner, and things to avoid. Some of these I’ve mentioned before, but I’ll go into more detail here.
If you have a piccolo, assign instrument 73 (flute) and cut the volume by around 25 (input -25 for volume correction). This helps it avoid sounding piercing and shrill.
Specific string instruments tend to sound less good and less full than instrument 48 (strings 1). For this reason, I assign all my string instruments to 48 and let registers and panning take care of eliminating mush.
If you write a trumpet, assign instrument 57 (trombone). This is an overall fuller and less shrill sound that sounds more like an actual instrument and is easier to hear overall.
French horn gets automatically assigned instrument 60 (tuba) and it should stay here. Do not set it to instrument 62 (french horn), because that doesn’t even sound like brass, at least not at the registers you’d write french horn at.
Instrument 1 (bright piano) works better at higher registers, and instrument 0 (grand piano) works better at lower registers. For this reason, I tend to assign 1 to my right-hand piano parts and 0 to my left-hand parts.
Instrument 33 (electric bass) tends to be hard to hear, so you might need to bump the volume by 10-30 or so, depending on the register your bass part is written in.
Same with timpani (57).
Weirdly, the side-stick in drum tracks calls a “castanets” instrument that sounds like neither. Keep this in mind if you want to write castanets.
This is basically verbatim what I said towards the top of the doc, but USE A DRUM KIT FOR AS MUCH OF YOUR PERCUSSION SECTION AS YOU CAN!!!! This will save you MOUNTAINS of headache when it comes to getting your songs ready for insertion! Things like tambourines and the like can be their own tracks, but if something you want to use is in a kit, USE THE KIT!
I HIGHLY recommend using the kick drum in the drum kit for your bass drum part, if you aren’t picky about the booming bass sound of the bass drum. This will save you the trouble of having to fix the Sleigh Bell Problem™ manually!
The cymbal roll (“Ride Cymbal 4”) only lasts as long as the note duration. This means you’ll need a note that lasts for around ~3 seconds in order to get the full swell.
Bonus 2: Sound Data
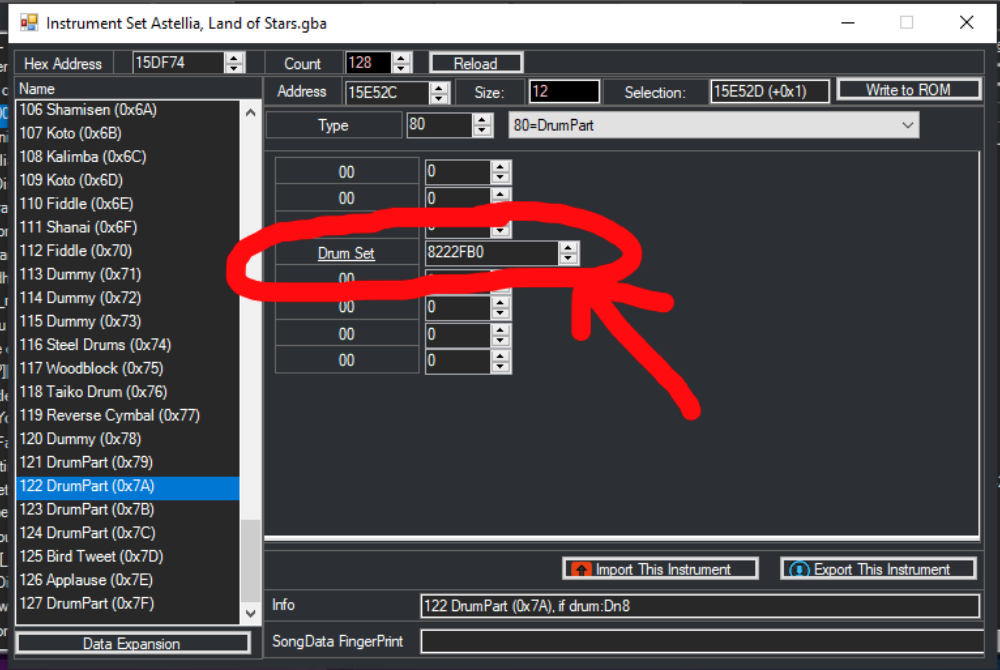
This is a SUPER niche technique and should probably be avoided through forethought and planning, but if you write a drum part and one of the instruments isn’t what you thought it would be/think it should be, you can change what instrument gets called by a given note by doing the following:

Bonus 3: FL Studio
If you’re using FL Studio, there are some additional things you’ll have to keep in mind. I don’t use FL Studio (I’ve only prepped MIDIs made in it), so my experience is limited, but in terms of MIDI event preparation, you’ll need to be on the lookout for the following:
First, FL Studio is known to duplicate everything that’s not a note or a program change event (instrument assignment) up to five times. When deleting extraneous non-note events, leave the program change (instrument) and ONE PAN EVENT, then manually set this pan event as you like.
Second, I’ve seen FL Studio default every program change event to 0 (grand piano) on export, so you may have to manually assign every instrument (i.e., manually set the program change event).
On the plus side, though, FL Studio appears to be very good about consistently making sure that channel assignments correspond to position in the instrument list.
Another thing to be aware of with FL Studio is that it tends to stick a bunch of duplicate Program Change, volume, pan, etc. events at the end of the event list for a track. Delete these (obviously). They will mess up your loops!
If anyone has any questions or needs clarification, let me know! I’ll try my best to answer your questions and I’ll update the tutorial accordingly.
Happy MIDI-ing!
