Greetings everyone, SilverRoy here!
So recently, I’ve got very curious about how exactly does the DSFEs (Shadow Dragon and New Mystery) works with their data of graphics, sound, text etc. By contacting @Eebit after their topic regarding their documentation on DSFE hacking, I’ve asked for their help in order to see if I can learn more about the ins and outs of the internal code as I’m capable of.
After learning from what Eebit explained to me, as well as other NDS hacking documentation on various other hacking websites, and using all the tools available to both edit the internal files and playtest the results, I’ve quite possibly actually managed to figure out how to both insert custom portraits into the DS games, as well as even import custom sounds and music!
(Huge shoutout again to Eebit for explaining to me their findings and the tools necessary)
Let me then have this topic used as a tutorial for anyone who’s interested!
I’ll start first with the portraits, then on the second post the music:
TOOLS FOR PORTRAITS
- NL’s Compressor (Other Options: Batch LZ77)
- GBA Graphics Editor
- Tinke (Other Options: CrystalTile2 / DSLazy)
- Graphics editor that can reduce amount of colors. GIMP is a great one.
- Precision graphics editor. LibreSprite is a good one.
1 - I’ll use Shadow Dragon and replace the status screen portraits as example.
(All of the tutorial should work for both FE11 and FE12)
Let us begin right away. First things first, open Tinke. This is a general purpose DS hacking tool that both lists the internal data of games and allows to both easy extraction, replacment and saving of modified DS games. When you open Tinke, select and open your FE11 game with it. It should show a list of various folders such as ascii, gmap, onfx and so on.
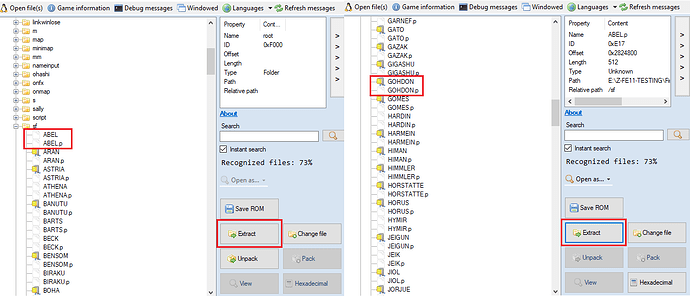
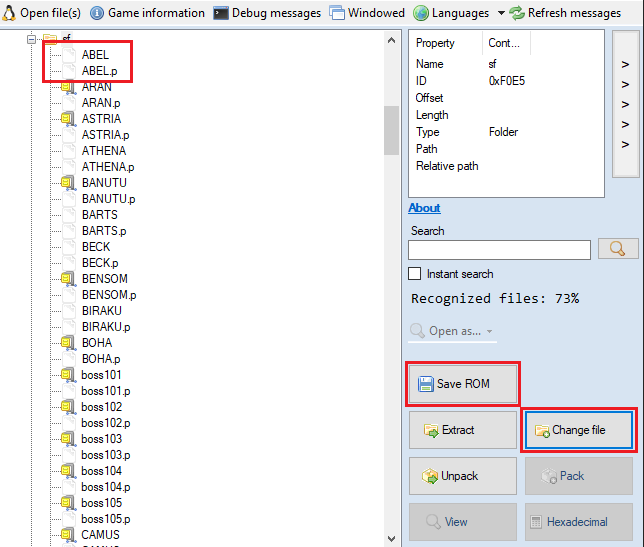
Our target is the sf folder. THIS is where the status screen portraits are stored (the dialogue portraits however are stored in the f folder, more information at the end of this post). You’ll see that it has a list of the japanese names of the Archanea units in all caps (so MARS is Marth, SHEEDA is Caeda, and so on), and there are two ‘files’ for each name: the one with only the name is where the main status portrait is stored, while the one with the .p file type is where the separate palette of the portrait is stored.
2 - We’ll now need to extract the portrait and their palette that you want to change, and use the NL’s Compressor tool in order to decompress the portrait files. With what Eebit explained to me, there are two types of compressions that these portraits have; some has the first byte at 0x40 which means it uses FEDS Portrait Compression while others has the first byte at 0x10 which means it uses LZ77 Compression. Luckily, with how Tinke lists the files, you can actually easily figure out which type of compression what portrait has to assist you. For this example I’ll extract both Abel’s and Gordin’s portrait, as they are both examples of each compression type:
In the screenshot above, ABEL’s file icon is a plain one, same as the .p palette file, so it uses FEDS Portrait Compression, while GOHDON’s file has the icon that resembles zipped files, so it instead uses LZ77 Compression (note that in GOHDON’s case, you can actually open it in Tinke, but DON’T DO THAT, simply extract the file itself just as detailed in the screenshot).
Now we need to decompress the portrait files (the .p files you don’t need to decompress). Open NL’s Compressor, then use the following screenshot for ease of explanation:
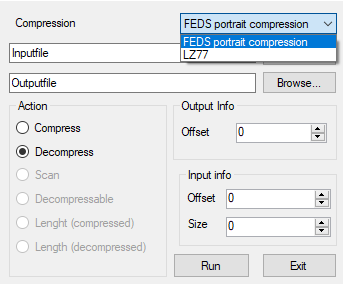
First on Compression, select whenever it is the aforementioned FEDS or LZ77 compression, then use the Inputfile to select the OG portrait file, Outputfile to select where the decompressed file will be (note that it tries to save as .nds files, but you can simple save it without any file type, same as how the OG portrait files are), then on Action whenever you are Compressing or Decompressing. You can leave the Output Info and Input Info areas alone, you’ll not have to change anything in their boxes. Finally, click Run, and if there were no errors in the process, a box will appear saying Finished.
3 - Now comes the fun part sort of, open the GBA Graphics Editor tool, this will be main one where the majority of the edits will take place, and where the more meticulous editing will take place alongside your personal image editors.
(Note that from here, the process is the same regardless of whenever your portrait uses FEDS or LZ77 compression, I’ll use Abel’s portrait as example, but you can do the same process for Gordin’s portrait, and so on for all other portraits)
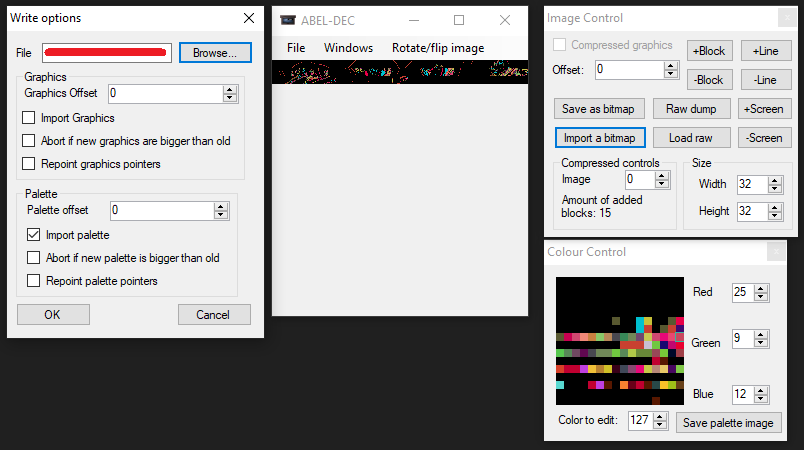
On the GBA Graphics Editor, go on File → Open ROM. We’re not actually gonna open ROMs, instead we’ll open the files we extracted from FE11. Open the ABEL.p palette file first, and you should see a weird pink line appearing on the main window, with garbled textures on the far left of it. From here, first things first you need to go to Windows → Palette Control, then on Graphics mode, change from 4bit tile graphics to 8bit tile graphics. The garbled textures should had changed, now let me use the following screenshot for ease of explanation:
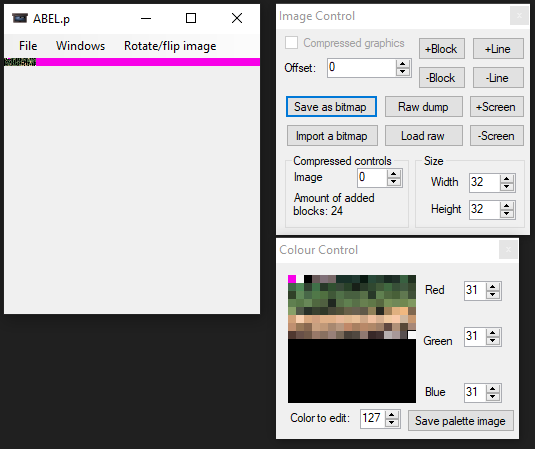
As you can see, the window on the left is the main window, on the upper right is Windows → Image Control, and on the lower right is Windows → Colour Control. Pay special attention on the lower right, on Color to edit:, it goes up to 127, as selected on the palettes.
THAT’S the color limit that portraits can use!
This will be important when you find a new image to replace the portraits.
Now, you need to, on Image Control, select the Save as bitmap option, to save the image just as it is on the main window in order to use it’s palettes soon.
(All of the aformentioned images from here can be saved as .png files)
4 - NOW it’s the time to see the actual portraits! This time, open the decompressed ABEL portrait file you just got from NL’s Compressor. You’ll see that the image is now weirdly full black with several lines here and there. I believe this is some sort of layer or mask that it uses as a base for the portrait’s design, while then using the separate palette file for the actual colors.
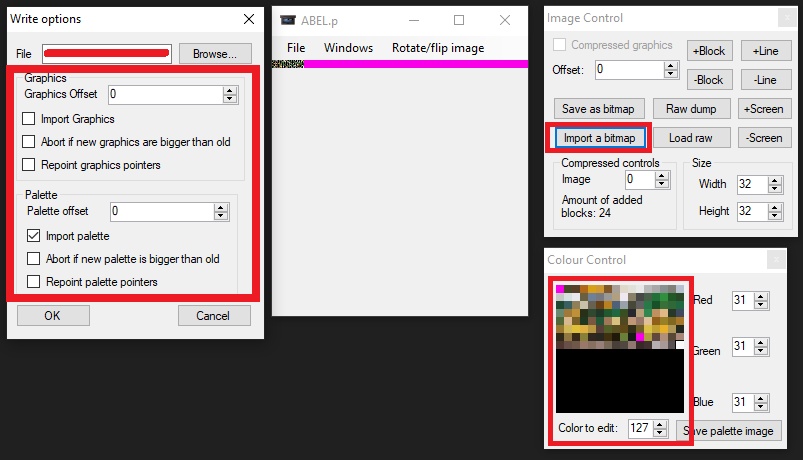
From here, do the following with the screenshot above as example: Go to Image Control, select Import a bitmap, Browse... to select the pink line palette image we just saved before, on the various boxes ONLY SELECT Import palette, then click OK. A new window will appear showcasing various little boxes of the palette colors, but you don’t need to edit anything here if the palette image was correct, simply click on Finished, and voila! Abel is now appearing on the main window, even if with the face separated in pieces at first!
Let me show you now another important part you need to do with the screenshot above.
So again, at first Abel’s face will be separated in pieces, but if you go to the Size box in Image Control and change Width from 32 to 8, you’ll see that Abel’s face will finally be (mostly) corrected! That’s great for us to have a visual example of how the portraits are looking so far, but here’s the important part now: as detailed in the screen shot above, you must ‘Save as bitmap’ BOTH of the Widths, in both 32 as well as 8, separately.
Let me explain now two details you might have noticed from Abel’s portrait at 8 Width:

Above the portrait, that’s where the upper part of his hair should be, but because we used the palette image to see the colors, that garbled texture ended up being there in place, because that’s actually the palette data that the .p file uses. It’s important that, when we are finished preparing the new portrait, that we do not save it like that, that’s better explained soon.
The second note is bellow Abel’s portrait, you can see that it’s actually an extra part of the portrait that extends on the lower right in the OG status screen screenshot. This can be used just like so to make a little extension of the portrait depending on which unit you replace, but whenever that will actually be possible or not, you can instead simply make it be completely blank if you wish (replacing it with the pink background).
5 - Let us finally replace the portrait with a new one! Open GIMP in order to edit the 8 Width Abel’s portrait, this is a great image editor that allows for easy transparency editing, resizing for the new portrait you’ll be implementing, as well as the VERY IMPORTANT option to reduce the amount of colors your new portrait have.
Let us make an example replacment for Abel’s portrait. I’ll replace it with Alec’s portrait, specifically his Trading Card Game artwork from the wiki.
When you open the image in GIMP, in order to reduce the amount of colors, you need to go to Image->Mode->Indexed... and there, there will be an option with a box that allows the maximum amount of colors that the portrait image you’ll use has. Use it in whatever way you want to reduce the maximum amount of colors to 127, the same number we talked about way earlier that’s the color limit that the portraits use in the DSFEs. That’s the most important part in order to make sure the portrait looks correctly in-game, you can then use GIMP (or another image editor you use that can also reduce the maximum colors) to resize, edit and move the portrait in order to place it on the same box that Abel’s Width 8 portrait is:
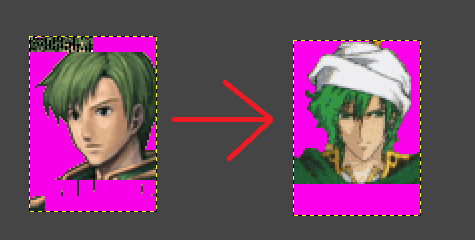
Looking cool Alec! But now comes a very meticulous part: remember back when I said to save the image of Abel’s portrait in both the 8 Width and 32 Width. So, you might be thinking if you can simply import the 8 Width image and leave it at that, but that seems to mess up GBA Graphics Editor, and not make them be able to correctly import the new portrait to be compressed (it will end up with garbled texture if you try to import for the actual game). So we’re gonna have to perform the long work: meticulously separating the new Alec’s portrait in pieces and putting it on the 32 Width image.
When you finally have the image file correctly separated as the example above, you can then import it back on the GBA Graphics Editor, the same way as you used Import a bitmap in order to test if everything is aligned correctly and the like.
(Keep in mind that, when you are Importing a bitmap, there is a box that says ‘Abort if new graphics are bigger than old’, you can uncheck that box, because as far as I’m aware, if you correctly made your portrait have the limit of 127 colors, then there’s no problem if the new image ends up just a little bigger than the old one by mere pixels)
If the portrait appears correctly when you import as Width 32, then change it to Width 8, then congratulations on successfully preparing the portrait file! But now, here’s how we’ll ACTUALLY finally replace everything correctly.
6 - Following the example above, if you indeed have the new Alec’s portrait, correctly separated by parts as Width 32, then immediately close the file on GBA Graphics Editor (DO NOT SAVE/OVERWRITE IT YET) and open once again the ABEL.p palette file on the GBA Graphics Editor.
Using the screenshot example above to help, we’re finally gonna replace the ABEL.p file. Go to Image Control->Import a bitmap, in the new window ONLY SELECT the Import palette box, then Browse… the new Width 32 Alec’s portrait you just saved, click on OK, click on Finished on the new window that shows several palette boxes, and if everything had gone right, on the Colour Control window Color to edit: will still be up to 127 colors.
If everything is all right, you can then in the main window, go to File → Save, and click finished. Alec’s palette file for his portrait is complete!
7 - Now, for the main ABEL file you decompressed to use as a base to create Alec’s portrait:
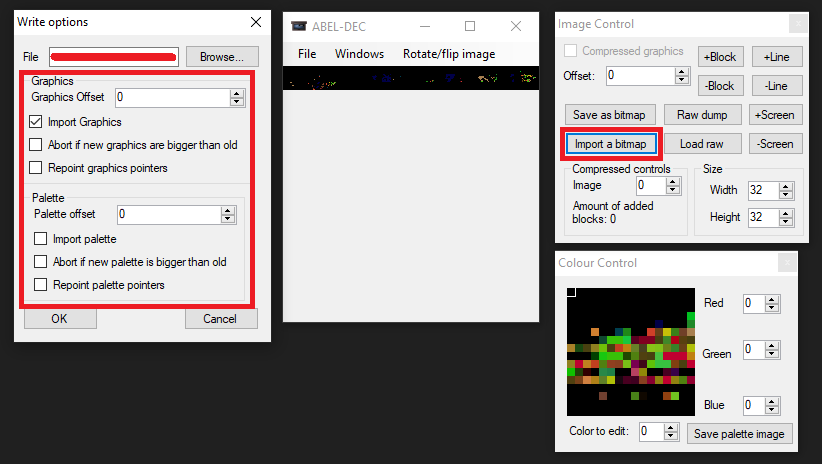
This is very similar in spirit to the palette file replacement: Import a bitmap, instead of checking only Import palette, you instead check only Import Graphics this time, select the Width 32 image you just made, click OK, click Finished, then if everything was ok, the weird black rectangular image on the main window will have changed in shapes only, but that means it was correct (and for this one you don’t have to worry about the amount of colors in Colour Control). Then just as before, go to File → Save, click finished, and congratulations, you also finished editing the portrait file!
8 - Now here comes the part to compress back the file and finally implement it in FE11:
First things first, go back again to NL’s Compressor, and this time instead of decompressing the main portrait file, compress it using either the FEDS Portrait Compression or the LZ77 Compression, depending on way back what I explained what kind of compression method you identified that the portrait you’re working with has.
(Also remember that we don’t need to compress/decompress the palette file)
NOW, let us finally go back to Tinke, and this time, as we worked on both the ABEL and ABEL.p files, go back to the list at sf, and now, use the Change file option at the lower right to replace the vanilla portrait/palette files for the ones you just made:
After you changed both of them, you can now click on the Save ROM option, and fortunately, Tinke doesn’t not overwrite the FE11/FE12 file you were working on, it saves a completely new one, in case an error occurs and you need to go back to the earlier version you were working on to fix things. And now, well, let us test the game, and if everything worked:
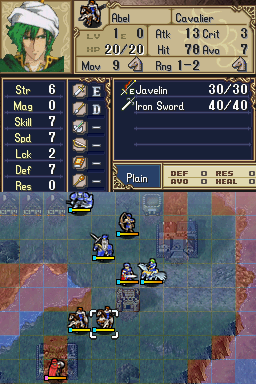
Welcome to Archanea, Alec!
As you can see, the portrait replacement was a success! The only thing being the part on the lower right, which corresponds to that one extra area in the portrait I explained at step 4, that was made transparent for this example.
Hope that you’ll be able to use this lengthy tutorial to start importing new custom portraits for the DSFE games! On the tools list at the top of this post, I showed alternative tools that can also help with DS hacking, this is because there might be a few specific parts that should be easier to do in the alternate tools, as well as to help make precise graphical edits when you’re actually editing your portrait image. Feel free to check out anything that could help you more.
To finish this post up, here’s the .ups file of the portrait edit I’ve made so you too can check it out in-game. I’ve changed both Abel’s and Gordin’s portraits, to showcase that both portraits of different compressions can still be edited without problem. Feel free to use this .ups file to test and reverse engineer the work if it can also help you learn more:
Let us now continue to sound and music replacement on the next post!
