So I was playing Gaiden the other day, as you do, and it got me thinking about map design and Gaiden’s strengths, weaknesses, and principles.

(I love this Gaiden Novel Artwork)
Gaiden has many maps that are considered ridiculous when viewed under a modern lens (and sometimes rightfully so), but I nonetheless find them super interesting and worth examining. So I can at least pretend to be brief, I’ll only be focusing my attention on the maps of Act 1, even if that’s just because that’s the furthest I have reached on my latest playthrough.
One important thing to consider when examining Gaiden map design is that for 90% of the game, the primary 3 considerations when playing maps are Terrain, Unit Ranges, and EXP Distribution.
-
Terrain avoid bonuses are legendarily extreme in Gaiden, so you almost never want to allow an enemy to occupy terrain if you can otherwise avoid it. Conversely, you almost always want to occupy terrain, so you start to think up to multiple turns in advance and which of your units can reach advantageous terrain before the enemy.
-
Unit ranges are very important in Gaiden; archers have their insane 1-3 and later 1-5 range, and maps will often be wide open with sparse terrain, so very specific positioning is required if you want enemies to engage units in player favorable matchups.
-
Perhaps most importantly is EXP Distribution; if you are playing Gaiden and you want to play without subjecting yourself to lots of grinding, on every map you need to make decisions on a meta level regarding who to give experience. Promotion is everything in Gaiden, and so even on otherwise unremarkable grind or rout maps, you’re making involved decisions about which units will go where, who will chip, and who will kill.
Even when Gaiden’s maps are at their most plain, these 3 considerations comprise the turn to turn engagement that keeps you from just hitting auto battle and end turn.
Anyway, Let’s start with the Ram Village Map
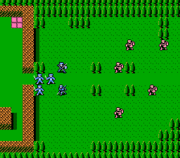
The Ram Village map does a remarkable job of introducing the 3 primary considerations, Lukas and Alm start within range of the forest terrain which will enable them to smoothly bait in the brigands and do significant chip damage, while the player’s real goal is to feed kills to Tobin and Kliff, who need levels for promotion. The map also introduces the concept of healing AI, which is a rather decisive element of Gaiden’s map design, although here it introduces the concept in such a way that is unlikely to inconvenienced the player; any enemy going for the heal tile will likely be easily picked off by one of the units which the player wishes to feed exp.
As a side note, the Echoes version of the map improves it greatly by explicitly highlighting the value of feeding kills to units needing promotion via a short tutorial dialogue, as well as highlights the importance of unit ranges by highlighting the added and much appreciated enemy range display toggle.
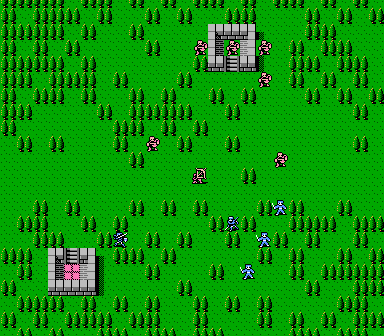
Ram Woods introduces an archer, which I don’t feel a need to elaborate further on, but it also separates Alm from the rest of the group for the first handful of turns. I actually really like this decision; it means that instead of just leading once again with Alm and Lukas, the player has to immediately from the first turn consider the positioning of their villagers and the terrain. The terrain is much more prevalent on this map, so a player who understands the value of terrain can easily take advantage of it, while one who hasn’t quite understood it yet will be exposed to the concept again here. The use of healing AI and the southern heal tile I’m less keen on; when brigands retreat to the northern heal tile, it stresses the importance of deliberate player phase aggression and cutting off the enemy’s escape, but in the rare case where an enemy flees to the southwest, it does harm the pacing of the map.
I’m not going to deliberate on each individual dungeon grind map.
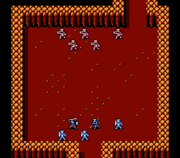
It’s a box.
They are all boxes.
With different enemy unit compositions, but it’s a box.
These maps do still utilize the principles seen across the rest of the game however, since the box is so devoid of interactable elements, it’s pretty much a test of your unit positioning to feed exp to the units you desire while keeping both they and your more vulnerable units safe.
I will say that other than QoL, this is probably the area that Echoes most significantly improves over the original game; extra elements like impassable terrain, forests and other avoid granting tiles, and still simple but more diverse and appealing layouts very much improve these maps, and the addition of the first strike mechanic and the light stealth mechanics that enable you to skip the vast majority of dungeons fights are very welcome additions. In general however, these improved echoes dungeon maps still feature the same 3 primary principles of Gaiden’s map design, terrain usage, unit ranges, and exp distribution.
Ram Valley is the first real test the player receives in Act 1. It has a familiar set up with brigands, an archer, and a fort with heal tile. It has sparse but very deliberate and useful terrain in the form of the southern forests. However, it introduces a very archaic but effective anti-turtling incentive in the form of the infamous leather shield mercenary. 
You don’t want to be slow enough that the merc either joins the brigands or pincers you from behind. Unit positioning is key, and you’ll want all of your villagers to be promoted, the LS merc can easily kill more squishy units like Silque or unpromoted villagers if you allow him to reach them. Thankfully, if you do proceed fast enough, you can have Alm or one of your other units capable of piercing his large defenses occupy the healing tile to make the fight go more smoothly in your favor.
Quick Echoes side note, I love how the game specifically highlights the leather shield mercenary as more elite than the brigands, and makes you take note of his leather shield.
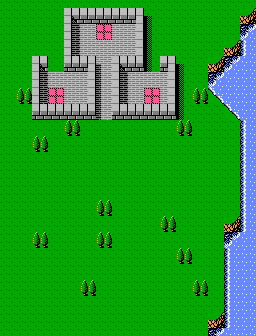
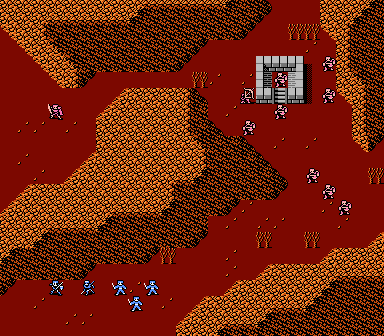
Southern Outpost is the introduction of something that I don’t think gets discussed enough despite being controversial (and no, it’s not the 20 avoid floor tiles, those are just kinda dumb).
Southern Outpost is the first map that I think introduces a design philosophy that can be felt all across Gaiden, a philosophy seen mostly in Kaga’s Fire Emblem titles and TRS/Berwick/Vestaria. This is the idea that forts, castles, and any other maps made by human hands for the purposes of defensive occupation are designed as such; they can be difficult to assail, having chokepoints, defensive terrain, some even have murder hollaces, portcullises, and other real world siege defenses.
On one hand this can make these maps more frustrating, more of a slog, and less fun. It’s perfectly reasonable I think for people to not enjoy and engage with this more player neutral or player hostile design. However, on the other hand I think there can be a certain appeal to this philosophy of map design. I think a certain sense of verisimilitude can be damaged or lost when fort and castle maps feel designed in such a way as to be friendly towards and taken advantage of by the player’s invading force rather than their occupants, and if the game gives you appropriate tools to approach these kinds of maps, there can be a certain appeal to disassembling the sturdy and carefully built defenses of the enemy garrison.
I think each individual will come to decide for themselves if this style of design appeals to them, and also if Gaiden is even successful at it. I can pretty reasonably imagine players who enjoy this style in Thracia and Berwick Saga but don’t enjoy it in Gaiden or TRS for example. Personally, I enjoy using Warp, Invoke, 1-5 Range Bows, Magic, and in the case of Echoes, Rescue and certain Combat Arts to tackle these maps in less conventional ways on their own terms. Regardless, I think this style of design has potential that haven’t been explored yet. (and I plan to do so in my own hack project  )
)
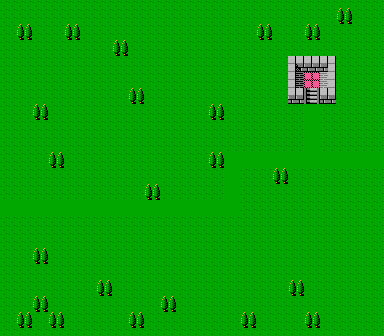
Ok, so after having so much to say about Southern Outpost I don’t really have much to say about Southern Zofia 1. It’s a much more relaxed and simple map than Southern Outpost or Ram Valley, and I think modulations in pacing can be important to good chapter by chapter pacing. You get to use the Lighting Sword Jeigan??? It has the mythical single cavalier who takes like 4 turns to arrive, which I guess can be a mounted unit tutorial if you didn’t promote any of your villagers to cav???

It’s fine but not very interesting.
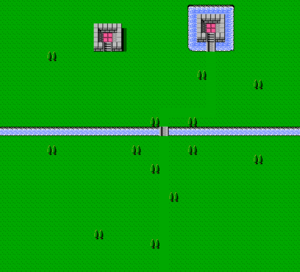
Now Northern Southern Zofia? hahaha
This Iconic Map?
I actually kinda dig it.
Don’t get me wrong, it’s very silly, but let me explain.
So this map is the first time you really have to consider the value of mounted units, both on the player and enemy side. The lower section is pretty much typical Act 1 Gaiden, lure the enemies into your formation and then feed the kills to the units that need them. However, the bridge, river, and heal tiles all contribute to a subtle, teachable moment on this map. You can use the bridge as a choke point, and it counts as a floor tile and gives you 20 avoid, but if you do so without thinking then the enemy heal AI will kick in and the enemy cavs will retreat to the forts. What a slog.
However, if you have your own mounts, either a promoted villager and/or Clair, you can chase them down and finish them off; Clair can even use her flight utility to cross the river and cut off the enemy more readily. Alternatively, you can bait the cavalry to cross the bridge and attack into your formation, and then use a sturdy unit to choke the point on the bridge and rob them of their retreat. There’s actually a handful of ways to wisely engage with this map.
Would it have been better if the bridge was 2 tiles wide? and/or the river and bridge were 2 tiles tall? Probably. Would it have been more visually appealing if the river wasn’t as straight, and had more variety? Absolutely. But I actually really appreciate this map (and it’s reused versions in Act 3) because they require you to engage with the map layout and the tools you have to clear them efficiently and effectively.

Deliverance HQ. It is spooky. It has skeletons. 
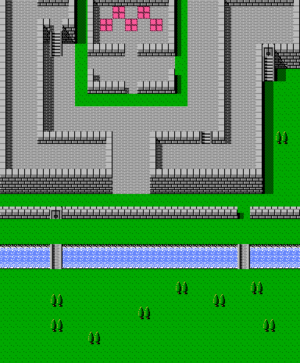
Alright, it’s time to wrap this up, Zofia Castle. The final exam of Act 1.
There’s a lot of wasted space here that I’m not a fan of, but on the whole this map is a test of all the principles the game has tried to impart on you. Archers attack you from atop the battlements, which need to be met with archers of your own, Slayde is notable for being a moving boss you have to respect, and while 20 avoid floors are dumb, I actually really like the use of grass, floor, and wall tiles in the inner courtyard; if you’re playing smart you can position yourself on the floor in such a way that the enemy as to attack from the grass, or so that you can attack safely with archers or magic over the walls. Enemy armors get introduced here, so that in tandem with the terrain makes mages very valuable in the late stages of the map.
You thought you defeated Desaix? Ha! That was just a double.

(More Quality Novel Art)
Anyway, that’s about all my thoughts for today, and probably for a while, but in summary:
-
Gaiden maps are designed around 3 core principles, unit ranges, terrain usage, and exp distribution.
-
Gaiden maps are heavily dependent on the tools and structures of the game; they wouldn’t work at all without the tools the game gives you (Gaiden Magic, 1-5 Range Bows, Warp/Invoke), or the systems it deploys (Mila Statue Promotion, Promotion Gains, Learned Magic and Group Exp).
-
There are both strengths and weaknesses to the more “realistic” style of fort/castle map design that Gaiden and later Kaga titles use, and I think this design philosophy has been mostly forgotten or overlooked both by modern IS and hack/project designers.
-
Map design has very little strength on its own, it must be evaluated under the lens and in tandem with the mechanics and goals/principles of the game that it is in. Not to distract too much, but this is why I think Gaiden/Echoes often has tighter map design then certain modern games like Awakening and 3H, where the maps often appear of higher quality at first glance but they don’t synergize with or can even feel segregated from the other important mechanics.
I don’t mean to hate on Awakening or 3H, they just provide useful examples.
Alright, I think I got it out of my system.
Enjoy one more high quality Gaiden Novel artwork.
God I love Gaiden. #JustPlayGaiden