[FE14] Misc Notes on Fates

A thread to store random bits of info I’ve picked up on FE14 in no particular order.

Tools:

  • Paragon (can edit a lot of things e.g. characters, classes, items, chapter data/terrain/spawns, dialogue etc. I made a fork that allows you to copy/paste terrain types too)
  • Exalt (edits events)
  • FEAT (can decompress/recompress most filetypes)
  • BCH Texture Editor (used to replace textures in BCH files e.g. for maps)
  • Ghidra (decompile code.bin - I use TildeHat’s definitions file)
  • Magikoopa/Armips - used to create asm/c patches
  • gdb-multiarch (command line debugger - I run it through WSL2 but it doesn’t link to Citra’s GDB stub for whatever reason. It does work with Luma’s GDB stub though. Having said that I really need a better way to do it)
  • BCSAR-View - Edit music library
  • Citric Composer - Edit individual songs within the library

Some things e.g. model editing are limited in what can be done without using Nintendo’s dev tools - similar to discussion of GBA roms, these tools are outside the scope of this thread.

Useful hacks

My Hacks

Inserted using magikoopa in the .hks file.

Remove Character Creation:

DeleteCharCreation:
    type: patch
    addr: 0x43aa38
    data: 10402DE90040A0E1380080E20010A0E30B7BFFEB0400A0E1240200EB1080BDE8

GetPlayerAlwaysFalse:
    type: patch
    addr: 0x4f6340
    data: 0000A0E31EFF2FE1 # return 0 immediately

Set time of day using events:

TimeSet_NoCheck: #allow bev::時刻(hour, minute) to change the time outside cutscenes
    type: patch
    addr: 0x1693e0
    data: 00f020e3 #nop

Shove:

AnyoneCanShove:
    type: patch
    addr: 0x37c3a0
    data: 00f020e3 #nop

ShoveAnyone:
    type: patch
    addr: 0x3a1820
    data: 00f020e3 #nop

more notes to come

16 Likes

Because this was giving me trouble today:

Models and textures are contained in BCH files, which are sometimes contained within ARC files. FEAT can extract and repack these (specifically this fork GitHub - VelouriasMoon/FEAT: Fire Emblem Archive Tool (A tool to automatically extract data from 3DS Fire Emblem archives))

Some files are LZ13 extended compressed - this can be identified by the header which is 13 xx xx xx where xxxxxx is the file size decompressed (little endian). Current release has an issue where FEAT treats the size as big endian - I expect it will be fixed but if not you can use HxD to edit it yourself.

This way you can edit the textures in a way that is compatible with hardware (Citra makes texture swapping much easier but it won’t work out of emulator).

image

7 Likes

I got the Warp staff working in Fates:
ezgif-1-b449dea8bc

GitHub Link

Some notes on the process below in case it helps anyone else.

Procs in FE14 (warning, essay below)

If you don’t know what Procs are go read Stan’s guide. Fates is a bit different from FE8 but not that much.

The main game loop is called nnMain and on startup it does a whole lot of initialising, including running a whole lot of routines with the name scheme: `global_constructor_keyed_to’_XX_Something_cpp (more on these later). Then every frame it will do things like check for Home button pressed, update key buffers, clean up Procs marked for deletion, execute Proc trees, and update graphics.

Unlike GBA, Fates has 3 Proc trees which are titled ‘Hi’, ‘Def’, and ‘Low’. I have not investigated what goes where within these trees. Stan’s guide refers to ProcStates which are 0x6c bytes in ram and contain a header plus a fixed amount of space for the Proc to store data. In Fates these are called ProcInsts and while they have a fixed header the size is variable and depends on the type of Proc. I unfortunately do not have much doc on the format of this struct, except that 0x0 and 0x8 seem to both contain Proc Commands? 0xC appears to be the name string pointer. Beyond that I am not sure.

The main purpose of the global_constructor routines which are run at game start is to write the Proc Codes into RAM. For some reason these are not stored as data in code.bin but rather as a series of instructions e.g. store ‘4’ at address XX, then store ‘0’ at address XX+1, etc etc. This might have been a problem but in fact you can ignore the RAM and just put your own Proc Codes into code.bin and repoint the references (more on that later). Proc Codes are 0x14 bytes long and their format depends on the opcode which is the first 4 bytes.

I also haven’t documented many of these but 0x4 is the ProcLabel opcode while 0x8 and 0xB seem to run routines (unsure what the difference is). 0xD sets the cycle routine.

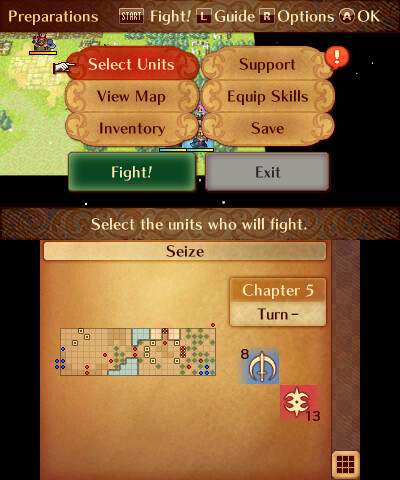
For the purposes of Warp, the biggest problem was that by default, the game flow would be Select Unit->Show Action Menu->Select “Staff” Action->Select which staff to use->Select a target->Execute action and end turn. What I needed was to insert a step after selecting a target to allow the user to select a destination. I decided to base this second selection off the ballista routine because it is a freeselect with the map cursor, rather than scrolling through predefined target tiles.

I identified the relevant Proc was MapSequenceHuman and used the decompiled code in Ghidra to reconstruct the Proc Code. Below is an excerpt - the actual routine goes on for about 500 lines…

void 'global_constructor_keyed_to'_20_MapSequenceHuman_cpp(void)
{
  DAT_0072b8c8 = 4;
  _DAT_0072b8cc = 0;
  _DAT_0072b8d4 = 0;
  DAT_0072b8dc = 0xb;
  _DAT_0072b8e8 = map__SequenceHuman__anonymous_namespace__ProcSequence__FreeCursorPrepare;
  _DAT_0072b8ec = 0;
  DAT_0072b8f0 = 0xd;
  _DAT_0072b8fc = map__SequenceHuman__anonymous_namespace__ProcSequence__FreeCursorTick;
  _DAT_0072b900 = 0;
  DAT_0072b904 = 4;
  _DAT_0072b908 = 1;
  _DAT_0072b910 = 0;
  DAT_0072b918 = 0xb;
  _DAT_0072b924 = map__SequenceHuman__anonymous_namespace__ProcSequence__PickCursorPrepare;

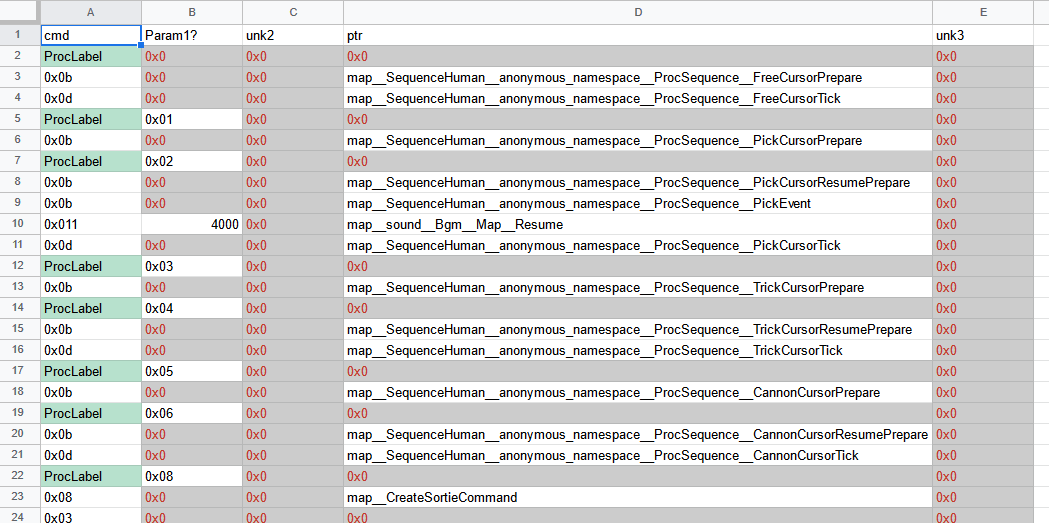
From this I was able to do a bit of find and replace shenanigans to turn it into a usable .csv file and reconstruct it:

That was turned into a bit of C so that I could expand it and add my custom routines based off the ballista routines:

struct ProcCmd
{
  int opcode;
  int unk1;
  int unk2;
  int functionPtr;
  int unk4;
};

extern void WarpCursorPrepare();
extern void WarpCursorTick();

#define PROC_LABEL(num) {0x4, num, 0, 0, 0}
#define PROC_END {0, 0, 0, 0, 0}

const struct ProcCmd gProcMapSequenceHuman[] = {
	PROC_LABEL(0x0),
	{0x0b,				0x0,				0x0,				0x034c9cc,				0x0},
	{0x0d,				0x0,				0x0,				0x0351904,				0x0},
	PROC_LABEL(0x01),
	{0x0b,				0x0,				0x0,				0x03537dc,				0x0},
	PROC_LABEL(0x02),
	{0x0b,				0x0,				0x0,				0x0353bd4,				0x0},
. . . . . . . . . . . . . . . . . . . . . . . . . . . . . . 
	PROC_LABEL(0x027),
	{0x0b,				0x0,				0x0,				0x01ed9c4,				0x0},
	{0x0b,				0x0,				0x0,				0x0353b0c,				0x0},

		PROC_LABEL(0x2A), //use this one for warp staff!
		{0x0b,				0x0,				0x0,				(int) WarpCursorPrepare,				0x0},
		{0x0d,				0x0,				0x0,				(int) WarpCursorTick,				0x0},

	PROC_LABEL(0x029),
	PROC_END
};

As you can see I inserted a new label into the Proc Code. The default RAM address of the vanilla Proc Code was 0x72B8C8 which was referred to in the routine map__SequenceHuman__Create (which creates a ProcInst of SequenceHuman and sets the Proc Code pointer to this location). I repointed this to my custom Proc Code, but next I needed a way to reach the new label.

The relevant routine here was map__anonymous_namespace__ProcSequence__Decide, which contains a switch statement for each action performed at the moment the target is decided (i.e. right before I wanted to show the warp destination select). The case for Rescue Staff was 0x25 which says among other things to jump to Label 0x26 in the SequenceHuman Proc Code. I simply replaced 0x26 with 0x2A and boom now we are in business.

Based on trial and error I could see that if I simply jumped to label 0x6 (CannonCursorResumePrepare, followed by CannonCursorTick) it would draw the ballista freeselect and try to attack with a Fire Orb once a valid target was selected (i.e. enemy within damage radius). Therefore I created the WarpCursorPrepare routine based heavily on CannonCursorResumePrepare, and the WarpCursorTick routine based on CannonCursorTick.

To cut a very long story short, this was successful but meant that every staff now would draw the Warp cursor instead of behaving normally.

So I added a check to see if the item being used was the Warp Staff and if no, jump back to label 0x26 to behave like a normal staff. I had to check if the unit has an equipped item - if no, the staff is top of their inventory. If yes, the staff is 2nd. Incidentally, the current unit is checked by using map__Mind__Get followed by map__Mind__GetUnit to get the unit struct in RAM. The inventory begins at 0x108 of the unit struct and is 4 bytes per item. First halfword is item id, second is durability.

Once the destination tile was selected, I jumped back to label 0x26 to proceed as usual for a Rescue staff, right up until the moment it tries to decide on the tile to warp the unit to (function map__ItemHelper__Rod__GetRescuePosition). This routine is actually used for a lot of things to try and get the nearest valid tile to warp someone onto, including things like Pheonix mode resurrection, so I did not replace the whole routine. Instead I replaced the call within the parent routine map__SequenceBattle__anonymous_namespace__ProcSequence__Rescue to my own custom routine.

Here I reused my previous check to whether the item being used was a Warp staff - if no it would continue to the vanilla routine as usual for Rescue. If yes, it would instead warp the target unit to the cursor position, which of course is where you last had the cursor at the moment you confirmed the warp decision.

Also I updated the validity condition from “enemy within damage radius” to “no unit on tile and target is able to move on terrain type” - this part was also heavily referenced from vanilla code.

Now, the above makes me sound like I know what I’m doing. I want to be clear - I really, really do not have any idea what I’m doing at any given time.

Next time: how to debug when you don’t know what you’re doing.

9 Likes

Right, now that I’m awake: Debugging in 3DS is kinda a huge pain. I sorely miss No$ debugger and even VBA has a memory viewer, disassembler, and cheat search.

2 ways to debug: Citra emulator and Luma3DS on hardware. In both cases I was not able to get far with a GUI solution due to various issues, so I ended up using gdb on command line.

First step is to download DevKitPro assuming you haven’t already got it since it’s a requirement for many things like Magikoopa. Regular GDB won’t work for 3DS so you need to use \devkitPro\devkitARM\bin\arm-none-eabi-gdb.exe - this will work but it does like to crash if you ever mistype a command or use one that isn’t supported e.g. layout asm. Open PowerShell in that folder and type .\arm-none-eabi-gdb. This opens gdb.

GDB with Citra

Next, go to Citra, Emulation>Configure, then the Debug tab and tick “Enable GDB stub”. Next launch your game. It will get stuck on the launch screen because it is waiting for a GDB connection. Go back into PowerShell and type target remote localhost:24689. This should connect to Citra. If you get a timeout error, close both Citra and PowerShell and try again. It’s really annoying but if you follow the instructions it should hopefully not happen often. All going well it should connect and you can go to the “Using GDB” section.

GDB with Luma

On Luma, make sure you are connected to the same network as your computer. Then start up the game and then press the Home button to pause it. Press L+Down+Select to open the Rosalina menu. Go to Debugger options and enable debugger. Make a note of your 3DS’ IP address shown in the top right corner. Now go to Process List and select Iron15. It needs to be at the Home menu because GDB can’t connect if it’s not paused.

Go back into PowerShell, and type target remote [ip address]:4000 to connect to your 3DS. You can now go back into the game, and it will be paused. You can now use GDB to set breakpoints and inspect memory.

One note if you are using WSL - you can actually run gdb-multiarch to connect to your 3DS instead of arm-none-eabi-gdb, and this is slightly more stable and supports things like layout asm.

Using GDB

Right now if you’ve followed the above instructions your game is paused awaiting input from GDB. There are a few things that I usually do from here:

  • b *0x12345678 sets a breakpoint at 0x12345678.
  • x 0x12345678 prints the word at address 0x12345678
  • x /100x 0x12345678 prints 100 words starting at address 0x12345678
  • info registers prints the value in each register.
  • set $r0 = 0x1234 puts the value 0x1234 into register r0.
  • si runs a single instruction and then pauses the game again.
  • j *0x12345678 jumps to 0x12345678 and unpauses the game.
  • c unpauses the game.
  • detach stops the connection.

As you can see, this is pretty limited compared to what GBA has in terms of debugging. I’ve tried a few other options to get debugging working through e.g. Ghidra or gdbgui or other frontends for GDB but haven’t been able to get them working.

Having covered all that, what does debugging actually look like?
For starters, in Ghidra I look for a function that seems to be relevant and I’ll put a breakpoint there. Then I play the game until it hits the breakpoint, which lets me see if the function is actually called where and when I think it is. If I’m not sure what a function’s parameters are, I can put a break on the function and inspect the registers to see what values are being passed in. Inspecting memory lets you see what a routine is reading or writing, and with a hefty dose of trial and error you can get a long way just by poking around.

It is a really time consuming part of the process though so I find myself avoiding using the debugger if I can help it… but there are definitely times when you just have to pull out the debugger and check what’s happening in game and it can save hours of looking at code with no idea what it’s doing.

3 Likes

Quick and dirty hack to view growths, no I don’t plan on fixing anything else about it any time soon:

Magikoopa patch:

ViewGrowths:
    type: branch
    link: true
    addr: 0x4e8f9c
    dest: 0x5330b4
ViewGrowths2:
    type: branch
    link: false
    addr: 0x4e902c
    dest: 0x4e9040

Also need to edit MID_H_能力値_基本値 which lives in m\@E\ResidentMenu.bin.lz

2 Likes

Also made lunge work with siege weapons.

AllowSiegeLungePlayer:
    type: patch
    addr: 0x62f588
    data: 00000000

AllowSiegeLungeAI:
    type: patch
    addr: 0x4cc3c8
    data: 00000000
2 Likes

Another little hack to allow chapters to toggle between two map themes:

In the .hks file for magikoopa:

BMapBGMChnageFlagOnToggle:
    type: branch
    link: false
    addr: 0x3ac7c4
    func: BMapBGMChnageFlagOnNew

In the .s file for magikoopa:

.align 4
.global BMapBGMChnageFlagOnNew
BMapBGMChnageFlagOnNew:
push {r4-r5, lr}
bl GameUserData__Get
ldr r0, [r0, #0x1c]
ldr r1, =0x3ac7e0 @the string for S_BMapBGM切り替え
mov r4, r0
mov r5, r1
bl FlagManager__Get
cmp r0, #0
mov r0, r4
mov r1, r5
beq SetFlag
bl FlagManager__Clr
pop {r4-r5, lr}
b map__sound__Bgm__UpdateBGMNew

SetFlag:
bl FlagManager__Set
pop {r4-r5, lr}
b map__sound__Bgm__UpdateBGMNew

.align 4
.pool

map__sound__Bgm__UpdateBGMNew:
push          {r4-r6, lr}
bl            GameUserData__Get
ldr           r0,[r0,#0x1c]
ldr           r1, =0x636374            
bl            FlagManager__Get            
cmp           r0,#0x0
beq           ChangeMusicBack
ldr           r0, =0x77956c            
mov           r1,#0x0
bl            0x0507834                       
ldr           r5, =0x6d7f38  
movs          r4,r0
ldr           r0,[r5,#0x8]
add           r0,r0,#0x1
beq           LAB_003991f4
ldr           r1,[r4,#0x0]
bl            sut__strcmp   
cmp           r0,#0x0
bne           LAB_003991f4
ldr           r1,[r4,#0x4]
ldr           r4,[r5,#0x8]
mov           r5,#0x1
mov           r2,#0x40
add           r0,r4,#0x1
bl            sut__strncpy      
strb          r5,[r4,#0x0]
strb          r5,[r4,#0x18c]
LAB_003991f4:                         
mov           r4,#0x0
bl            ProcSoundMonitor__GetInstance    
cmp           r0,#0x0
beq           Return
bl            ProcSoundMonitor__GetInstance   
mov           r0,r4
pop          {r4-r6, lr}
b             ProcSoundMonitor__ResetPosition 
ChangeMusicBack:
ldr           r0, =0x77956c            
mov           r1,#0x0
bl            0x0507834                       
ldr           r5, =0x6d7f38  
movs          r4,r0
ldr           r1,[r4,#0x0] @original music
ldr           r4,[r5,#0x8]
mov           r5,#0x1
mov           r2,#0x40
add           r0,r4,#0x1
bl            sut__strncpy      
strb          r5,[r4,#0x0]
strb          r5,[r4,#0x18c]
b LAB_003991f4                         
Return:
pop {r4-r6, pc}

You can then switch the music back and forth using ev::BMapBGMChnageFlagOn() (yes the typo is required).

Example usage for player/enemy phase toggle:

event [16](-1, -1, 0) {
    #every player phase
    ev::BGMStop(500);
    ev::BMapBGMChnageFlagOn();
    ev::TimeWait(501);
}
event [16](-1, -1, 1) {
    #every enemy phase
    ev::BGMStop(500);
    ev::BMapBGMChnageFlagOn();
    ev::TimeWait(501);
}
2 Likes

Replacing map music:

In the romfs/sound/stream folder are all your streamed sounds i.e. music, mostly. For this example I am replacing STRM_MAP_F1.

First we need the actual wav file. I am using music taken directly from SoV but the format doesn’t quite match because Fates does combat music as additional channels layered over map music.

Specifically, the wav needs 5 channels:

  • on the map, it plays channels 1 and 2 (L and R)
  • in combat, it plays channels 4 and 5 (L and R) as well as 3 (usually a mono version of Channels 1 and 2)

I am using Audacity. You need to enable exporting multichannel wavs first in Edit>Preferences:
image

Next I put my map music on channels 1 and 2 and the combat music on 4 and 5. I leave 3 blank because I don’t want it to clash with my combat music.

As you can see the combat music is a much shorter loop, so I make it repeat the full length and just fade out for a second at the end before it comes back in. This will cause a bit of a weird moment during combat at the moment the map music loops but I haven’t found a better solution other than ensuring the map music and combat music have the same loop points like vanilla music does.

Speaking of loop points, you can’t set those yet but keep Audacity open because we’ll come back to that.

I’ve been told that the 3ds cannot handle 48000 sample rate and it needs downsampling even though SoV uses it just fine. But to be safe I downsample to 28637 Hz and export as a 16bit wav.
image

Next, in Citric Composer you can go to Tools>Isabelle Sound Editor and then go to Edit>Import File and select your wav.

Click Project Info so you can see the left pane, and expand the window because it doesn’t have scroll bars.

Now you need to enter the loop points. I was able to copy the values from SoV but if you don’t have that, you can find the loop point in Audacity, zooming in as far as you can to be the most precise, and use the timestamp at the bottom to find the values to put in.
image

For map music, under ‘Version’ you should put 2, 3, 1 instead of the default 4, 0, 0. Also make sure to tick “Loop” and finally click “Update Project Info” to confirm your changes.

Then you can File>Export Binary and overwrite the music you’re replacing. Fin.

5 Likes

Another small but potentially very powerful hack:

This allows users to make their own custom ev:: commands for use in event scripts.

AddNewScriptCommands:
    type: branch
    link: false
    addr: 0x42e2a4
    func: AddNewEVCommands

.align 4
.global AddNewEVCommands
AddNewEVCommands:
@ copying the rest i guess but instead of r4 + whatever we'll just use our own address????
ldr r0, =aCallRoutine
ldr r0, [r0]
tst r0, #1
bne 0x42e44c
ldr r0, =aCallRoutine
blx __cxa_guard_acquire
cmp r0, #0
beq 0x42e44c
ldr r2, =CallRoutine @new event routine.
ldr r0, =0x716e98
mov r3, #1
ldr r1, =aCallRoutineString
bl cmvm__CmCFunction__CmCFunction
ldr r0, =aCallRoutine
pop {r4, lr}
b 0x103d04


aCallRoutine:
andeq r0, r0, r0
aCallRoutineString:
.string "ev::CallRoutine"

The example command given is CallRoutine which I have set up to work similar to ASMC does in GBAFE i.e. it runs an ASM function at the given address.

However I have added some additional options to use params - you can set $0-$3 which can be passed in as r0-r3, and I also added the option to pass in a ProcInst pointer as many routines require this.

Usage:

ev::CallRoutine(0x123456, -1) will call the routine at 0x123456 with r0=$0, r1=$1 etc.
ev::CallRoutine(0x123456, 0) will call the routine at 0x123456 with r0 = event ProcInst pointer, r1 = $0, r2=$1, etc.
ev::CallRoutine(0x123456, "ProcName") will use Proc__FindByName to find the first instance of "ProcName" and put that in r0. r1 = $0, r2 = $1, etc.
CallRoutine:
push {r3-r7, lr}
@r0 is the parent proc, r1 is the routine to call, r2 is -1 if not passing parent proc, and 0 if yes
mov r12, r1
ldr r4, [r0, #4] @r0 is parent proc. r0+4 is the pointer to the $0 variables.
cmp r2, #0
beq PassProc
blt NoPassProc
@otherwise use it as a string pointer?
mov r0, r2
bl Proc__FindByName
b PassProc

NoPassProc:
@if not passing proc
ldr r0, [r4]
ldr r1, [r4, #4]
ldr r2, [r4, #8]
ldr r3, [r4, #12]
b EndCallRoutine

PassProc:
@if passing proc
ldr r1, [r4]
ldr r2, [r4, #4]
ldr r3, [r4, #8]

EndCallRoutine:
blx r12
pop {r3-r7, pc}
2 Likes

The code below has some issues so don’t use for now.

If you just want the prep screen without having to go to castle (i.e. before castle is unlocked), you can set the below in paragon:
image
image


WIP CODE

Making use of the ‘add ev:: commands’ hack from the above post, here is a new command to allow skip castle while still saving between chapters

    ev::ChapterSetSkipChapterSaveCastle(1); //original, skip both save and castle
    ev::ChapterSetSkipCastleWithSave(1); //new, save and then skip castle

Default behaviour:
if 0x1000000 set, skip save and castle and go to next chapter (used for e.g. endgame part 1->2)
else if 0x800 set, skip save and go to castle (used for castle defense?)

New behaviour:
if 0x1000000 set, skip castle
if 0x800 set, skip save

magikoopa hooks:

ReplaceevChapterSetSkipChapterSave:
    type: symbol
    addr: 0x426428
    sym: SkipCastleWithSave

ReplaceBeforeSaveRoutine:
    type: branch
    addr: 0x1b66fc
    link: false
    func: CheckSkipCastle

ReplaceAfterSaveRoutine:
    type: symbol
    addr: 0x53a1ac
    sym: PostSaveRoutine

asm (includes the callroutine ev:: code from prev post because it’s all part of the same expansion of event commands):

.align 4
.global AddNewEVCommands
AddNewEVCommands:
@ copying the rest i guess but instead of r4 + whatever we'll just use our own address????
ldr r0, =aCallRoutine
ldr r0, [r0]
tst r0, #1
bne 0x42e44c
ldr r0, =aCallRoutine
blx __cxa_guard_acquire
cmp r0, #0
beq 0x42e44c
ldr r2, =CallRoutine @new event routine.
ldr r0, =0x716e98
mov r3, #1
ldr r1, =aCallRoutineString
bl cmvm__CmCFunction__CmCFunction

ldr r0, =aSkipCastleRoutine
ldr r0, [r0]
tst r0, #1
bne 0x42e44c
ldr r0, =aSkipCastleRoutine
blx __cxa_guard_acquire
cmp r0, #0
beq 0x42e44c
ldr r2, =anonymous_namespace__ChapterSetSkipChapterSaveCastle @this is the original one
ldr r0, =0x716e98
mov r3, #1
ldr r1, =aSkipCastleRoutineString
bl cmvm__CmCFunction__CmCFunction
pop {r4, lr}
b 0x103d04

.pool
aCallRoutine:
andeq r0, r0, r0
aCallRoutineString:
.string "ev::CallRoutine"
aSkipCastleRoutine:
andeq r0, r0, r0
aSkipCastleRoutineString:
.string "ev::ChapterSetSkipCastleWithSave"

.align 4

CallRoutine:
push {r3-r7, lr} @why r3?
@r0 is the parent proc, r1 is the routine to call, r2 is -1 if not passing parent proc, and 0 if yes
mov r12, r1
ldr r4, [r0, #4] @r0 is parent proc. r0+4 is the pointer to the $0 variables.
cmp r2, #0
beq PassProc
blt NoPassProc
@otherwise use it as a string pointer?
mov r0, r2
bl Proc__FindByName
b PassProc

NoPassProc:
@if not passing proc
ldr r0, [r4]
ldr r1, [r4, #4]
ldr r2, [r4, #8]
ldr r3, [r4, #12]
b EndCallRoutine

PassProc:
@if passing proc
ldr r1, [r4]
ldr r2, [r4, #4]
ldr r3, [r4, #8]

EndCallRoutine:
blx r12
pop {r3-r7, pc}

.global SkipCastleWithSave
SkipCastleWithSave:
cmp r1, #0
push {r4, lr}
bl GameUserData__Get
ldr r1, [r0, #0x28]
beq clearSkipBit
orr r1, #0x800 @normally used to go to castle without saving
orr r1, #0x1000000 @and the bit for skip castle+save
b 0x3af27c
clearSkipBit:
bic r1, #0x800
bic r1, #0x1000000
b 0x3af27c

.global CheckSkipCastle
CheckSkipCastle: @checks if 0x1000000 and 0x800 are both set and if so skips castle and save, else just save, we'll skip the castle later in postsaveroutine
cmp r5, #0
beq 0x1b6724
mov r0, r7
b 0x1b6700

.global PostSaveRoutine
PostSaveRoutine:
push {r4, lr}
mov r4, r0
bl GameUserData__Get
ldr r1, [r0, #0x28]
tst r1, #0x1000000
beq NoSkipCastle
mov r0, r4
pop {r4, lr}
mov r1, #6
b ProcInst__Jump

NoSkipCastle:
pop {r4, pc}
.pool
2 Likes

Super quick adjustments to pair up mechanics:

To allow paired up units to dual attack: change 0x347418 to 00000000
image

To prevent paired up units from negating dual strikes (except when guard gauge is full): change 0x347f60 to 00000000
image

7 Likes

Removing the My Castle tutorial:
citra-qt_xXCAwvyBHu

RemoveCastleTutA: #how to build a thing dialogue
    type: patch
    addr: 0x47f51c
    data: 1EFF2FE1
RemoveCastleTutMenu: #brings up the build a thing menu
    type: patch
    addr: 0x44d5b0
    data: 1EFF2FE1
RemoveCastleTutB: #with that i'll take my leave
    type: patch
    addr: 0x47f424
    data: 1EFF2FE1
RemoveCastleTutC: #butler line from jakob/felicia
    type: patch
    addr: 0x47f39c
    data: 1EFF2FE1
RemoveCastleTutD: #popup notice
    type: patch
    addr: 0x47f328
    data: 1EFF2FE1

For the gif above I commented out the RemoveCastleTutB patch and replaced the dialogue with my own. You can try mixing and matching if you like, I’ve found what works for me.

General notes:
The proc managing My Castle is called CastleMainSeq. At ProcLabel 0x1 it runs the routine castle__CastleSeq__InitEnterTutorial which checks if it should run the tutorial. You shouldn’t actually cancel this though because among other things it sets up your initial buildings and you’ll have an empty castle.

If it decides it’s the first time you’re entering the castle it will create a ProcInst of FirstEnterSequence aka EnterSeq and jump to CastleMainSeq ProcLabel 0x2. At this point CastleMainSeq is the parent and EnterSeq is the child proc.

First, EnterSeq runs check on what step we’re at and jumps to the appropriate ProcLabel. 0x0 does the setup e.g. deciding a castle style based on route, assistant based on player gender, initial buildings placement, plays the BGM etc.

0x1 shows the initial tutorial dialogue (RemoveCastleTutA) and yields to the CastleMainSeq which then brings up the castle menu (RemoveCastleTutMenu) and forces you to build something (which can softlock if no buildings are available).

0x2 shows the post-building dialogue and notices etc (RemoveCastleTutB-D).

3 Likes

Use support conversation BG for regular talk events

citra-qt_MFExmSYWVQ

event [12]() {
    ev::TelopPlay("Tlp_イベント背景");
    ev::Talk("MID_C007_OP1");
}

This is useful for when you want a talk event before the prep screen, which usually either requires a bev cutscene to load a 3d map which is a lot of extra work, or to have them talking in the void.

It takes advantage of the unused (except in DLC) ev::TelopPlay() command to display the bg used for support conversations.

Hopefully this opens the door to showing custom backgrounds in future.

5 Likes

Apparently the future was not very far away:
image
image

How to insert other backgrounds:

First creating the arc.lz file. The default BG is in romfs/effects/Tlp_Ev_t001.arc.lz so make a copy of that and extract it using FEAT. You should get a folder containing a bch. Rename the folder to whatever you like, I’m using Tlp_Ev_MyBG. I wasn’t able to edit the bch using either BCH texture tool or Ohana3DS Rebirth, but did some digging and Ohana original (non-rebirth) was able to replace the texture and save.

Then use FEAT to create a .arc file from the folder and use FEAT again to compress it to .arc.lz. I tried FEAT 3.0 and it didn’t work but using FEAT 2.6 and editing the header per the below, I was able to make it work:

Open the Game Effects editor in Paragon and click Add. Find Tlp_イベント背景 on the left and copy it to the newly created effect. Then rename the label, effect, and arc names.

Finally you can go into your events and put

    ev::TelopPlay("Tlp_MyBG");
    ev::Talk("MID_C007_OP1");
6 Likes

Cool thread. I can’t wait to see the Fates hacking scene grow more. Seems like another great place to set up camp.

I greatly appreciate the background denotation being Tlp