How to Make A Support Table out of Macros and EA:
KIRB DID THIS SO MUCH BETTER HERE, READ THIS INSTEAD Editing Supports
So everyone knows that the Support Compatibility Editor is the .nmm file that changes the compatibility of each character to support each other. It changes the potential partners, initial values, and growth per turn. If you’re using a buildfile, the easiest way to change this data is to use nmm2csv to make a .csv table, edit it, and place it in the game using c2ea. Pretty basic stuff, right?
Well, I hate the CSV.
I hate it with a burning passion. Staring at this mess makes me have an aneurysm. I can’t have all the information of a character on the screen at the same time. And yeah, I know I could always edit around the formatting of the table to view everything easier, but I have to open up the CSV every single time, and every single time the formatting will reset. (This is just a problem with OpenOffice, if you’re rich and have Excel maybe you don’t have this problem.)

So what do I do instead? I use an .event file covered in macros.
Now come on, you have to tell me this looks so much better. Not much is different: it just looks better and easier to understand. So how is this done? How do you achieve such marvelous results in such an elegant form?
I’ll break it down the best way I know how: terribly.

DISCLAIMER: This will only work for buildfiles. If you’re using FEBuilderGBA, you have a much better visual interface anyways; go use that. If you’re using Nightmare, get help.
Part 1: White Clouds - Making your .event file
Create a blank .event file. I keep mine with my chapter events because I’m a huge doofus who cares nothing for
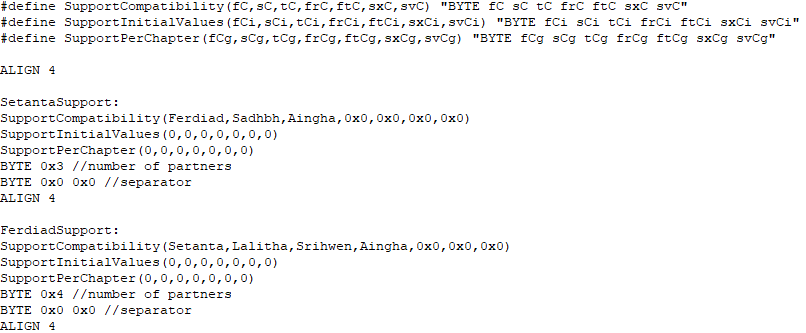
The three macros that define a support table for a unit are:
#define SupportCompatibility(fC,sC,tC,frC,ftC,sxC,svC) "BYTE fC sC tC frC ftC sxC svC"
#define SupportInitialValues(fCi,sCi,tCi,frCi,ftCi,sxCi,svCi) "BYTE fCi sCi tCi frCi ftCi sxCi svCi"
#define SupportGrowths(fCg,sCg,tCg,frCg,ftCg,sxCg,svCg) "BYTE fCg sCg tCg frCg ftCg sxCg svCg"
- The SupportCompatibility macro defines all characters the unit can support with. (Fun fact: support partners don’t need to share the same byte in each others’ support tables: though most of them do. Look at Eirika and Saleh for an example in vanilla.)
- The SupportInitialValues macro defines the initial values each support begins with. These values would be best in decimal for clarity’s sake.
- The SupportGrowths macro defines the amount that each support will grow when two units are adjacent. These values would be best in decimal for clarity’s sake.
Each of these macros does the exact same thing in actuality: defines seven bytes of data. I will not go into detail as to how macros work, but the list of “fC”, “sC”, and so on cover every byte of character definitions and values. The different macros are only separated to make things clearer for the user. Place these three macros at the top of your .event file.
(If you look closely at the image, you’ll notice I use SupportPerChapter instead of SupportGrowths. The two function identically, but the hack I’m using this for uses the FE9-style Supports determined by Venno here: Venno's small ASM hacks and notes. If you aren’t using this support fix, it’s best to use SupportGrowths instead for more clarity. I will continue to only use SupportGrowths in this tutorial.)
Let’s look at a character’s support data I’ve created to better understand how everything works:
SetantaSupport:
SupportCompatibility(Ferdiad,Sadhbh,Aingha,0x0,0x0,0x0,0x0)
SupportInitialValues(0,0,0,0,0,0,0)
SupportGrowths(0,0,0,0,0,0,0)
BYTE 0x3 //number of partners
BYTE 0x0 0x0 //separator
ALIGN 4
So how does this work? Well, I’ve already explained what each macro does, and I’ve already gone ahead and filled out the SupportCompatibility macro with a few character definitions I’ve made elsewhere. These macros all line up: the first byte in SupportInitialValues modifies the initial support amount of Ferdiad, and the same goes for the SupportGrowths.
After the macros are three additional bytes. The singular byte tells us the amount of support partners this unit has: pretty straightforward. The BYTE 0x0 0x0 is simply a separator. It’s best not to modify it. Finally, we align the data by four so we may call it properly using a pointer.
Modify this example as you please, then paste it below your macros. It’s best to name the data something informative so you understand what it’s for: it sucks when you don’t know what everything is because your dumb butt called everything “agsjdfghkljsdhg” and “jdfhlskdjghd5”.
By the end, your .event file should look something like the picture above. Save the file and pat yourself on the back for doing something good.
Part 2: Crimson Flower - Implementing your .event file
Alright, so you have your .event file done. What now?
First thing you’ll wanna do is include it somewhere. I usually include the .event file in my chapter events because I also include my REDA and effectiveness definitions there, but you can choose to insert it wherever you please.
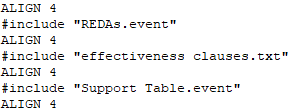
Bam. It’s done. If everything’s done alright, it’ll compile correctly and everything will be alright. But how do you actually give each character their newly-formatted support data? You’ll have to bring up the FE8 Character Editor.nmm file and head to the Support Data column. Put in the character’s row the name of their support data, followed by IsPointer. For example, if your character’s support data is called EirikaSupportTable, you should place EirikaSupportTable|IsPointer in their row.

Put the CSV in your hack and that’s it! If you’ve done everything correctly, your character should have their support compatibility replaced by whatever you placed in your .event file!
Now, this isn’t the most useful tutorial in the world. I’m sure there’s some better way to manage supports using buildfiles, but this is the best method I’ve come up with. You’ll still have to use CSV tables for support text IDs and stuff like that, but those CSVs are more palatable. The good news about learning this is that once you’ve learned this sort of BYTE and macro fun, you can sometimes replace other tables. For example, you can use the same method to replace your effectiveness pointers: create an .event file, place your data under pointers, and in the Item Editor.nmm table replace the effectiveness pointer with your new bytes’ pointer. (Of course, doing this method for effectiveness brings up a whole new set of complications for items such as the Fili Shield, but that’s a tutorial someone else can come up with…)
Shout-out to @Zane for originally teaching me this method of using BYTE a long time ago. (Also apparently @Pikmin1211 did this whole thing before I did, but I developed it separately after him without knowing so give him some props too: I stole his thunder. You know @Kirb actually also did this exact whole thing before me in a separate topic with better detail so oop. read that here Editing Supports)