Heyo.
My name is RandomWizard, and I’m primarily a map designer in the Fire Emblem modding community. In my experiences playing and creating chapters, I’ve found one highly important area in particular that’s been of varying quality across hacks - enemy placement. Despite the existence of numerous other tutorials for maps, chapters, units, ASM, writing, et cetera, there’s nothing in particular that quite discusses how to make fun and interesting enemy placement.
So without further ado, allow me to fix that.
(NOTE: All screenshots in Chapters 1 and 2 showing examples of enemy placement formations and AI types are taken from Souls of the Forest by Scraiza or FEWoD.)
Chapter 1: Overview of Enemy AI Types
Before you can start placing enemies, you need to know what sort of enemies there are to place. The exact classes and tools available to you, and what their stats and movement are like, will vary highly depending upon what project you’re making, but enemy AI types in Fire Emblem are more or less consistent between games. I’ll go over the most common ones, and how to implement each of them in gameplay.
Charge AI

Charge AI is probably the easiest AI to understand. Enemies with this AI just rush towards you, regardless of how far away they are - oftentimes, they’ll be walking, galloping, flying, slithering, etc. across the entire map to pull this off. This is seen most often on reinforcements, but can be common on initial enemies on the first few turns of chapters as well. When used well, Charge AI can make a map fast-paced and engaging; when used poorly, it bogs down the chapter into mashing End Turn at chokepoints.
Use Charge AI To:
- Make the map feel highly active.
- Force the player to play defensively against an enemy group.
- Create extremely dynamic challenges on the first few turns of chapters.
Attack-in-Range AI

With this AI setting, the unit doesn’t move far across the map; they only attack when a player unit is in their range. Lone attack-in-range enemies can be weak and helpless, but with overlapping formations or combination with other enemy types, they can be highly threatening defenders of a given area. Overuse of attack-in-range AI can turn a map into the unpopular “bait-and-switch” style of gameplay, in which a lack of pressure or danger allows the player to bait in individual enemies, kill them one at a time, and push forwards at their leisure.
Use Attack-in-Range AI To:
- Make the map feel somewhat slower-paced and tactical.
- Force the player to think carefully about luring in enemies.
- Guard specific, larger areas without resorting to Guard Tile AI.
- Overlap ranges to make it difficult to bait in foes.
Guard Tile AI

The favored AI of armor knights and throne bosses everywhere, we all know this AI setting: units who sit safely on a single tile, never moving at all and only attacking if a target comes within reach of their weapon. The slowest and most defensive choice out there, Guard Tile AI can be divided into two main forms: holding points and long-range attacks.
Point-holding Guard Tile AI is the type of AI used for unmoving enemies right in the player’s way, primarily armor knights and throne bosses as mentioned above. These enemies aren’t especially threatening, but they’re good for simply giving the player something to kill on otherwise quiet turns, holding droppable keys and items, and acting as bait to get the player into range of more mobile foes.
Meanwhile, long-range attackers with Guard Tile AI use tools like longbows, siege tomes, and Physic staves. They never move because they don’t need to - standing at a single point lets them cover a single specific area with their tool of choice, and that’s the only area they need to cover.
Use Guard Tile AI to:
- Make an area feel extremely well-defended.
- Get the player to work around or through long-range tools.
- Have the player go on the offensive against enemies.
Attack-in-2-Range AI

If you’ve ever played Vision Quest or watched Pandan’s design videos, you’ll know well the power of Attack-in-2-Range AI. It strikes a balance between Charge AI and Attack-in-Range AI - the enemy charges towards player units if its victim is within twice its movement range (in other words, if it’d be able to attack them the turn after this). This allows you to have enemies dynamically approach the player at a certain point without tying them to specific turns through reinforcement timing. It’s a great tool for making maps feel active and fast-paced without being overwhelming. Note that you can count out the exact number of tiles units with this AI will move to figure out where their ranges overlap!
Use Attack-in-2-Range AI to:
- Make the map feel like it’s reacting to player movement.
- Have enemies guard larger specific areas than with Attack-in-Range AI.
- Have sections of the map seem active and mobile while letting the player reach them at their own pace.
Linked AI

Linked AI, also known as Group AI, is a feature that doesn’t quite exist in vanilla GBA Fire Emblem, but can be replicated with ASM, Commander AI, and/or tools in other engines. This works like attack-in-range AI, but with a twist: baiting in one enemy in the group also makes the rest of them start charging. This lets you make the whole group close in on Enemy Phase, and force the player to take them down next turn.
Use Linked AI to:
- Ensure the player has to fight an entire enemy group all at once.
- Fit in attack-in-range formations without requiring ranges to exactly overlap.
- Have moving bosses that must be fought alongside their lackies.
Escape AI


Not a typical AI type by any means, enemies with this AI setup will attempt to carry their stolen goods to escape points or off the map - or, in some situations, assault unprotected defend points! Instead of serving as enemies on their own, units with this AI should primarily function as incentives to get to specific locations by specific turns, in order to intercept treasure or protect defend points.
Use Escape AI to:
- Create anti-turtle incentives for chapters.
- Put a twist on the typical flow of enemies attacking the player.
Chapter 2: Combining AI Types Into Formations
You have a basic toolkit of enemy AI types, but none of them can make a map interesting on their own. To make fun chapters, you’ll generally want to combine these AI types into specific groups and formations. I’ve provided a partial list of some ways you can combine AI types to create interesting combinations that are fun to play against.
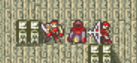
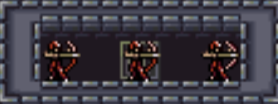
Kaga Block
 (Fire Emblem: Shadow Dragon, Chapter 4)
When in doubt, you can’t go wrong with kaga blocks (aside from all the ways in which you can). A “kaga block”, named after early FE developer Shouzou Kaga, is an enemy formation consisting of a squad of enemies (typically in rectangle or line formations) that all have the same movement and Charge AI. These blocks are simplistic, but they do the job of making you take on a whole squad of enemies all at once; they can be especially intimidating as reinforcements.
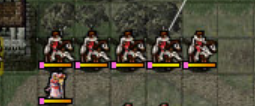
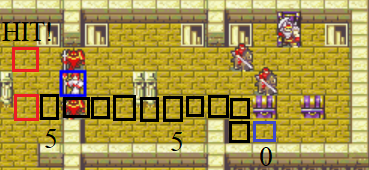
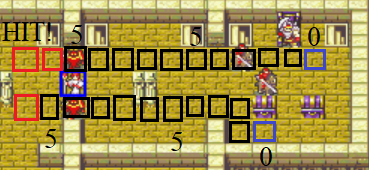
Overlapping Ranges I: Attack-in-Range Only
 (Souls of the Forest, Chapter 2)
On their own, unless generic enemies are absurdly strong or carrying tools like Killer weapons, attack-in-range enemies aren’t much of a threat. But what if you combined them with other attack-in-range enemies? Place multiple such enemies near each other, with movements and weapon ranges lined up so that they have extremely similar (perhaps even identical) ranges of attack. As such, baiting one means baiting them all. The typical challenge of these formations is finding a unit that can survive all of their attacks and lure in every foe here at once - after that, they’re no different from having a kaga block or another type of formation right in range of you to take down.
Overlapping Ranges II: Guard Tile Only
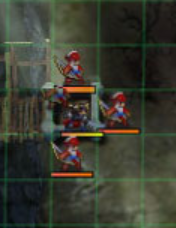 (Fire Emblem: Fates, Chapter 3)
Combine several enemies with tile-guarding AI right next to each other to build up a point-choking formation to be reckoned with, where you need to break through the immobile foes all at once to avoid being devastated by their overlapping Enemy Phase attacks. You could have longbows behind armor knights, mages behind brigands, status staves behind mages… And I didn’t even mention the way you can bring in long-range attackers and their overlapping ranges into this!
Overlapping Ranges III: Combining AI Types
 (Fire Emblem: Sacred Stones, Chapter 9 Ephraim)
Other enemy AI types have ranges they can attack in as well. You could pair the edge of an attack-in-range enemy’s range with that of a guard tile enemy holding a point - perhaps an armor knight with a Steel Lance, positioned such that fighting him at 1 range puts you at the edge of a Mage’s reach. Or with attack-in-2-range enemies, so that baiting in one enemy also makes the attack in 2 range formation start charging. Or with charging enemies - if you’re at that area on a certain turn, the ranges of the specific enemies here line up perfectly. This is a broad category - there are numerous combinations of AI types you could create here, including many I haven’t even listed!
Behind Doors and Walls
 (Fire Emblem: Sacred Stones, Chapter 4)
Doors and breakable walls give the player a unique opportunity to close in on enemies from a space well within their range. You can place large numbers of enemies (often with attack-in-range AI) just on the other side of a door or breakable wall, confident that the player will be able to break the wall and rush those enemies in a single turn. Furthermore, using these helpless enemies to know where the player is lets you time attack-in-2-range and charging enemies accordingly, to approach or strike at them there. You can also have enemies appear right on the top of the player through reinforcements.
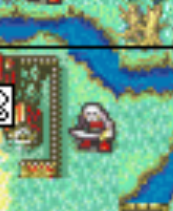
Relevant Lone Enemies
 (Fire Emblem: Sacred Stones, Endgame)
Not all enemies need to be part of formations to be relevant - indeed, sometimes, an enemy being alone will make them better for the hack. For example, a single enemy with attack-in-range AI and a killer weapon needs to be treated and baited as carefully as an overlapping formation might be. You might also want to have a stealable or secret on an out-of-the-way enemy that’s easy to engage without interference. In addition, a long-range tile-guarding attacker like a ballista or siege tome is best off alone - just their presence massively multiplies the threat of any enemies within their range, since you have to worry about the siege enemy and their melee allies teaming up on a unit.
Murder Hollaces
 (Fire Emblem: Thracia 776, Chapter 11x)
Don’t mind the name; it’s some sort of horrible mangled translation. Anyway, a “murder hollace” is an enclosed space from which mobile ranged enemies can snipe at the player party. It could also take the form of the tops of cliffs or the other sides of thickets in outdoor maps, in addition to enclosed rooms. These function something like long-range siege enemies, in that they amplify the danger of other enemies in the area they cover, but on a smaller scale.
Chapter 3: My Enemy Placement Strategies and Assorted Tips
Clarification before we begin: My enemy placement strategies aren’t the One True Way to design chapters, nor do they function on every map. This is just a method that I’ve found works well for me in practice in most of the chapters I design.
The core rule of my enemy placement is as such: I consider roughly where I want the player to be on each turn (sometimes even drawing out an actual diagram on the map with MS Paint or similar), and place enemies so that they have an amount to fight on each given turn/at each location that’s engaging but not overwhelming.
In order to incentivize the player to stay on pace, I time anti-turtle incentives (dying green units, thieves attacking chests, brigands attacking villages, hard chapter turn limits, pursuing reinforcements from the back, etc.) such that the player should be able to reach and obtain the rewards if they’re at the locations I want them to be on at each turn, but not if they’re significantly behind.
Another important thing I do is making sure to mix up which AI types and formations I use when. A map too heavy with one AI type can get extremely samey and boring - variety is critical to making the chapters stay fun.
One more detail is occasionally building enemy formations around certain units - if I want to show off the abilities of a specific unit (especially one who just joined), I might build a few formations or enemy placements around giving them foes they’re especially well-suited to baiting and killing.
Having the number of starting enemies be roughly 2 or 3 times the number of player units is a good rule of thumb; if you have more than 3 times, there’s a decent chance the map is too dense, and it’s likely to be too empty if you have less than 2 times.
Oh, and when in doubt, make sure to playtest the chapter heavily. That will always show all manner of ways you could change the enemy placement or timing to make it flow better and be more interesting.
All this might sound confusing on paper; it’s hopefully less so in practice.
Chapter 4: Enemy Placement In Practice
Allow me to demonstrate how these enemy placement rules might work.
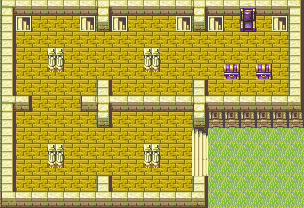
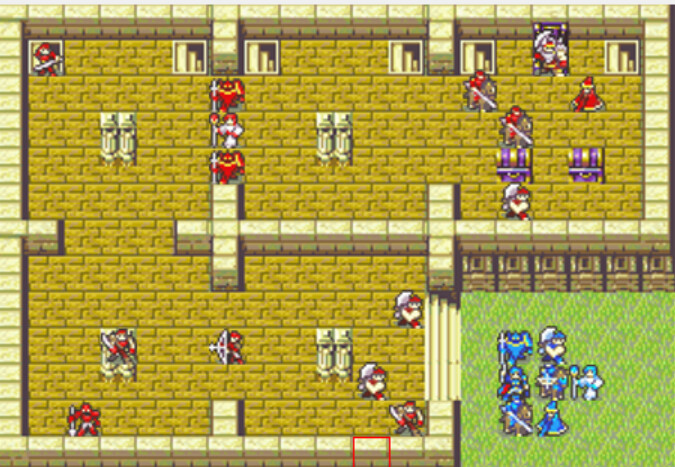
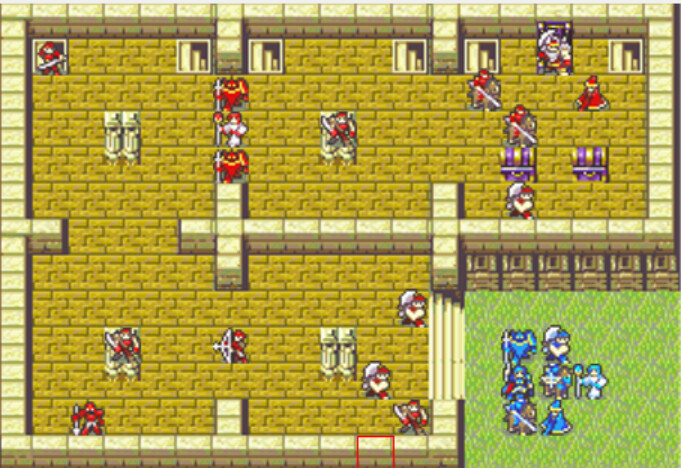
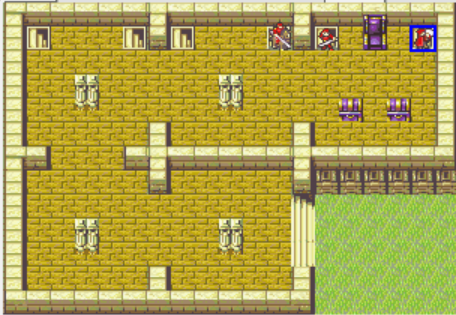
I’ve sketched out a simple map. The layout here isn’t super interesting on its own; it’s just a collection of 5x5 rooms with pillars in the middle. That said, good enemy placement could do a lot to spruce this place up.
But we’ll need a player party first.
This should do the trick. We have seven units: a lance lord, a Ranger (presumably a jagen archetype), Cavalier, Knight, Fighter, Mage, and Curate. Overall, a fairly typical Fire Emblem party, with a bit of an emphasis on lances. The objective will, of course, be to seize the throne.
We’ll also want to establish some details about combat math (which might be different for your project): we want it to take roughly two rounds of combat from units with good matchups to kill a given enemy (except the jagen one-shotting with a Silver Bow), and with average matchups, roughly three rounds of combat from enemies to kill a player unit. Movement is GBA standard.
With that in mind, let’s start drafting out a flow.
It’s a crude MS Paint sketch, but it’ll do the trick.
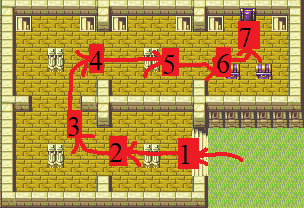
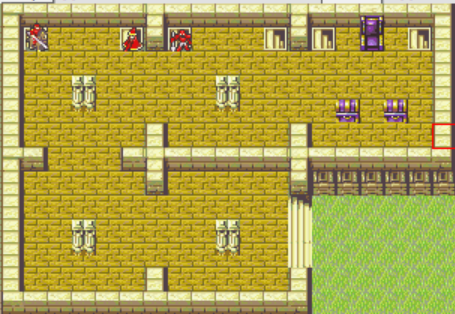
Turn 1, let’s have the player close in on enemies more or less freely.
These three enemies have charge AI - not that it matters, because they’ll almost always die on Turn 1. I also put in a boss on the throne while I was here. The player should be able to take out these three thugs easily enough.
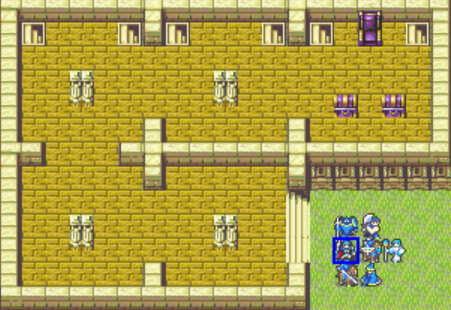
Next up, on Turn 2, the player will have some charging enemies closing in to deal with. These new ones will have charge AI. Fitting with the flow diagram, we want the player to engage them around the far side of the starting room.
Actually, looking at this, the area between the rooms looks a bit bare - let’s move that Archer forwards so the player has to defend against them on Turn 1 Enemy Phase.
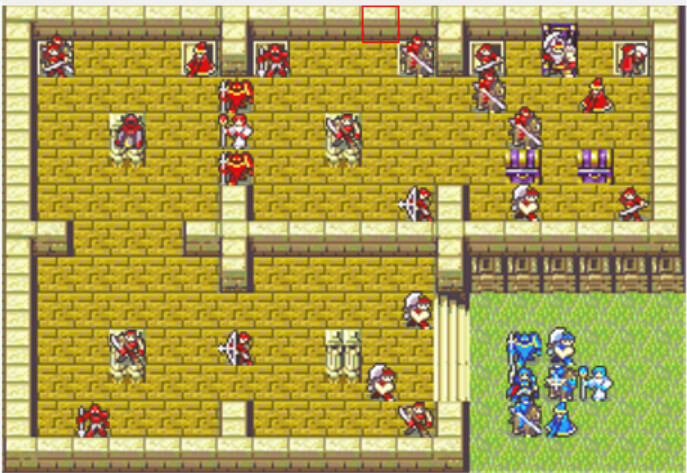
So far, so good. How about we have more charging enemies to confront at this point - the specific corner spot where we have the player arriving at on Turn 3 could hold host to a nasty set of Cavaliers, perhaps. Let’s go count out where a Cavalier would need to be to arrive there on Turn 2 EP…
Looks like the cavalier will move about this far. Let’s just make that more of a proper formation…
Looks good.
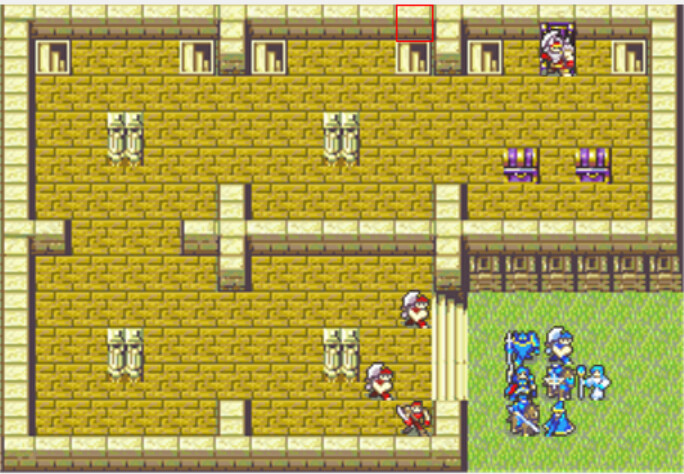
Next up, we’ve been having a lot of charging enemies. Let’s change that up a bit. How about a set of immobile foes for the player to fight on Turn 4?
All three of these enemies have guard-tile AI. An enemy healer in the middle makes the player have less attacking foes to deal with, while forcing them to work quickly to bring down the armors lest a well-placed Heal undo their damage.
Ah, but now the top left is looking bare. Since we have only two combat enemies for the player to kill this turn, how about an additional optional attack-in-range foe to change that up a bit?
A Myrmidon with a droppable Armorslayer should do nicely - it also gives the player another good way to kill the armor knights. Even this one lone enemy makes the room feel much more complete and adds a new dimension to the map.
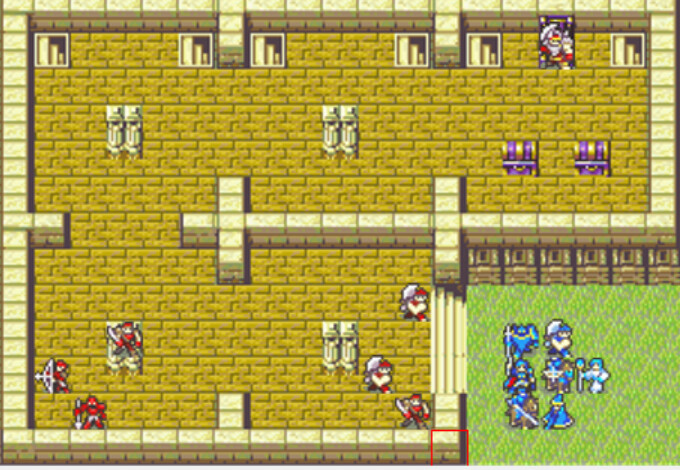
We now need enemies for the player to fight on Turn 5. As such, how about we use the legendary, the amazing, the tangela-tastic, Attack in 2 Range AI? A pair of enemies with that AI can move such that engaging the armor knights gets you in range of their movement.
Once more, we’ll count out the amount of spaces these Attack in 2 range enemies need to move to get to the player there.
This is good for the lower one…
and something like this for the top. How about we put an enemy mage on the top part - we haven’t had any of those yet.
Actually, the central room is still looking fairly empty - how about an attack-in-range enemy who punishes you for targeting the healer?
Something like this.
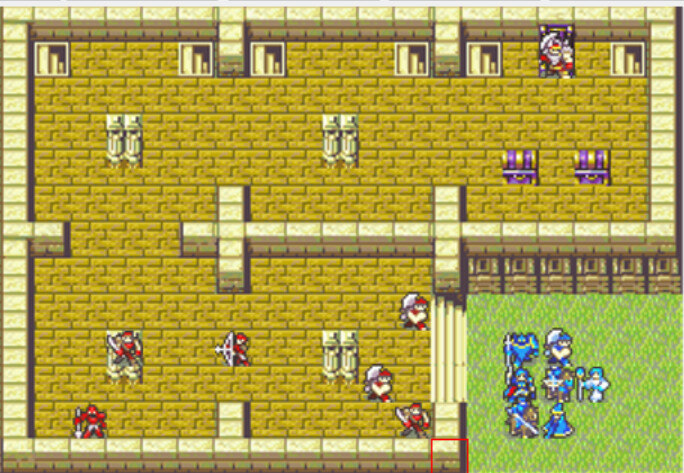
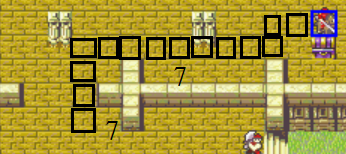
So that gives us enemies for turns 1, 2, 3, 4, and 5. How about Turn 6 is a chance to take on some reinforcements instead? Right then, we can use some of those staircases I’ve placed - and fit in our anti-turtle Thief as well. We want the player to be clearing the throne room right about now, so spawning in a single thief (who goes for the chests, then the escape point) will force them to do that quickly.
A formation like this - two enemies the player can spawncamp, one they need to catch before their treasure disappears from under their nose - should do the trick.
Turn 7 is mostly about killing the boss, who’s helpless on the throne. That said, we could throw in another attack-in-range enemy who probably gets baited on Turn 6 to add more to do. How about in the bottom right corner? And they can have a droppable Chest Key while they’re at it. (Another chest key can be on one of the armor knights from earlier or something.)
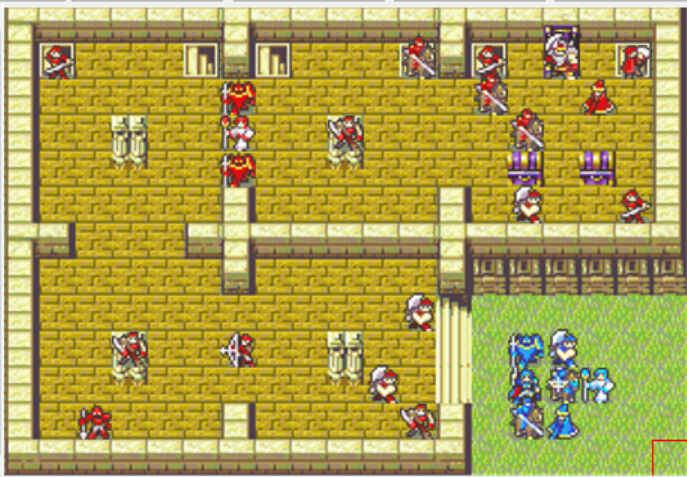
And from there, we’re almost finished. The top left and top center rooms still look empty - let’s throw in an immobile Mage on the pillar and an immobile Longbow Archer in the corner of the center room - and some Turn 8 reinforcements to make sure the player keeps moving.
And here we have it! A chapter’s worth of a first draft of enemy placement. We have 19 starting enemies and 7 starting player units, which is a bit under 3 times as many enemy units as player units; well within our rule from earlier. As with any enemy placement, it’d need playtesting to make sure there’s no location or turn in the chapter that’s too boring or absurd, but this should function and hopefully be fun and fairly paced.
If you’d like to reference it, you can download the .ups patch with the example enemy placement here. Note that I haven’t set up unit stats at all, or replaced most of the vanilla eventing/jank, so there are probably a lot of parts that don’t work right.
Chapter 5: In Summary
There are several types of enemy AI you can use in Fire Emblem enemy placement, including charging AI, attack-in-range AI, tile-guarding AI, attack-in-2-range AI, and linked AI. You can combine these AI types in a variety of formations, anywhere from simple large blocks of charging enemies, to complex mixtures of tile-guarding armor knights acting as bait to bring you into the range of attack-in-2-range enemies under the cover of an immobile siege tome.
At its core, I consider where the player is meant to be on each given turn (sometimes drawing that out in MS Paint) and place enemies such that they have something interesting to fight on each of those turns, and use anti-turtle incentives like brigands attacking villages to make sure they stay on track for the pacing I want.
I also try to vary up what strategies and AI types I use on my enemies, and go for a target number of about 2.5 times as many enemy units as player units.
When in doubt, playtest the chapter a lot, and watch Pandan’s design videos. He’s far better at this advice than I could ever be.
Addendum 1: Reinforcements (TBD)
This is placeholder text! I’ll finish this addendum another time, hopefully.
Addendum 2: Green Units (TBD)
This is placeholder text! I’ll finish this addendum another time, hopefully.
That’s all for this guide for now. Make sure to let me know if you have any feedback. I hope reading it helps you to make better enemy placement and design better chapters in your future!

 I’m gonna make sure to bookmark and practice with it. and read all through it.