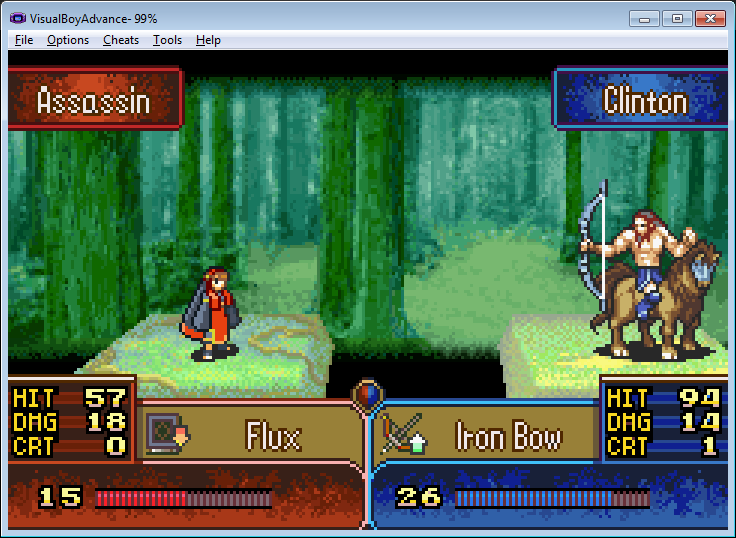
Hey everyone. I’ve been working on a battle screen over the past week that I’m really excited to release. It is F2U/F2E and the link to the download folder can be found just below the first image where it says Download Folder. Along the way, I learned a lot about battle screens (courtesy of some very helpful people in the community) and a fantastic guide from @Pikmin1211. Pik’s guide can be found here: [FE8] Creating and Inserting Battle Screens . And here is the completed battle screen in action.
Download Folder: Dropbox
This post is by no means trying to steal the thunder of Pikmin’s great topic, but rather, to try and be supplemental to it. Let me get my priors out there… I know incredibly little about Fire Emblem hacking and don’t know a lick of buildfiles. But, I wanted to write out a very detailed step by step guide for FeBuilder insertion because some of this stuff can be a bit hard to grapple with… Especially if you are coming in with very little knowledge of the whole process. I figure that more information couldn’t hurt, because sometimes seeing the same thing explained slightly differently can make things click. All of this information is also in the ReadMe that comes with this folder.
Here are the steps for inserting this battle screen and I’m going to write this as if you are actually inserting my battle screen. It takes a little bit of work and is like solving a puzzle, but in the end you’ll have a clearer idea about how battle screens are set up as well as a cool looking battle screen (I think it’s cool anyway!). Also worth noting, if it any time this guide leaves you stuck on what to do, try referring to Pik’s guide as well. Everything I know started there!
-
Download the folder named “Battle Screen Illuminated”. It has everything you need to make the battle screen.
-
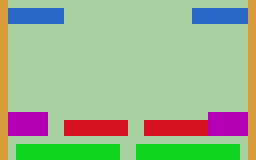
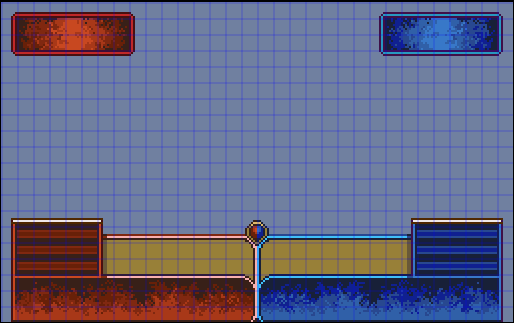
Open up the folder that you just downloaded and open up the the “Base Frame” .png file, “Step 2 Battle Screen Reference Point” .png file, the “Step 2 Main Tilesheet Reference Point” .png file, and the “Starting Point” .png file. Minimize all of these, you will come back to them. If following along on FeUniverse, all four of these are listed below in order and you can use them as reference.
Base Frame (I pulled this from Pik’s Topic)
Battle Screen Reference Point
Main Tilesheet Reference Point

Starting Point
- Open up FeBuilder and in the “Advanced Settings” tab, there is a tab called “Battle Screen”. Open it.
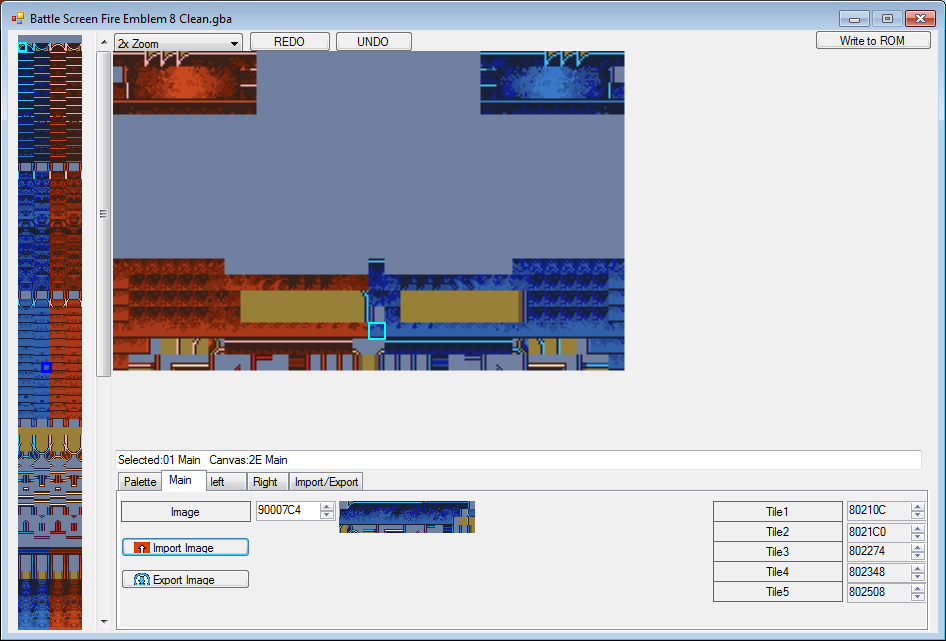
4)In this new screen, there seems to be a fair amount going on. You’ll see the original battle screen in front of you, some columns of very small tiles to the left that you can click and actually place onto the big battle screen in the middle (more on this later), and a few tabs at the bottom like “Palette”, “Main”, etc. If you drag your mouse over the battle screen image, you’ll see a light blue square show up. Take note of this for later. For now, click on the Import/Export tab.
- In the Import/Export tab, click the “Import Image” button. Find your way over to the original “Battle Screen Illuminated” folder that you downloaded. In this folder, you want to open up (Import) the “Full Battle Screen” .png file.
***This step is mostly just to import the palettes that I used for the battle screen. If you are using your own palette, you can manually enter your colors through the “Palette” section, but personally I find it easier to just import the bulk file and have FeBuilder do it for you. Also, and this is a kinda important point… If you are making your own battle screen, steer clear of changing the color for the first three indexes (the first three colors). The first color is used as the transparent background color, the second color is used for the color of the text, and the third color is used as the dark brown shadow for the text. Take care to avoid using these three so you don’t have to go back and redo your palette down the line.
***Also, for what it is worth, I used aseprite to make my screen. At the bottom of aseprite, if your image is set to being a “layer”, you need to right click the word “layer” and set it to “layer from background” so that the image is set as a background. FeBuilder does not like importing these any of these pngs unless it is set to being a background. You also need to ensure the background color is set to the first index. If you don’t, your palette could be messed up when you import.
***Also also, because I’ve seen this happen with several folks who are importing their battle screens. You need to make sure your palettes are “indexed.” At least in Aseprite, click on the Sprite heading at the top and hover over Color Mode. There should be an option for “Indexed”. The reason you need to do this is so FeBuilder does not skip over colors it doesn’t naturally see when you import your tilesheets / bulk import your full battle screen. Remember when I said you don’t wanna mess with the first three colors of the palette from vanilla (even if they aren’t in the actual battle screen you made)? This is precisely why.
- Now, what you’ll see is in an image that looks fairly close to what the final battle screen is supposed to look like, but there are a few errors. Namely, the fire pattern in the HP box starts repeating itself, the HIT/DMG/CRIT boxes have some stray pixels on the outside, the gem in the middle is cut in half. And unfortunately, you won’t like me for the next step, because in order to get the screen looking right, you’ll have to blow this image up to fix it.
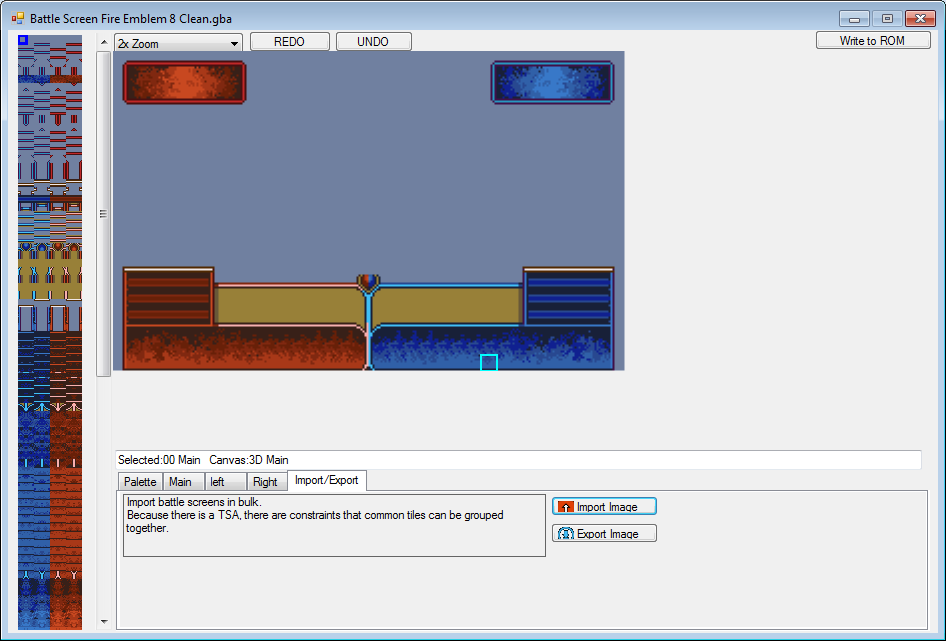
**Take note of the very small tiles on the left of the window. I’m going to call this part of the Battle Screen Window “Small Tile Window” from here on. This image is about to change and you’ll see why in just a moment.
-
Still in the battle screen window, go over to the “Main” tab at the bottom. Again, you want to import an image, and from the same downloaded folder as before, import the “Main Tilesheet” .png file.
-
You’ll notice that the battle screen on FeBuilder just went crazy (it should look like the Starting point image above). Allow me to explain. When you have a battle screen, it is actually just a series of 8 pixel x 8 pixel tiles that are arranged like a puzzle to make up your screen. That light blue cursor that you see when you hover over the battle screen? That is one tile. When you imported the FULL battle screen in Step 5, the program did the best that it could to recreate the full battle screen image, but there are flaws in how it constructs it. This is because of the way certain tiles are grouped, and as a result, it can leave several tiles out that are needed to complete the puzzle. When you imported the “Main Tilesheet” .png file, it gave you all of the tiles that you need, but unfortunately, they are in a different order than the “Full Battle Screen” guessed them to be in. Remember when I said to take note of the small tiles on the left? In “Small Tile Window”? The image and order of the tiles will now be different as a result of importing the “Main Tilesheet” into FeBuilder.
-
Before you go any further, do me a favor and unminimize the “Base Frame” .png file (or reference the picture above). This base frame shows a general layout of where things need to go in the battle screen. This is important to know for a few reasons. For example, up towards the top of the “Base Frame” .png file, there are blue boxes that represent the name plates. Of all the things that probably went haywire when importing “Main Tilesheet” into Febuilder, the name plates (which are made up of a 2 tile x 7 tile area, where there are 2 rows and 7 columns) should have been left intact. For added clarity and a reference point, compare the current FeBuilder battle screen image to the “Full Battle Screen” .png image I asked you to open up in Step 2. You’ll see that they are still the same. You’ll also see that where the red boxes on the “Base Frame” .png file, which represent the item boxes, have been left intact as well.
You’ll see why this is important a little bit later, but for now, try not to put anything into either the name plates or the item plates. -
Now, here is the fun/hard part and the part that needs explaining. On the left side of the battle screen window (where the small tiles are) consists every tile you need to patch up the battle screen. To understand how to do this, I need to do a bit of explaining.
Let’s go back and look at the "Main Tilesheet Reference Point” .png file I asked you to minimize in step 2. Let me explain what this .png file actually is. This .png has 68 tiles in it, where each tile is 8 pixels x 8 pixels (denoted by the grid). For the moment, consider the image as having 4 rows of 17 tiles each, and let’s consider the first of these four rows. When you imported “Main Tilesheet” into the “Main” tab in FeBuilder, what FeBuilder does is take that first row and translate it to being vertical instead of horizontal. So, rather than being
1 2 3 4 . . .
it is now
1
2
3
4
.
.
.
Once it finishes with that first row of 17 tiles, it then continues with the second row of tiles and does the same thing. So for the 17th tile and 18th tile then:
1
2
.
.
.
14
15
16
17
18
19
.
.
It will do this for the third row next and the final row last. All together, this column has 68 total tiles. And to start bringing things back to FeBuilder, this entire column is actually what shows up in the first column of “Small Tile Window” on FeBuilder. If you hover your cursor over the top-left most tile in “Small Tile Window”, it should match up with the first tile in row 1 from the “Main Tilesheet” .png image (which is actually a blank tile). DIRECTLY BELOW IT in “Small Tile Window”, you will find that the second tile from “Main Tilesheet Reference Pont” (Column 2 Row 1) should be just below the tile I just mentioned in the FeBuilder “Small Tile Window” (Column 1 Row 2). This continues downward for all 64 tiles from the “Main Tilesheet” .png image.
***If using a custom tile set of your own, make sure that the first tile is always a blank tile with the background transparent color!
Now, you might be asking yourself why I said DIRECTLY BELOW IT in all caps… Or why there are tiles that are to the right of the first column in “Small Tile Window”. To start, let me say that “Small Tile Window” has 8 columns… And here is how FeBuilder fills them. Each of the tiles in the first column (the ones that we imported from “Main Tilesheet”) is then translated in three different ways from the original tile. The first translation is a mirror image across a vertical plane, and the result is the image that appears in the second column in “Small Tile Window”, directly to the right of the first column (original tile). The second translation is a mirror image across a horizontal plane and the result shows up in the third column. The last translation is a mirror image across both a vertical and horizontal plane and the result shows up in the fourth column.
The next four columns (5, 6, 7, and 8) in “Small Tile Window” are the exact same images from columns 1, 2, 3, and 4, respectively, only with the enemy color palette instead. So the image in column 5 is the same as column 1 but with an enemy palette. Column 2 is in Column 6, etc.
- So now that you have an idea about how most of “Small Tile Window” was made, let’s go ahead and reconstruct our battle screen. This may seem daunting, especially considering how small some of the tiles in “Small Tile Window” are, so I’d like to give you a starting point. Using the “StartingPoint” .png image above, take note of where the highlighted light blue tile is on the main battle screen. Then look at “Small Tile Window” and see the tile that is also highlighted with light blue tile. On your FeBuilder, LEFT click the exact same small tile in “Small Tile Window” and place it on the larger main battle screen image in its corresponding spot with another left click.
***(Right Clicking a tile in the main battle screen will show you where that tile is in “Small Tile Window”. It is denoted by a darker blue square)
-
From here, in “Small Tile Window”, left click the small tile directly below the small tile you just placed. You are going to place this tile one tile to the right of the first tile we just put down on the main battle screen (with a left click).
-
Continue working downwards in “Small Tile Window” while also working to the right in the main battle screen. Eventually, you will run into the edge of the image. From here, simply select the next tile in “Small Tile Window” you would have placed next and place it below the very first image you put down (use the StartingPoint" .png image if you need it). Once again, continue working down on “Small Tile Window” and right on the main battle screen until you can’t go further to the right any more. Repeat one more time. All said and done, you should have an HP window that looks great.
***Note: Because of the way I made my Main Tilesheet, it gave me some ease about knowing where the tiles were. I would suggest that if you are making your own tilesheet, you try and do the same. It may be easier to throw your entire HP box together (still remembering the 4 row, 17 tiles per role rule, where it takes the first 17 tiles in the first row and then moves to the next row). I simply took HP box and did the same thing (working from the top left of the box to the right, one row at a time, downwards), placing them one tile at a time until the HP box was done. I then filled in the tiles that weren’t part of it in a somewhat organized matter, though it wasn’t perfect, as you’ll see if you are following along with me. Just remember that you have 64 tiles total that you can use (not including in the name plates or the item boxes). Do not put duplicate tiles into your main tilesheet that you can use more than once on your battle screen, like straight lines, because you’ll be eating into your 68 tile allotment. If the 68 tile allotment isn’t a problem, then by all means, organize your main tilesheet so it’s you know exactly where to start and where to place things.
-
From here, you’ll have to play detective a little bit. Using “Step 2 Battle Screen Reference Point”, find the tiles in “Small Tile Window” that correspond to the tiles still need to be properly placed on the player (blue side). They are mixed up a little bit so you may need a bit of trial and error. You can always ‘Control Z’ to undo any mistakes or ‘Control Y’ to redo something. It is worth noting here that for tiles that are identical, you can just keep placing the same one down as you move around. To explain what I mean, for the tiles that go directly above the item box on the player side (again, try not to touch the item box itself, using Base Frame as a reference point if need be), you can see that the same tile is used 8 times in a row. A few of the other tiles, specifically those that go on the corners of the name box, will all be on the same row in “Small Tile Window” because it is the same tile (just rotated around).
-
If things are going well, you should have reconstructed the player side of the battle sheet. I would consider hitting “Write to Rom” to save our progress. We are now going to do the same for the enemy side. For my particular battle screen, and this may not be the case for you if yours is custom, the enemy HP window is the mirror image (across a vertical plane) of the player HP window. So for my battle screen, rather than working in column 5 (which would normally correspond to column 1 from the player side), we actually need to work with column 6. Remember the very first tile we put down? You are going to use a tile from the same row in “Small Tile Window” as the first tile, only you are going to use the tile from column 6 in that row. Place this tile one tile to the left of the very first tile we put down.
-
Continue working down on “Small Tile Window” as you work to the LEFT on the enemy side battle screen, just as you did for player side when moving to the right. If you do this properly, you should end up with an HP box that looks good. Play detective again and figure out where to fill in the pieces for the enemy side, though you should have a rough idea of where they are in “Small Tile Window” from doing that player side. Be sure to Write to ROM once more to save your progress.
***It’s important to note that the item box location for the enemy side is not the same as the player side. Be careful to not mess around with the item box tiles!
- The final thing I want to address comes back to the name boxes and item boxes. Up to this point, I’ve asked you to be careful about putting anything in there, but truthfully, it’s not a huge deal if you messed up. These boxes play by some different rules and if you put the wrong tiles in here (even if it is the right color/shape), when you go to play your game, the text will be a garbled mess. For example, if you messed this step up for the weapon box, the weapon box will never write “Steel Sword” properly. So from here, we are going to ensure we did things right and import the name and item boxes for both the left (enemy) and right (player) side. This should clear up any errors if you made any. On the bottom of the entire battle screen window, next to “Main”, you’ll see “left” and “Right”. Click “left”, and you’ll see that you can import an image for both the name box and item box. Click “import image” for the Name box, and in the original folder that you downloaded with everything in it, import “Left Name Box”. Do the same for the item editor same and import “Left Item Box”. Go ahead and do a similar thing in the “Right” tab. Here is what they look like.
Name Box
![]()
Item Box
![]()
- If you did you tile placement correctly, nothing should have changed on your battle screen. It turns out that sometimes, when importing the original bulk image from step 5, it actually does a good job of getting the item and name boxes right. This time it did.
Also worth noting, now that you have imported all the component tiles that make up the battle screen, you will now find all of the tiles from both the name box and item box in “Small Tile Window”. See note below.
***It is important to understand why I was particular about the order. You may have noticed by now that if you hover over any tile in either the battle screen or “Small Tile Window”, you’ll see some numbers change just above the tabs that say “Palette”, “Main”, “Left”, etc. For the tile you have selected from “Small Tile Window”, you will see which number tile is selected as well as what category it falls into. For example, if you have selected tile 21 from “Small Tile Window”, you are currently using a tile from the
“Main Tilesheet”, which is why it says “Main” next to selected. The “Canvas” component tells you which tile you are currently hovering over on either the main battle screen or “Small Tile Window”. You will also notice that most things (but not all things) in the item box and name boxes have specific designations for them as well. If you have selected tile 68, for example, you’d see that its designation is “Right Name”.
What is funky here, however, is that for the 2x7 tile grid that makes up the name plate on the player side, the top left most tile is actually designated “Left Item Editor” even though it is an essential component of the right name box. I wish I had a good answer for you as to why this is, but I don’t. If you pull up vanilla FE8 and look at the battle screen, you’ll notice the very same issue. It’s not something I think you need to understand, but more that you just need to be aware that FeBuilder does this. You’ll find similar issues for enemy name box and both item boxes. And it gets slightly more complex. For the Name and Item Boxes in particular in FeBuilder, they will always follow the same pattern of tiles. If you do not adhere to this pattern, the text will be garbled. To make matters EVEN more confusing, the tilesheet that you imported is actually not a 2x7 image, but rather, a 1x14 image, and the way it is ordered is different as well. I’ll give you an example of what I mean by this as well as a reference point for each of the boxes if you ever want to import a unique tilesheet.
Here is the actual 2x7 tileset you see in the player name box in game.This is the Right Name Box.

For the Right Name Box, when you make a tilesheet image, you may think you need to make a 2x7 image because this is what you see in game. However, in order to insert your image properly, you must rearrange the pattern into a 1x14. There is also a specific rule to follow to do this properly. First, from your own 2x7 grid, you need to take the 1st row x 1st column tile and place it first in a separate 1x14 grid. Then, you need to take the 2nd row x 1st column tile from your 2x7 grid and place it to the right of the first tile in the 1x14 grid. You’ll then go to the 1st row x 2nd column tile from your 2x7 grid and place this tile third on the 1x14 grid and so on and so forth.
Altogether, your pattern will look like this.
1 3 5 7 9 11 13
2 4 6 8 10 12 14
1 2 3 4 5 6 7 8 9 10 11 12 13 14
On FeBuilder, here are the actual tiles that the canvas uses. You should make sure that the tiles you are using for your name plate match this number on the canvas.
62 64 66 68 6A 6C 6E
63 65 67 69 6B 6D 6F

For the Right Item Box, it follows a similar concept, only the item box is actually slightly larger (it is 2x8 tiles). This means that the item box that you imported is actually 16 tiles long (1x16). The pattern is the same.
1 3 5 7 9 11 13 15
2 4 6 8 10 12 14 16
On FeBuilder, here are the actual tiles that the canvas uses. You should make sure that the tiles you are using for your item box match this number on the canvas.
70 72 74 76 78 7A 7C 7E
71 73 75 77 79 7B 7D 7F
For the left name box (2x7 in game, 1x14 as a .png image), we actually still work left to right. What this means is that when you have your 2x7 image ready to go, you’ll still start from left to right. This may seems confusing because for the player side, you actually worked from inside towards the outside, and intuitively, up to this point, nearly everything has been a mirror image. It is not the case for the item boxes and name boxes. Start your tiles from the top left most tile, similar to the player name and item
boxes and make your .png files similarly to the player side.
1 3 5 7 9 11 13
2 4 6 8 10 12 14
On FeBuilder, here are the actual tiles that the canvas uses.
44 46 48 4A 4C 4E 50
45 47 49 4B 4D 4F 51
And lastly, for the left item box. This is also a 2x8 grid in game, but when making the insertable .png image, it must be 1x16. I would like to reiterate, this box DOES NOT start directly next to the enemy HIT/DMG/CRIT box, but rather two tiles to the right of it (Check the Base Frame.png image for referece).
1 3 5 7 9 11 13 15
2 4 6 8 10 12 14 16
On FeBuilder, here are the actual tiles that the canvas uses.
52 54 56 58 5A 5C 5E 60
53 55 57 59 5B 5D 5F 61
- Last thing which is minor but still important. Through this process, the promotion screen will have gotten borked. There is an easy fix, however. Head on over to the “Patch” section of FeBuilder’s advanced settings and look up and type in “Battle Screen only when single”. Then click “TSA Editor”. Here, much like we did before for the battle screen, reconstruct the player side battle screen here using the tiles on the left. ***Worth noting, however, is that you should not place tiles over the vanilla tiles seen above in the Right Item Box (tiles 70-7F). If you do, the promotion item will not display properly! The tiles in the picture below are the ones you should not touch!
So that was long winded. Hopefully through it all, you have a battle screen that looks the way it should and you’ve learned some helpful things along the way about actually making your own tilesheet. If you have any questions or see something I missed or messed up, feel free to let me know and I’ll do my best to answer what I can.
Bonus (AND ALSO A WORD OF WARNING THAT COMES WITH IT): Last thing. When I made this battle screen, it actually left the weapon icons a little bit lower than I would have liked. @Huichelaar was kind enough to give me a script to move the weapon icons up by one pixel to make it look nice and clean. If you plan on using my battle screen, I would suggest going over to “Insert EA” in FeBuilder (assuming you have Event Assembler linked to FeBuilder) and running the script in the downloaded folder called “Pixel Up by One Script”. You can also run it through Event Assembler outside of FeBuilder. THE WORD OF WARNING, HOWEVER, IS THAT IF YOU DECIDE TO USE MY BATTLE SCREEN AND MOVE THE WEAPON ICON UP, AND THEN LATER DECIDE TO USE ANOTHER BATTLE SCREEN, REMEMBER TO USE THE SCRIPT TO MOVE IT BACK (titled “Pixel Down by One”). If you use FeBuilder and have older builds, you can also simply uninstall this script through EA as well.
Also, in the original image all the way I have at the top, I have a custom color for the HP bars. I bet there’s a better palette for the HP bars out there, and if you’re interested in changing the HP Bar color, @Snakey1 has a nice little guide about how to do it (he also made the script that allows you to do it). Also, again wanna thank @Pikmin1211 and @7743 for helping to make such a task even possible, as well as all of those in the discord that gave me some feedback about the battle screen visuals.
Thanks! Hope it helps!