A set of Custom Menus are one of the most powerful visual upgrades you can give to your hack. However, they also have a reputation for being extremely difficult.
Having recently dived into the process myself, I’ve found that doing menus isn’t difficult, so much as the process isn’t too well documented and requires a lot of asking around. So I figured I’d write up a guide sharing what I’ve learned to make it as easy as possible.
Before we begin, I’d like to thank the people who’ve actually done the work which I’m merely putting together in one place.
Cool People
Snek: tmx2tsa
Contro: Reference tmx file, edits to tmx2tsa, and just helping me a ton through the process.
Camdar: Compression tool
Scraiza, Knabepicer, Pikmin1211: Most of the installers are just copied from Bells of Byelen and TMGC.
How do Menus Work?
Various menus have their own data which tells them how to arrange these tiles to form what you see in game. We call these instructions TSA.
What You’ll Need
- Tiled Map Editor
- Python installed on your system
- Your pixel art editor of choice: ideally something that preserves palette order and lets you overlay an 8x8 grid, such as Aseprite or Usenti.
- This Folder, containing the installer and other required tools.
In addition, install the required python dependencies by opening a command prompt and running
pip install tmx six
Initial Editing
To start, open UI_Mapping.tmx in Tiled. You’ll be greeted by this.
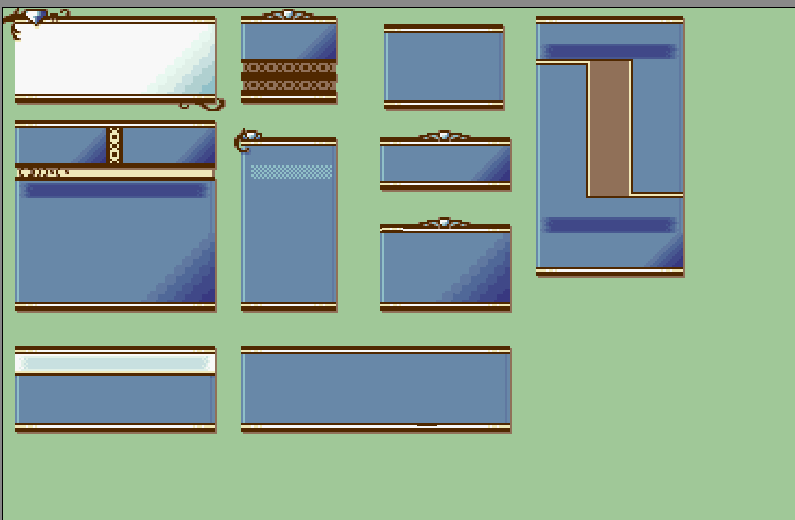
Unlike everything else we’re going to do in Tiled, we won’t be inserting this tilemap into the game. It’s just a helpful reference of a sample of the game’s various menus to use as you work out your initial design. With the map opened in Tiled, go ahead and open MenuTiles.png in your sprite editor. When you save your changes, Tiled will immediately reflect those updates.
Some tips to keep in mind for Tiled:
- You can right click a tile to select it, which also highlights it on the tile selector, allowing you to easily locate a tile you want to edit.
- You can flip tiles horizontally/vertically with the X/Y keys. If you have tiles that are horizontal and/or vertical mirrors of each other, they don’t need to take up any space on the tileset.
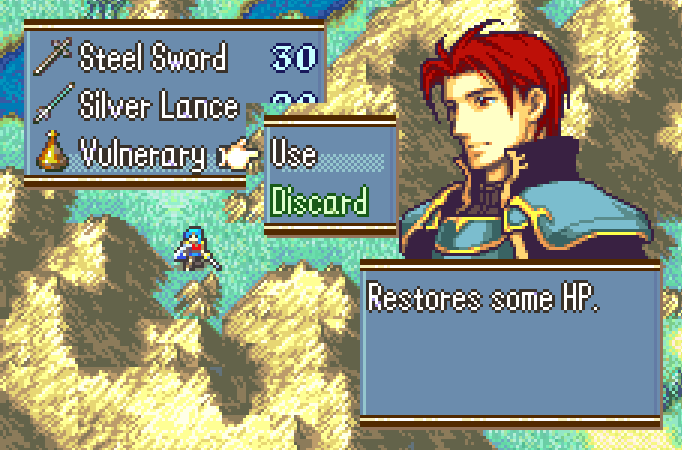
And one more thing: Take a look at this menu, specifically, the highlight for the currently selected option.
Circled in pink are the tiles used for this highlight, and circled in orange is the tile that replaces them when you move to another option.
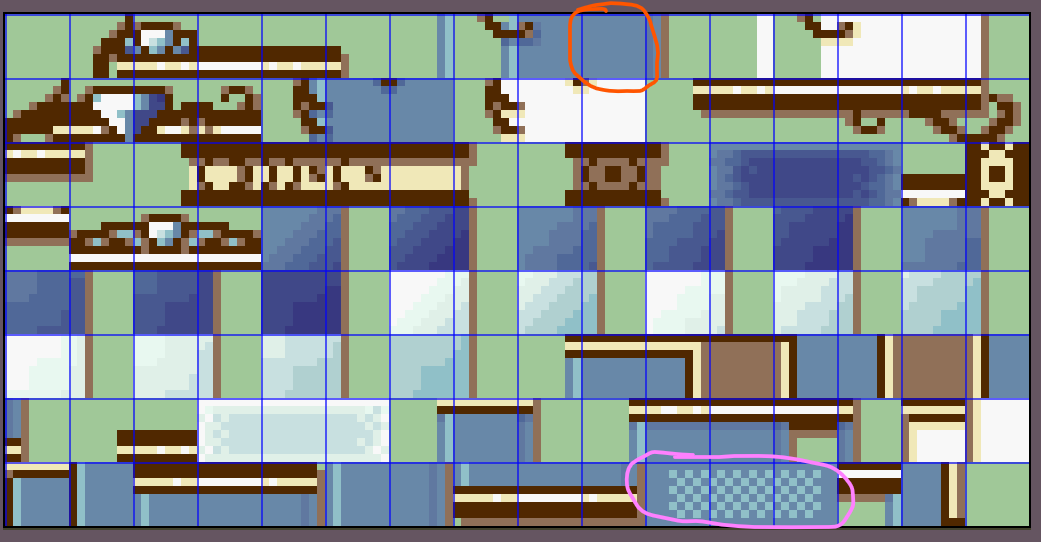
I’m unsure how to change what tiles are used for these, so I’d recommend leaving your equivalents in the same place. If anyone knows how to, let me know and I’ll update the guide.
Palettes
To get palettes, make four color variations of the Menu Image with the appropriate palettes. Then open a command prompt and run
Png2Dmp input.png --palette-only -po Output.dmp
Doing TSA
Once you’ve finalized your design, it’s time to move on to doing the TSA.
Luckily, it’s actually pretty easy: all we need to do is make the menu in Tiled, and hand that map over to tmx2tsa to do the hard part of converting it to TSA we can insert into our ROM.
If you open the installer, each menu has the size of the tilemap listed next to it in a comment. I’ve also included images of all the menus in the Reference Images folder, which you can overlay an 8x8 grid over to help make your maps.
In addition, you’ll also need to manage what palettes the TSA uses. tmx2tsa sets the palette for a particular tile using layers. Each layer needs to have an int layer property called PaletteID in Tiled, with the value being what PaletteID it uses. For most menus, everything is PaletteID 0. Exceptions are listed in comments in the installer.
Once you’ve gotten your tilemap done, open a command prompt and run
python tmx2tsa.py Input.tmx
This will generate an output file of Input.dmp. I’ve also noted in the installer that some menus are unreversed and headered. What this means isn’t important, outside of the fact that you should add --no-header --no-reverse to the end of the command for those menus.
Some menus are also compressed. Which ones are and aren’t is, to my knowledge, entirely subject to the arbitrary whims of Intelligent Systems’ programmers circa 2003. But I’ve listed which ones are in the installer’s comments. To compress a TSA, open a command prompt and run
compress Input.tmx > Input_compressed.dmp
Once you’ve gotten your TSAs created, you’re ready to insert them, either via including in your Buildfile or using Builder’s Insert EA. While MenuInstaller.event contains the whole nine yards, I would actually recommend starting with MenuInstallerBarebones.event, and copying stuff from MenuInstaller.event as you go along, so that if you’re doing something wrong, you realize after doing one TSA and not after doing all of them. Expect to adjust stuff, and as always, if you’re using Builder, use a test ROM and make sure you’re happy with everything before installing on your working ROM.
One last thing: A lot of the game’s menus have a slight transparency effect. To disable this, uncomment the NoTransparency define at the top of the installer.
The AutoBox
One tilemap that can’t be represented through an in game screenshot is the Auto Box. The Auto Box is a 4x12 map of three boxes that make up menus of variable sizes, such as the command list, your items, and so on.
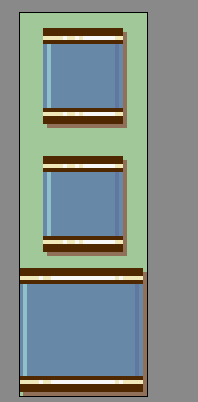
Notice how the bottom box takes up almost every pixel in its area. This is because it’s used for overlapping other menus. If it’s any smaller, it results in gaps such as these.
The MMB
There’s one thing that uses the menu tiles that’s not included here, and that’s the minimug box, since pretty much everyone uses Modular Minimug Box. If you’re using the vanilla minimug box, the pointer for it is at 0x8C70C, it’s uncompressed, and good luck with all the people telling you to install MMB.
For Buildfile users: Open your MMB’s installer file, then edit the tilemap section. Each short is the position for the tile you want there, starting from 0 in the top left, then increasing from left to right, and then top to bottom.
For Builder users: Install the MMB if you haven’t already, then search for this patch.
Note the address for the TSA, then make your minimug box in Tiled and insert it like this.
PUSH
ORG 0x[your address here]
#incbin "MMB.dmp"
POP
It’s uncompressed and uses PaletteID 0.
And that should cover everything. I’ve inevitably made some mistakes or left some things out, so if you’re having any issues or spot something wrong, let me know, and have fun drawing your boxes.