Sick tutorials, thanks for your efforts Busk, Im sure they will come handy for veterans and newbies alike :b
1 Like
It took a bit because tragedy seems to strike in my life every time I want to continue this thread lmao, but here’s the anti-aliasing tutorial.
After you’ve roughed out your shading, up next is anti-aliasing, which in my opinion is the most important step and technique in the GBAFE portrait style. It’s an extremely versatile skill, as it applies to practically every aspect of a portrait, whether it be skin/anatomy, clothes, hair, armor, trim; it does everything.
What is Anti-Aliasing?
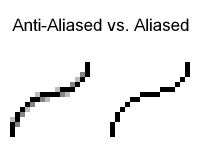
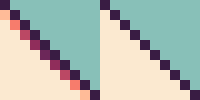
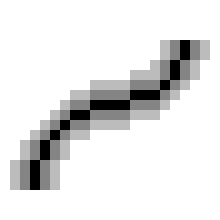
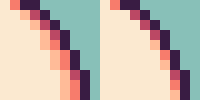
Anti-aliasing is the use of extra pixels of different shades to smooth an otherwise jagged, aliased line or edge. Below is an example; the left is anti-aliased, while the right is aliased.
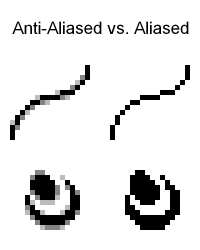
The anti-aliased line and shape are noticeably smoother, with the individual pixels of the shape being less apparent.
Aliased lines and edges aren’t necessarily a bad thing, and have their place, especially in regards to straight inorganic edges, but for softer shapes and more natural curves, anti-aliasing gives a much more desired look within the GBA style.
Anti-aliasing has a side-effect on the edge that it is smoothing; fortunately, it’s one that we can take advantage of when shaping our edges.
Anti-Aliasing's Use in Shaping
I will preface this section with a hot-take. I think anti-aliasing’s use in shaping is more impactful and important than its use in smoothing edges. Since its pixel art, of course those pixels will ultimately be apparent regardless how smooth of anti-aliasing you use, it’s in the name. Trying to “take the pixels out of pixel art” would be counter productive. Use enough to make sure your edges aren’t jagged and read well, but don’t worry too much about smoothing everything.
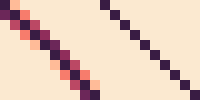
With that said, let’s explore this “side-effect”. In the last section’s example, note the difference in the overall shape between the two lines.
While it is obviously smoother, it is also thicker. This is a result of the extra pixels added to smooth it.
Though it may differ in the way it does affect it from case-to-case, anti-aliasing will ultimately always affect the perceived shape of the edge you’re smoothing.
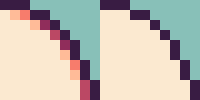
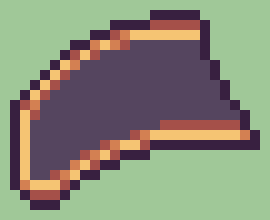
The most common way this happens is when using darker shades; the value of these shades “pulls” the edge either in or out. Below is an example of this effect.
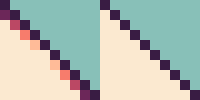
The outline between the left and right image are the exact same, yet one on the left has a subtle convex curve to it. This is because the darker shades at the corners are “pulling” the edge inwards, like I mentioned before. This same technique can be applied to convex curves, as in the example below.
These two examples can even be used in conjunction to achieve an even more noticeable curve. Please note that the outline in the middle has not changed at all between the left and right images.
Here in my Giovanna portrait, I’ve highlighted some sections where I’ve used this exact technique with the 1:1 pixel slope from the examples above.
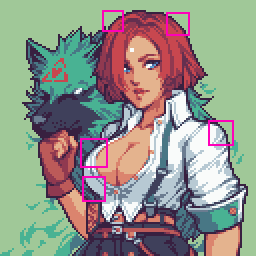
As I said before, anti-aliasing affects the perceived shape of any edge it is smoothing, not just these 1:1 pixel slopes.
Understanding how different valued shades “pull” your edges, as well as to what degree they do it, is key to exceptionally smooth and natural edges.
- Don’t overthink it too much; sometimes one or two pixels is all you need, especially for tighter curves like the examples from above.
- Darker shades will always pull the edge more than a brighter shade does.
- The more shades you have in a ramp, the more flexibility and control you’ll have over these subtle changes in value to shape your edges. This is why I chose to use skin tones for my examples, since they generally have 5 or more shades in their ramp in GBA style.
Since anti-aliasing is such a widely used technique throughout portraits, there are a lot of possible mistakes; some small, some not quite so small.
Common Anti-Aliasing Mistakes
I’ll address the elephant in the room; the most common and arguably most noticeable mistake in pixel art is banding.
Banding
Banding is a type of anti-aliasing that is categorized by shades stacked on top of each other. The shades that are meant to smooth the edge end up following the shape of the edge or the shade before them. This results in an attempted gradient look to achieve that smoothed edge. However, recall what I mentioned in the Shading and Lighting tutorial; gradients and pixel art don’t mix well. It instead just makes the edges look messy, and arguably makes the pixels even more apparent.
Banding can often lead to pillowshading, an error I covered in the Shading and Lighting section.
Below is an extreme example of banding for demonstration’s sake.
Just for an example of what banding would look like in an actual portrait, I added a bunch of banding to Eirika’s portrait on the left. The right is her normal portrait.
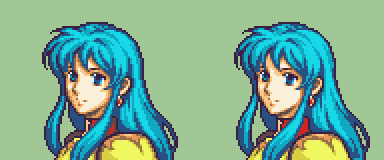
The edges and detailing are significantly less readable. They’re blurry, messy, and in some sections, very blocky, like the right side of the hair.
How to fix banding and over-anti-aliasing:
-
Recognizing it is the first step. A good general trick of thumb is to avoid letting your shades lining up exactly with your other shades or edge.

Using the 1:1 pixel angle from the examples earlier, this type of banding is pretty easy to catch because the 1:1 pixel angle pattern of the outline is being replicated with the 2nd shade.
In the example above, the 2nd shade follows the exact pattern of the outline, as well as some of the sections of 3rd shade. These types of banding is the most easy to catch.
However, not all examples of banding are so apparent. In the example above, the two pixels of 2nd shade line up too much with the 3rd shade, causing some banding, slight as it may be. The top pixel of 2nd shade serves no purpose in smoothing anything, and just hurts the readability of the curve ever so slightly. -
Once you’ve recognized the banding, the easiest way to get rid of it is simply using less pixels to anti-aliasing.
Using the example from before, the majority of the 2nd shade was doing practically nothing but muddying the edge.
A single pixel or two is often all you will need to anti-alias where pixels make a corner. -
The point above doesn’t just apply to banding, but other types of over-anti-aliasing. If your edges feel too busy or messy, but you’re not quite sure why, try just trimming away pixels that might be unnecessary.
The next common mistake I see is an interrupted main shade, often in regards to hair strands or armor/clothing trim.
Interrupted Main Shade
Another preface; this section is a little subjective, because I see a lot of artists do this and actually promote it as a technique. However, I personally think it hurts the readability of these specific types of details.
When working with trim, these shapes can get really thin. However, we still want anti-aliasing, but as we established earlier, anti-aliasing affects the perceived shape of what we’re smoothing.
Many artists will attempt something like this, where they keep that shape as thin as possible, without sacrificing the anti-aliasing.
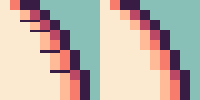
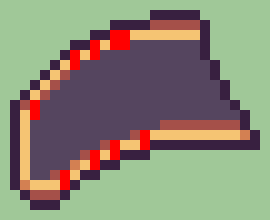
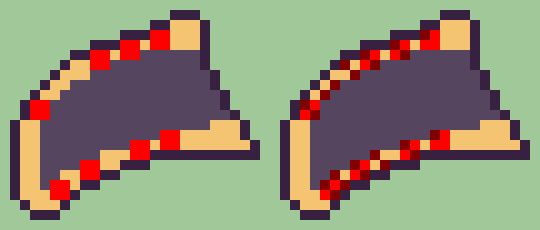
The issue with this is that the anti-aliasing is breaking up the main shade, as shown with the red below. I find this counter-productive, because anti-aliasing is actively hurting the readability of the shape in this case.
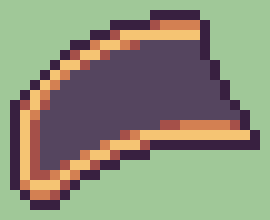
I personally prefer to sacrifice some of the thinness of the trim, so that the main shade remains uninterrupted. This allows you to get natural shaping with your anti-aliasing without losing the readability of the shape.
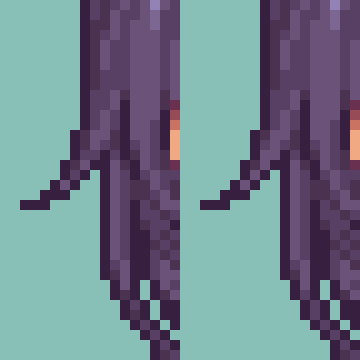
This situation also applies to long, disconnected hair strands, albeit to a lesser degree.
The example on the right keeps the main shade uninterrupted, and the flow of the strands is slightly easier to follow.
How to fix interrupted main shade:
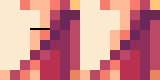
- It’s pretty self-explanatory in concept; simply just make sure the main shade is unbroken, always at least touching corner-to-corner.
- A consistent way I’ve found to keep the main shade unbroken is these 2x2 (the bright red) squares when the trim changes height or direction. Adding your anti-aliasing on outside edges (the dark red) ensures you have some anti-aliasing while always keeping room for the main shade.
- The technique above can be applied to long hair strands as well, though the triangular shape means you don’t have to worry about it too much.
Here’s some general tips to finish this up.
Other Tips
- Less is more; As I said a couple times throughout this section, one or two pixels is often all you will need to anti-alias a corner. You can use more pixels when working with very steep, broader slopes, but most curves will not require more than 2.
- Experiment with different valued shades; Darker shades will pull your edges in more than brighter shades will. This is the crux of subtle curvature and is invaluable knowledge in that regard.
- Practice! Anti-aliasing is a skill you will develop over time and is integral to good looking sprites. Fortunately, because it is such a key part to the style, simply just making portraits will give you plenty experience and practice. Hair, trim, and jaws/cheeks will give you the most practice with how to use anti-aliasing for shaping.
- As always, there’s nothing wrong with using references or asking for help. People in the FEU Discord Spritans channel are willing to help, myself included, so please don’t be afraid to reach out to myself or others if something’s stumping you!
I will probably add more to this section at a later date since there’s just so much to cover, including a full walkthrough of me anti-aliasing and detailing the rest of the Laegjarn. Still, I wanted to at least get this much out since its been a while since the last update, and its such an important topic in regards to the spriting process, so here’s what I’ve got so far (it’s a lot regardless pffff-)
15 Likes