Heya, back with another brief tutorial. As I’ve said, I love teaching but I am a slow learner; as such, as I go about learning the processes for hacking based on buildfiles and EA, I’m trying to properly document solutions where existing documentation is either really limited or not formalized yet. Both because I love it and because I feel it’s a good way to return the favour to the kindly folks who are helping me learn these things in the first place.
This time the topic is class cards, which I definitely thought were universally called “generic portraits” but there you go. Complete credit for this process goes to @Snakey1, as a Discord message of his from 2019 and a couple of PMs are the reason I could do this in the first place. Go check out his project for some super sweet material.
Anyway, here we go:
Including your images
Make a nice folder to store all your class cards, and put all of the images you’re looking to use here. In following with the Nomad I was making in my map sprite tutorial, I’ll be working with the generic portrait associated with the Nomad. Alongside your .png files, make yourself a new text document and we’ll get cracking.
ClassPortrait:
#incext Png2Dmp "ClassPortrait.png" --lz77
ClassPortraitPalette:
#incext Png2Dmp "ClassPortrait.png" --palette-only
This is what we want to end up with, two separate labels that refer to the portrait itself and its corresponding palette. There are two options for how to acquire these; one is by doing the modified Png2Dmp in the file itself as shown here, making sure to use --lz77 compression for the portrait and using --palette-only for the palette. The other option involves running the Png2Dmp EA extension externally to the text file, and then just including the .bin files it outputs for you like so:
ClassPortrait:
#incbin "ClassPortrait.dmp"
ClassPortraitPalette:
#incbin "ClassPortraitPalette.dmp"
Why would you want to do this extra work yourself, and how would you do it?
Because it makes your hack build faster, which is discussed at length in this post. I’d really recommend setting up a batch file to run this conversion for you, as clicking and dragging your image onto the extension itself won’t include the --palette-only modification. If this sounds scary, it really isn’t; this’ll be exactly the same style of writing and file as your MAKE_HACK.cmd / .bat. There’s obviously a lot of customization you can do here and checks you can implement if you wish, but here’s a functional skeleton that’ll get this done for all the .pngs in your folder with a nice double click. Please put a copy of Png2Dmp.exe in this same folder as well, or change the folder being referenced in the code:
@echo off
set PNG_CHECK=*.png
set png2dmp=%~dp0Png2Dmp.exe

for /R "%~dp0" %%F in (%PNG_CHECK%) do (
    set DUMP_FILE=%%~dF%%~pF%%~nF%.dmp
    echo Assembling "%%~nxF"...
    cd "%%~dpF"
    png2dmp "%%~nxF" --lz77
    png2dmp "%%~nxF" --palette-only > "%%~nF%Palette.dmp"
)

echo Done!
if /I not [%1]==[noPause] (
	pause
)
These labels won’t do anything by themselves, so in this file you’ll also want to include this line:
setCardEntry(ClassCard,ClassPortrait,ClassPortraitPalette)
which for my Nomad looks like:
setCardEntry(NomadCard,NomadPortrait,NomadPortraitPalette)
What’s this doing? We’ll talk about it in the next section. Save this text file, and head over to wherever you’re putting your custom definitions where we’ll define setCardEntry itself and talk about how it works.
Needed definitions
In your definitions, add in the following and we’ll talk about them in order:
#define setCardEntry(cardEntry,cardLocation,cardPaletteLocation) "PUSH; ORG` `PortraitTable+cardEntry*0x1C; POIN 0 0 cardPaletteLocation 0 cardLocation; POP"
#define ClassCard NextLocation
setCardEntry is what takes the binary files you’ve converted from the first section and stores the information in the appropriate place. It jumps to the location where the portrait table is stored, and populates the palette and card locations in the correct places within the table (hence the 0s, skipping through fields we don’t need to or want to change).
The class card definitions are what tell setCardEntry which row of the table to store your new card and palette in, so set the definition as appropriate for your class and next available location. For my Nomad, it’ll look like this:
#define NomadCard 0xAD
Where do I find the next available location?
If you’ve read my other guide or seen my slew of questions in #hacking_help in the Discord, you’ll know that I started off using FEBuilder. While I don’t use it for hacking directly anymore, it’s still by far my favourite way to find things like this (not to mention how helpful it is when debugging). Open up your hack in FEBuilder, and head to the Portrait Editor. Scroll all the way down:
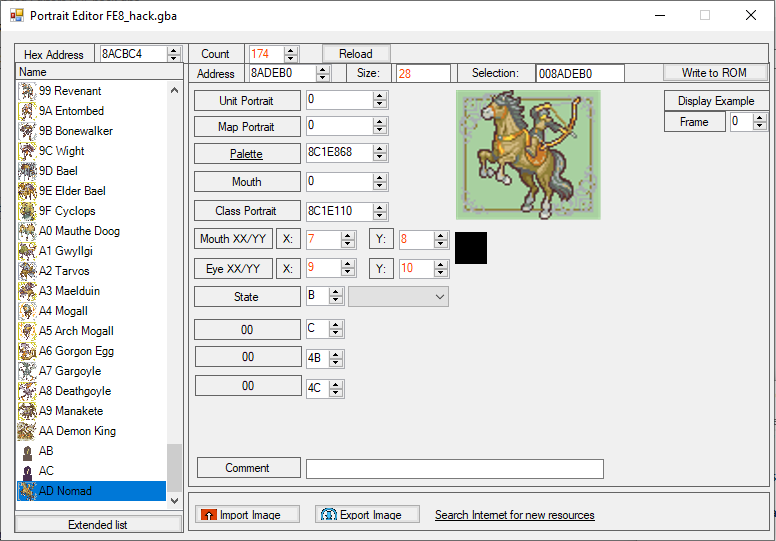
Check the last entry in this list, and make your first definition the value immediately after it. Vanilla FE8 ends at AC, so I’ve marked my Nomad in the definitions as the next entry, 0xAD.
Pointing to the images
This is a really fast final step, as the only remaining thing to do is to tell your class to point to its new card in the class editor csv table. Scroll down to your class, over to “Default Portrait”, and enter in:
ClassCard|IsPointer
which in my case becomes:
NomadCard|IsPointer
Credits
As I said in the intro, huge thanks to @Snakey1 for letting me write this using his method and explaining to me exactly how setCardEntry behaved. As always, thanks for the wonderful people in #hacking_help who deal with my confusion.
And that’s it, enjoy your new class card / generic portrait! Hopefully if you’re new you found this helpful. I intend to keep making these tutorials as I encounter processes that aren’t well documented when I try to learn something, so we’ll see when the next time that happens is. Thanks very much for reading! 