Inserting Custom Sound Samples

Introduction


Hopefully at this point you’ve been reading my other tutorials and are getting a good grasp on how the sound system works for the GBAFE games. If you haven’t read them already, and don’t know anything about the topics:

In this tutorial I’ll teach you how to insert custom samples into your ROM. There are two main methods to this. One uses Sappy exclusively, and the other involves the use of several different programs, namely:

Full credit for this goes to gogojjtech, whose tutorial taught me an insane amount about this topic. I’m basically rewriting his tutorial.


What can you do with custom samples? So much. You can make custom sound effects and a much greater depth of custom music. It’s… kind of empowering to be able to do that. So let’s get started.

5 Likes

Exporting and Importing Samples from Other Games


This method is the easiest, and can be used to extract Direct samples from other games that use the Sappy engine. Meaning, if it can be opened with Sappy, it will work. You almost have to do nothing.


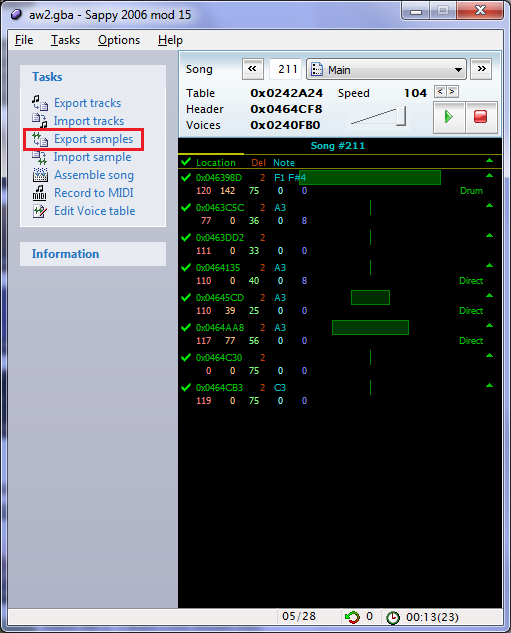
Open the ROM and song that you want to rip a sample from. Click on “Export sample”. In this example I want to rip the shakuhachi used in Kanbei’s Theme from Advance Wars 2. It’s instrument 77.

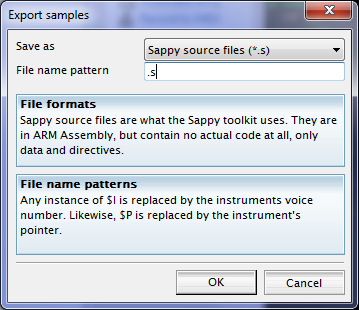
You’ll be presented with this window:

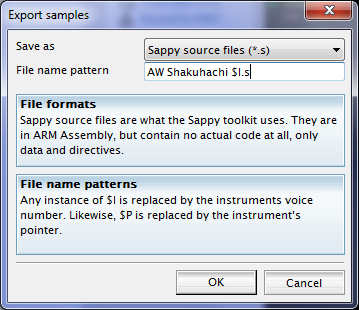
By default, that dropdown menu will have “raw” there, so change it to .s You can also rip it as a raw but it won’t do all of the looping for you, and the same would go for the wav ripping. Still, those options are available if you so choose. Sappy will actually rip all of the Direct samples from the current voice table whether you like it or not so in your file name you MUST include a $I so that you can identify which is the sample that you want. Like so:

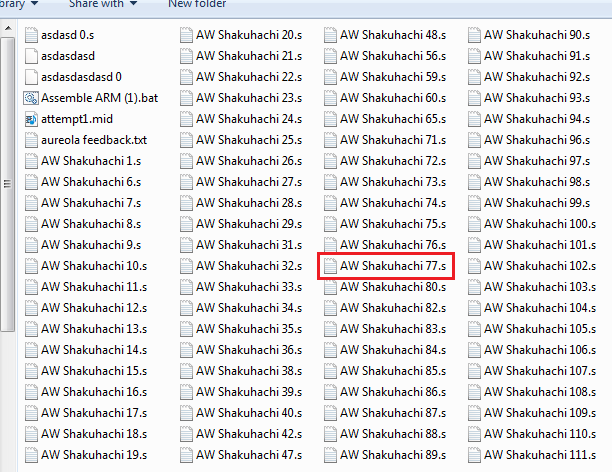
It will then rip all the samples in the voicetable and you’ll be left with a whole bunch of files. I have outlined the one that I want. You can delete the rest or keep them, it really doesn’t matter.

[spoiler=Optional: Adjusting the frequency & loop via text editor]If you open the .s file in a text editor, you’ll get this:

#MAPLE EXPORTED SAMPLE - PLEASE CHECK THE HEADER VALUES!
#TONE NAME     : AW Shakuhachi 77
#FREQUENCY     : 13700096
#BASE NOTE#    : 60
#START ADRESS  : 0000000
#LOOP ADDRESS  : 0007993
#END ADDRESS   : 0009965

#LOOP MODE     : Fwd
#FINE TUNE     : 0
#WAVE EXP/COMP : 1
#VOL EXP/COMP  : 1

	.section .rodata
	.Global	AW Shakuhachi 77
	.Align	2

AW Shakuhachi 77:
	.short	0x0000
	.short	0x4000
	.Int	13700096 # THIS LINE FOR THE FREQUENCY ADJUSTMENT VALUE
	.Int	7993 # THIS LINE IS FOR THE LOOP POINT
	.Int	9965

And then followed by a lot of .byte commands. You might recognise the last section as… the sample header, in text form!

This eventually gets processed into the ROM. Any line beginning with # is ignored. There’s not an awful lot to see here except this one particular line:

	.Int	13700096

Later when you are inserting your sample with Sappy the “Change Freq.” box will be greyed out. However, you can actually edit that in this file here. This is useful if you know for a fact that the sample is an octave high/low so you can double (increase 1 octave) or half (decrease 1 octave) that number there in the text editor.[/spoiler]

Now you need to go to the ROM you want to import the sample to, and open it up to any song (it doesn’t really matter).

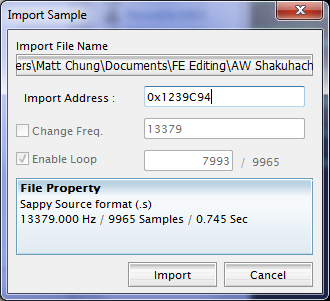
Click on Import Sample, and you’ll be given this window. Under “Import File Name”, browse and select your .s file. For Import Address, just import to free space in the ROM. As sound samples can be fairly big, make sure you have enough space in that area.

You can’t change anything else here unless you do as was outlined in the spoiler above, so hit “Import!”

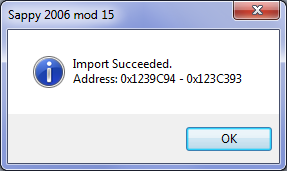
Success! It even tells you where it finished writing.

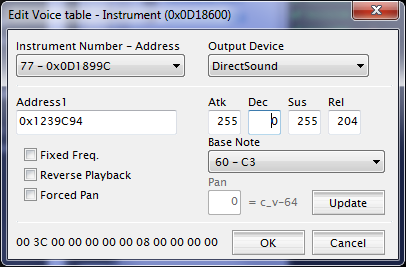
Then, make sure you edit the voice table of your desired song to include the same address, shown here as 0x1239C94. Hit Update, and OK.

And you’re done! How easy was that?
2 Likes

Obtaining SoundFont (.sf2) files


If you want to obtain samples from non-GBA games, or obtain samples from a Multi or Drum instrument, you’ll need to get the .sf2 file containing them and all the panning/loop/frequency adjustment values as well.

There are two main methods I’m going to show you which will allow you to rip samples from any GBA game using the Sappy/M4A engine as well as most NDS games. Additionally, any other game or source that you can obtain an .sf2 from will work with this.

But first, you have to get your .sf2 file.

Exporting GBA SoundFonts


This requires the use of a program called GBA Mus Riper (sic). Extract it to your favourite music folder and read the reame.txt (sic) included with the program. We’re using the SoundFont Riper function. Instructions are as follows:

== 1) GBAMusRiper ==

This is the main program which does everything automatically. Normally you’d only want to use this one, but the other parts can also be used individually too.
It detects the presence of the sappy sound engine in a given rom, and converts all detected songs to .mid files, and rip all detected sound banks to a .sf2 file.

To use this program you’ll need Java Runtime Environment (JRE). To know if you already have JRE installed, just enter in a command line and type “java” then enter. Normally you should get a long message explaining how to use Java from the command line. If a short error message appears then JRE isn’t installed on your machine and you should download it from the internet.

Now to use GBAMusRiper. Enter a command line and go inside the \bin directory (type “cd bin”). And type:
java gbaMus.GBAMusRiper name_of_your_rom.gba

You’ll need to use a command prompt for this. In order to use the SoundFontRiper.class, we have to direct the command prompt to the correct folder first. So if your \bin directory is in C:\Users\Agro\Documents\FE Editing\gbaMus\bin, then in your command prompt you must type:

cd C:\Users\Agro\Documents\FE Editing\gbaMus\bin

The program will take care of everything itself after that. You should obtain a .sf2 file with the same name as your .gba file, e.g. fe7.sf2. After this. You’ve gotten your SoundFont!

Exporting NDS/Other SoundFonts


This is really easy. Just follow the steps outlined in this topic. Also, make sure that you export as .sf2 files, and not .dls files. .dls files don’t support certain functions so .sf2 files are better, in this case. Note that when you rip .sf2 files from NDS games they are on a per-song basis. In some games, songs do not share the same .sf2 file so you may have to rip sounds from each song individually. I’m sure you’ll figure it out.

Exporting Samples from SoundFonts with Viena


Next up download and install Viena SoundFont Editor. It’s freeware, but you should consider donating because it’s fantastic software. Open the .sf2 in Viena SoundFont editor.

You’ll be presented with this screen, or something very similar to it.

You need to find the sample you want to rip, which may require some guesswork. You can click on the keys to play notes using that sample.

Now you need to expand the instrument info so you can get to the sample.

Expanding it will give you a list of the samples used within the instrument, which could be anywhere between 1 - 127. If

You’ll see some extra info displayed about each sample, including:

  • which note(s) (the range) it’s set to play for - useful for drum and multi instruments
  • Pan (in %, where 0 is middle, -50% is left and 50% is right. For reference, in decimal, middle Pan is 64, left is 0 and right is 127)
  • the root key (IMPORTANT!)

Right click on where it says “Sample 132” (blue box) and it’ll bring you to this window. This is from a different sample which I’ve picked to show you some more information.

This window gives you information about:

  • the size
  • the loop point (ALSO IMPORTANT!)
  • sampling rate (ALSO ALSO IMPORTANT)
  • root key (again)

You need to write down the loop point and root key somewhere, as well as the rate. Hit Export WAV file and save it as something easily identifiable. I like to include the loop point, root key and sampling rate in the file name for easy reference.

Converting the Sample to 8-bit Depth


If you’re ripping the samples from non-FE sources, the sounds may possibly be in 16-bit WAV and not 8-bit WAV, which is what the GBA natively plays. You can keep them as 16-bit WAVs and insert them later but this will cause ugly sound glitches. To convert them you’ll need the help of Wavosaur.

Open your sample in Wavosaur.

Process -> Bit Depth Converter -> 8-bit -> OK. Hit Save/Ctrl+S.

It’s been converted to 8-bit!

Obtaining the Frequency Adjustment Value


Before we import the sample into the game, we need to know whether or not the sampling rate needs to be adjusted to be played properly in-game. If you miss this step you may find that your sample plays at the wrong pitch, which may not be pleasant. Or it might be really pleasant, depending on what the interval is :P:

Anyway, download this Frequency Calculator by ipatix of PokeCommunity. Open it, and enter the details that I asked you to write down earlier. Those were:

  • sampling rate
  • and root key

The calculator will ask you for a third value, Fine tuning, but we’re not using that, so just input “0”

You’ll get a number back, which you should record to the 3rd decimal. Keep note of this.

Importing the Sample using Sappy


This should feel familiar to you if you imported a sample from another game. Open up Sappy, hit “Import Sample”, find the WAV. This time things are a little different.

The “Change Freq.” box isn’t greyed out, and neither is Enable Loop. You need to put those in yourself. “Change Freq” should be to whatever number the calculator gave you. If you don’t need to change anything, don’t tick it. If your sample is looped, tick the box and input the loop point you got from Viena earlier on.

Hit Import. You’ve inserted your sample. Once again, ensure your voice table is updated to include a pointer to this sample. Now you can play your sample in your FE game.


As for the envelope, this is something you’ll need to decide on your own based on intuition. If your sample is non-looped, 255 0 255 204 is a good setting. If it’s looped and doesn’t deteriorate (.e.g strings, trumpet) then 255 0 255 204 is also good. If it’s looped but does deteriorate (e.g. piano, harp, tubular bells) then a good setting to use might be 255 242 128 204. Experiment a little.


If you’re ripping a multi-instrument you’ll have to include an extra step in which you not only import all the samples but also import the note ranges from Viena. This should be easy enough given what I’ve shown you in earlier tutorials.


And now you know how to insert custom samples. Good job for making it this far!

1 Like

This tutorial is mostly finished. I just need to add some finishing touches on volume adjustment and I’m also wondering if anyone wants me to cover ripping samples from SNES games. Additionally, if there’s anything else you’ve thought about doing but aren’t sure is possible, let me know and I can see about writing something up for you.

Quick note: the GBAMusRiper bit is outdated, the latest version does not require JRE and has different instructions.

Also once you have a .sf2 you can use VirtualMIDISynth to preview your midis straight from your media player/MIDI editor without inserting into the rom: http://coolsoft.altervista.org/en/virtualmidisynth

1 Like

Compressing the Sample


Just icing on the cake. Sound sample is much larger than other resources like graphic and text. It will run out of free ROM space soon. It can be optimized with compression. Graphic uses LZ77 compression, text uses Huffman compression and sound sample uses DPCM compression.

First of all, you need to install engine hack to enable compression.

We are hacking Fire Emblem instead of Pokemon, so set POKE_CHN_INIT to 0.

.equ    POKE_CHN_INIT, 0

The mixer needs more space in RAM including a 64-byte-buffer for decompression and space for decompression routine itself. You need to allocate less than 0x300 words for it in total.

Then you need to compress your sound sample with DPCM.

For .wav samples in WAVE format, use this tool.

wav2agb input.wav output.s -c

For .aif samples in AIFF format, use this tool.

aif2pcm aif_file bin_file --compress

Finally, you can insert compressed samples into the game.

2 Likes

I don’t think we’ ve solved the freezing problem yet.
If you’re playing compressed music, the game will freeze if you don’t issue an EOT before reaching the end of the song.

Mine doesn’t freeze. It works as expected. You may have problem with loop or alignment.

You’re lucky and you’re just not stepping on a mine.

Aside from that, I have created a windows version of wav2agb, so please use it if you like.

https://github.com/FEBuilderGBA/wav2agb/releases/download/20211006/wav2agb.exe

I found the cause.
This is my mistake.

I made an installer for m4a_hq_mixer based on Improved Sound Mixer.
However, since m4a_hq_mixer has larger code than Improved Sound Mixer, I had to increase the number of bytes to copy to RAM.
And unfortunately, the routine to adjust the end of the compressed wav song was placed at the end of the code.
So that part of the code had not been copied and was in a mass of nop, which resulted in the code running out of control.

Is this tutorial up to date? I thought I’d ask before taking the plunge (and possibly letting others know.)

Hey, I think there is now a better way to do this with FEBuilder, though I’ve never used it before so I wouldn’t know

1 Like