After reading 3 times and loosing 3/4 of my brain cells i conclude that he means every one starts to move when enter these spots

Dont mind i am using a phone so it is what it is
After reading 3 times and loosing 3/4 of my brain cells i conclude that he means every one starts to move when enter these spots
Dont mind i am using a phone so it is what it is
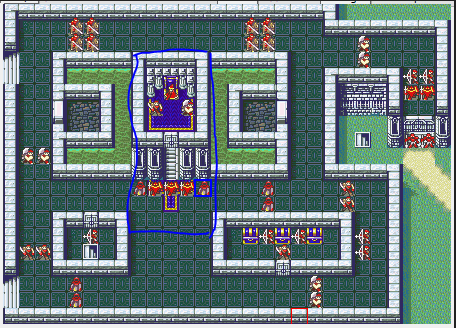
this area
I was close lol
Hooray! Poison! Do you like poison? I hope so!
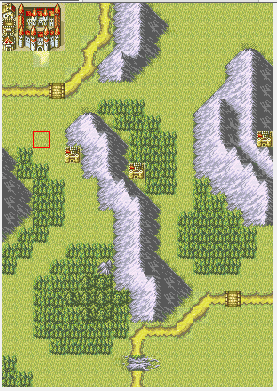
Chapter name: Poison Banquet
Chapter number: 4
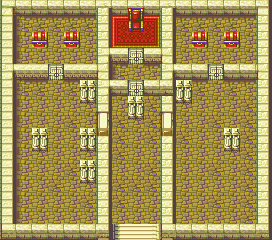
Picture of the map:
Link to the map file: Is the PNG insertable? Do tell me if it isn’t.
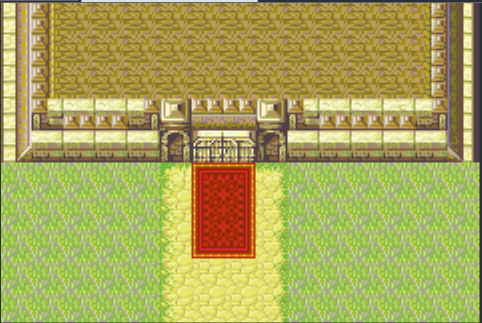
This one is the intro map, but I kinda forgot to export it via FEBuilder. If you need me to, I can remake it lol.
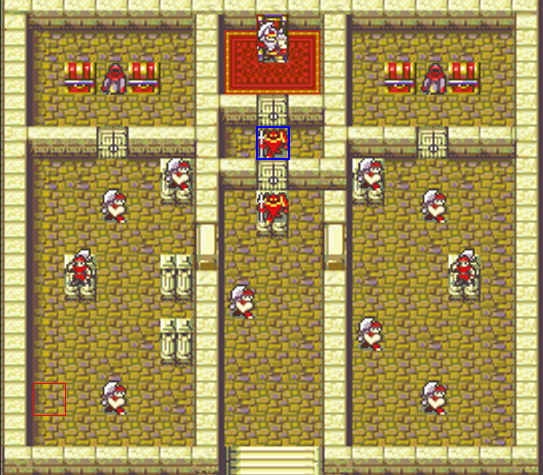
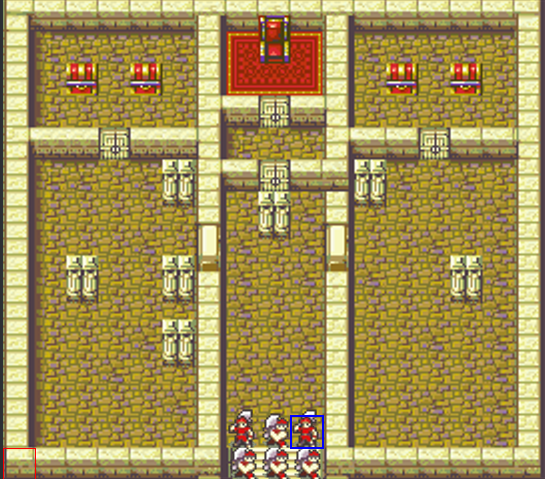
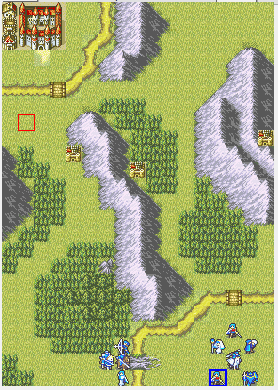
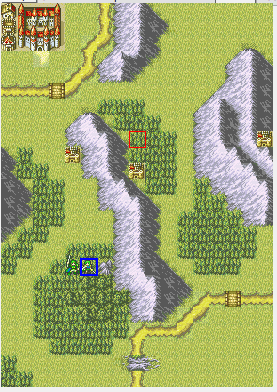
Player Placement:

Enemy Placement:
Anti-Turtle Reinforcements:
Below this is completely optional-
Reinforcements and the turns: The squad in the picture, with the journeymen being super trainees. Equipment detailed later in post.
Edit: Wow, forgot turns. Lol, the reinforcements show up on turn 15, being anti-turtle.
Tile changes (no need to list chest, doors, and villages): N/A
Special enemy equipment notes: Every enemy besides the knight guarding the inner door to the boss, the super journeymen, and the shamans have poison axes. The super trainees have silver axes, except the one on the left, who has a killer axe. The shamans have flux tomes, and the knight has a javelin.
Enemy skill notes: Nothing of note.
Droppables/stealable items: Dorcas drops an antidote, the killer axe super trainee drops that, and the shamans both have antidotes. The knight in front of the first door drops this:
Keyblade (3 mt, 9 wt, 90 hit, inf uses, locked to grant/mercs. Grants locktouch. Desc: a very large key, for big boys only.) Use a door key icon.
Vendors/Armory items: none here!
Fog of War?: no
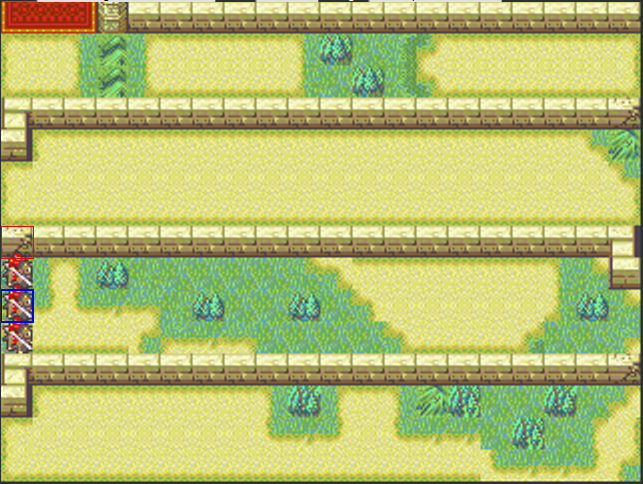
Chapter 5: A Harrowing Rescue
Map objective: Seize the gate
Thief escape point: Top right of the map
Map:
The snag bridge is destroyed after battle preparations, splitting the party.
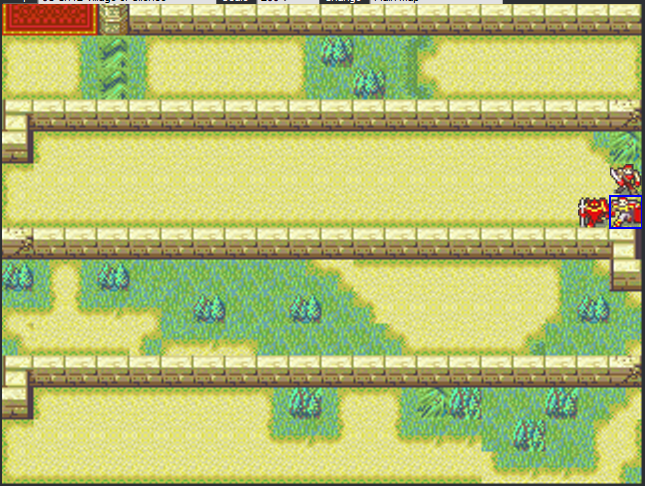
Player placement:
Slots 1-5 and slot 10 are on the right bank; slots 6-9 are on the left bank. (this affects how the next map plays out, hehe)
The 4 units sent to the left bank of the river will become the 4 units trapped in jail in the next map, unless somebody in unit slots 2-5 dies during this map. The need to rush in and save the green units is intended to encourage strong units to be deployed on the left… where they’re conveniently unable to help out in the next map when they’re needed most. Why are there no Door/Chest keys in the Shop? That’s also here to make the next map annoying.
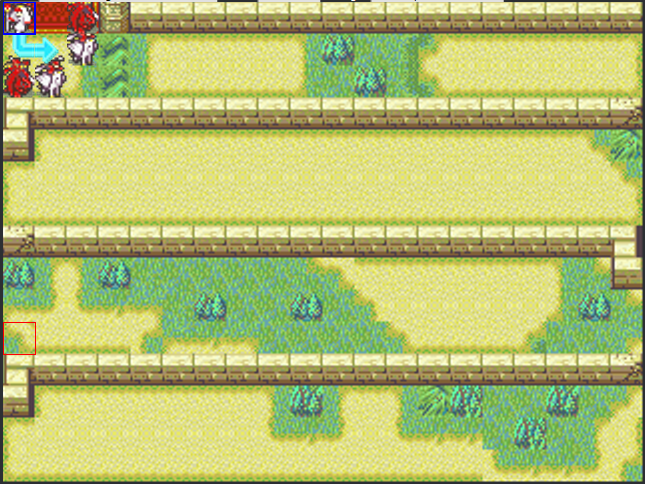
NPC placement: The Natasha and Joshua replacements start in the forest, surrounded by enemies. Jack is on the right, Hector on the left. They will last a few turns, but will quickly get overwhelmed. Talk with anyone to recruit both.
Enemy placement (note that the gate is completely undefended; this is intentional as the castle is the setting of the next chapter):
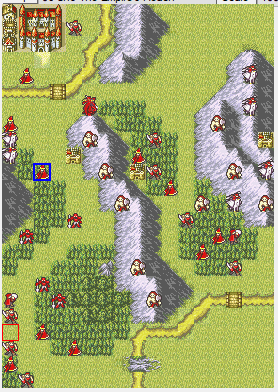
The lone Wyvern Rider is the boss (see below)
Enemy equipment:
All enemies use Steel weapons, except for Mages, who use Fire. They also all move unprovoked. Exceptions listed below.
The two Pegasus Knights on the left edge of the map have Axereavers. They wait 1 turn before charging.
The Mercenary near the top of the map has a droppable Armorslayer. He waits 1 turn before charging. If not interrupted before turn 5, he will attack Hector and deal effective damage.
About half of the Brigands have Hatchets to help them hit stuff.
The right Thief has a Killing Edge equipped and drops a Secret Book. He avoids combat and will escape turn 5 if not interrupted.
The left Thief has a Killing Edge equipped and drops a Master Seal. He avoids combat and will escape turn 6 if not interrupted.
Reinforcements:
Turn 3: 3 Pegasus Knights from the right fort; 1 Mercenary each from the other two forts
Turn 4: 1 Brigand with a Tomahawk and a droppable Speedwing from the right fort. He avoids combat and will escape turn 10 if not interrupted.
Turn 5: 1 Brigand with a Tomahawk and a droppable Torch from the right fort. He avoids combat and will escape turn 11 if not interrupted. 2 Mages, one from each of the other two forts.
Turn 6: 8 Cavaliers from the top right of the map. These are labeled as “Soldier” and not “Cuttthroat”.
Turn 8: 8 Mauthe Doogs from the bottom of the map, 4 on each side of the river.
Turn 12 (anti-turtle): 8 Gwyllgi from the bottom of the map, 4 on each side of the river.
Shop details
Armory: Iron Sword, Slim Sword, Steel Sword, Iron Lance, Slim Lance, Steel Lance, Javelin, Iron Axe, Hatchet, Steel Axe, Hand Axe, Iron Bow, Short Bow, Steel Bow
Shop: Fire, Flux, Lightning, Heal, Vulnerary, Antitoxin
Boss submission
Name: Kuraat
Replace: Saar
Class: Wyvern Rider (M)
Description: A local highwayman infamous for his ruthless aerial attacks.
Boon: SKL
Bane: RES
Inventory: Killer Lance, Elixir (stealable; he will run away to use it if low on HP)
Battle Quote: Time’s up! Now roll over and die for me!
Defeat Quote: Dammit… these guys are way too strong…

Portrait by CanDy
1boss( pablo) 2maps left 12a 14a i read the rules there is no limit to number of maps you can submit unlike units so go wild boys and bring a spicy one
Just for fun which ever map is next give juna fruit (-5 level ,5 uses, for promoted level 10 or above ) as dropable. Preferablely 14a
Juna Fruit probably shouldn’t be reusable, although maybe a 2 or 3 use Juna Fruit would be balanced if you could find a way to stop a unit from using it multiple times like the Metis Tome.
Well 5 use is just fine because so far all units seem broken and will cap with no difficulty and its also for the trashmilla who has 0 in everything oof

Portrait by CanDy
Unit: Pablo
Name: Reed
Description: A former friend of Grant, against his multi-dimensional shenanigans.
Class: Berzerker
Items for encounter 1: Anchor (Icon: ![]() by Ereshkigal. Wt 15, mt 15, 1 rng, S rank, 40 uses, 75 hit, grants pavise. Desc: Forged from an actual anchor.) Master Seal(Drops)
by Ereshkigal. Wt 15, mt 15, 1 rng, S rank, 40 uses, 75 hit, grants pavise. Desc: Forged from an actual anchor.) Master Seal(Drops)
Items for encounter 2: Anchor (Drops)
Skill: Forger
Stats / growths (Bane/Boon for bosses)
Str: Boon
Speed: Bane
Con: +3 (can be increased or decreased from class by a max of 3)
Weapon Ranks: S Axes
Death quote 1: Grant… I will be back.
Death quote 2: It seems I will not be able to stop you. Heh… Take this, for old times sake.
Unique Dialogue 1 (Grant):
Reed: Grant… This ends here. I cannot let you pass.
Grant: Heh, you think you can stop me? With my power?
Reed: I’m gonna try.
Unique Dialogue 2 (Grant, second map):
Grant: No more running, time to die.
Reed: I suppose it is time. Send me off with a bang, eh?
Battle Dialog 1: Grant! I will stop you! You hear me?!
Battle Dialog 2: This ends here! One of us will die, and I’m gonna make sure it isn’t me!
Mostly for my own sake, I’m gonna say that all bosses have been taken, and that chapters 3, 4, 5, 6, and 19 have also been taken. Also for anyone else planning to submit maps I guess lol.
Y’know, I’ve never really liked mounted units. Not sure why, they’re objectively good, like, regardless of stats, but I dunno. So, in honor of my undying hatred of cavaliers, paladins, great knights, and any other horse-bound scrubs, here you go!
Chapter name: Infantry, Charge!
Chapter number: 12a
Picture of the map:

Below this is completely optional-
Reinforcements and the turns: each set of reinforcements will appear when a unit moves in the area that they spawn from, on the next player phase. Anti-turtle reinforcements will spawn from the bottom on turn 25, and continue spawning until turn 28.
Tile changes (no need to list chest, doors, and villages): the breakable walls all have 10 hp, and the enemies will not break them.
Picture of enemy/player placement:
Player Placement

Enemy Placement:

(The prince is a Halberdier, I’m using vanilla FE8 here lol, so I don’t have that.)
Reinforcements 1:
Reinforcements 2:
Reinforcements 3:
Anti-Turtle:

Special enemy equipment notes: The Generals near the boss have Short Spears, as well as the knight guarding the wall. The other knights have Steel Lances. The Halberdier has a Silver Lance. All the Mercs have Iron Blades. The Myrm has a Silver Sword. The Cavs have Steel Lances/Swords. The Archer has a short bow, and the Ranger has a Longbow and a Silver Blade. The pegs have iron lances, and the wyverns have a spear and short spear (Your choice as to which gets what). The wyvern knights get killer lances.
Enemy skill notes: The Generals have pavise, and the hero has battle veteran. the wyvern knights get killing machine and crit force. (Don’t stick around lol). The ranger has bowrange +1.
Droppables/stealable items: The Ranger Drops whatever weapon he isn’t using (The Silver Blade by default). The Hero drops an energy ring, and the merc in his squad drops a master seal. Both Generals drop Juna Fruit, which has 1 use (Sorry Aswink, just 2 lol). The Wyvern with a spear drops that, and one of the pegs drops a spirit dust. The Myrm drops an Elixir, and the knight guarding the wall has a stealable elixir. One of the Cavs (Your choice) Has a stealable Blue Gem.
Special Enemy AI Notes: All enemies placed on mountains won’t move, along with the knights (Minus the one from the Heroes squad). the Cavs charge unprompted, and all other enemies just move to hit whatever’s in range.
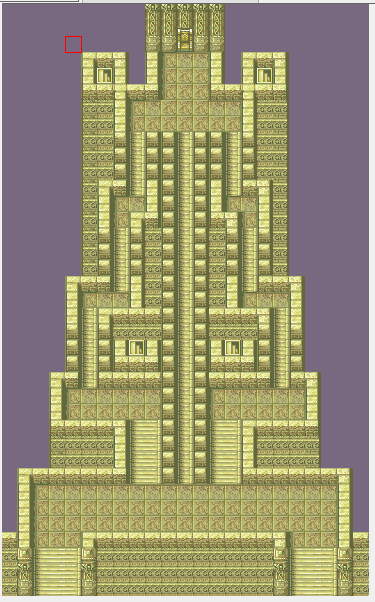
Chapter 14: Scaling the Tower
Objective: Seize the Throne
Notes: Heavenly Arrows fall every turn on every column, except the two columns on the left and right side of the map, as nobody can go there.
Map:
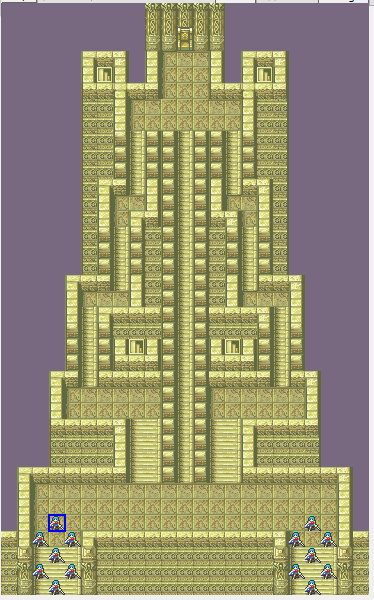
Player placement:
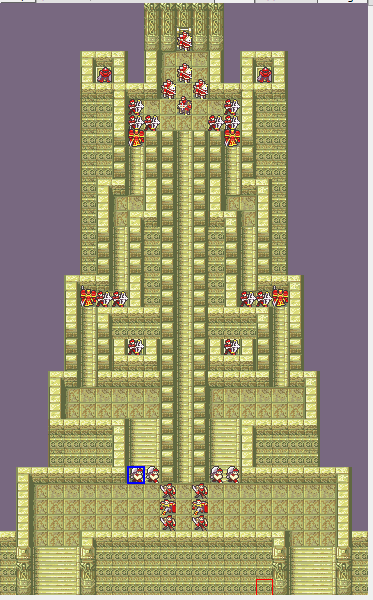
Initial enemies:
Enemy data (all enemies move to attack units in range unless stated otherwise):
All enemies have Renewal
Fighters and Mercenaries are Lv20; they all have steel weapons
Heroes are Lv10; they have Silver Swords
Snipers are Lv15; they all have Longbows; the bottom two Snipers also have Killer Ballistae where they are standing. They do not move, no matter what.
Generals are Lv10; they all have Tomahawks. The do not move, no matter what.
The two Druids are Lv12; they have Bolting, Sleep, Sleep. The Left Druid drops a Juna Fruit, the right Druid drops Boots. (they will eventually die of trap damage on Normal, so you need to hurry to get their loot)
The three M!Paladins in the boss squad are all Lv15 and all have Silver Lances and Amaterasu in addition to Renewal. One has a droppable Heavy Spear, another a Dragonspear and the third a White Gem.
The enemy on the throne is a Lv20 F!Paladin with a droppable Spear (the class has better stats). She does not move, no matter what.
Why are all the enemies so overleveled? Well, it’s this way so they all outheal the Heavenly Arrow damage with Renewal. The exceptions are the two Druids on Normal; they will die to Heavenly Arrow damage in 10, 11 or 21 turns depending on their HP roll (on Hard, they outheal the trap damage). The Druids can only be attacked with the Bolting in Ch10A, so ways to get their valuable loot is limited. Furthermore, while the Druids are timed on Normal, on Hard, despite the lack of a timer, they are much stronger and bulkier, and hence trying to kill them without running out of Bolting is a bigger challenge. As for the rest, FE8 class growths aren’t actually that high, and notably these enemies aren’t so fast they’ll double everything you have, so they aren’t exceedingly dangerous.
Here are all my map files, if I haven’t uploaded them earlier:
Nooooo! god noooo omnifox999 why just why give 1 valid reason to go though this helll who the f*ck hurt you lol
This is not the worst map and enemies but it is up there lol
Can you even attack them to get the loot bro like no one submitted 4 range weapon soooooo rip those items lol
There’s exactly 1 obtainable Bolting at this point. You’ve gotta make it work, somehow.
What pit of hell did this map crawl out of?
I had better ideas involving the boss with 21% Adept on Shadowshot, and you had to put that boss here LMAO
What a waste of a good (read: threatening) boss