Thanks for the quick reply.
Ah, damn, I thought as much. This was really neat to avoid all the overhead of having to find a ROM, emulate it, install the hack … Too good to be true
1 Like
I could be mistaken, but since I’ve been kept in the dark about my hack being there in the first place, as well as me not knowing about the site or what kind of, if any, quality assurance or security measures there are, I cannot give it my endorsement. Should you decide to keep playing, proceed with caution and give due consideration.
Thank you for bringing it to my attention.
1 Like
Very possible that is related to the phantom escape bug I previously noted that also caused a softlock in a similar fashion.
There’s a possibility the escape mechanic just has latent bugs in general.
2 Likes
The patch in the link has been updated, as there was a bug with the chapter Making Waves, where if the topmost platform was underwater (because the map was ended while an unit stood there), the platform would remain underwater and as a result the ending cutscene would glitch.
Apologies for the inconvenience.
3 Likes
Edit: Nevermind, I’m just being dumb.
I thought the markers were just some thief’s escape point or something, so I completely ignored them.
I actually did read the hint about the barrel and pirate’s strength the first time I played the chapter, so I was looking around for some special barrel tile. After I didn’t find any I completely forgot about the hint…
Original post:
Ok so I just want to ask if it’s intentional that
Maybe spoilers?
in the 3rd map (the one with the boat) that killing the boss ends the chapter, but you don’t get the recruitable unit, which I found out after checking the recruit guide you need to step on the tile as it says in the map win objective to get?
I was really surprised when I found out I was missing a unit even though I thought I had done everything.
1 Like
So far I really like all maps I’ve played, which admittedly is only 5 so far. (Playing on Hard difficulty btw, from trying it out a bit Normal difficulty felt a lot smoother but I noticed Items and Unit Placement differed from Hard so I prefer Hard.)
Least liked is the fog map btw, though only partially because of the fog. The Steel Axe Brigands perfectly 2-shot Agnessa and so far this is the only map where I felt like I could not grab all side objectives.
Maybe Avani could go for the cave by abusing her 3 range against the Tomahawk Brigand instead of Skyler so Skyler can go left and steal the Red Gem? But I’ve been trying to conserve Longbow uses so IDK about that.
Also the chapter became a lot easier when I realized you win as soon as you kill the boss so I didn’t have to worry about my units dying on Enemy Phase afterwards. (My bad for not checking Status)
Anyway, you can really tell the enemy placements and unit stats were planned and very exact, especially in Normal Mode.
One gripe I have though is the stats in Hard Mode can get thrown off by the enemy auto level growths, including the hard mode bonus levels. The difficulty of the maps vastly change depending on whether or not an enemy get an extra point of HP/Def/Str
An enemy getting an extra point of HP and/or Def and they suddenly go from being ORKO:ed to surviving with 1~3 HP, or from requiring one hit to kill to requiring doubling, which give them a retaliation attack etc.
One extra point of Str and suddenly a player unit goes from being able to take 3 hits to dying in 2.
This wouldn’t really be a problem if it weren’t for that the stats keep changing after each reset, so I have to constantly check enemy stats and readjust my strategy or I could just reset the game until I get the right enemy stats.
Now that’s just default Fire Emblem enemy auto level behavior, but I really want to emphasize this point—that because the unit base stats are so precise—these +1 HP/DEF/STR have disproportionately large impact on increasing difficulty as they’re always huge break points in enemy survivability and/or lethality.
Basically every time I reset there’s a 50/50 chance that my strategies won’t work anymore and I have to decide between going for it anyway and hope I just get lucky, think up an alternate strategy (that’s hopefully just as good at getting all objectives etc.), or just reset a few times more until I get an easier map.
I’ve got a few different suggested solutions to these perceived problems:
-
Fixed Enemy Growths: I’m not sure how feasible it is but if enemy stats are the same regardless of how many times the game is reset then there won’t be huge changes in difficulty depending on enemy auto level RNG.
Either the enemy growths use Average Stats or somehow all enemy stats are randomized at the start of the game and don’t change after resetting, only changing when you completely start over, like how FE Fates Conquest has fixed level ups for the player units. (The latter is probably completely unreasonable but it would be the ideal solution imo.)
-
Adjust enemy base stats: Lower enemy base Def by 1 and/or maybe HP by 1~3 points. (or alternatively increase them if the increased difficulty was intentional)
This way even if the stats change a bit it won’t have any real impact on gameplay.
-
Remove enemy growths (especially Hard Mode bonuses) in the first few chapters:
The time when the impact of enemy stats changing between resets is the most impactful in the beginning, before prep screen and stat boosters can be used, and before level ups have added variance to the player units.
At least I think you should remove the +2 hard mode enemy level bonus in the Prologue chapter.
Also, like I mentioned before, if Agnessa had 31 HP instead of 30 she’d pretty much increase her survivability by 50% to all the steel axe users (dying in 3 attacks instead of 2), but maybe this was intentional?
While there’s some pros to having varied enemy stats, like (which is also why ideally stats would be random but not change after resetting) I think that the difficulty massively changing depending on +/- one or two stats here and there takes away from the real highlight of this hack, which is the map layout, unit positioning and calculated stats.
The variance would be interesting if players had to readjust their strategy between runs (and I guess if you play Ironman you’d have to, but as much as I like what I’ve seen of this hack so far I would never ever play this Hard mode ironman, and I don’t think you’ve really intended for the game to be played in Ironman either), but when my choices are to rethink my strategy and come up with a bunch of alternatives or reset the game a few times until I get the right enemy stats I’m just going to reset the game.
Note: I originally just intended to give some feedback but I got really hung up on talking about Chapter 5 “Slumber Disturbed” so I moved it to last and a TL:DR would be that I’d really like if that cliff tile wasn’t a cliff tile  .
.
A question/suggestion about this cliff tile (highlighted with ingame cursor) in the 5th map “Slumber Disturbed”:
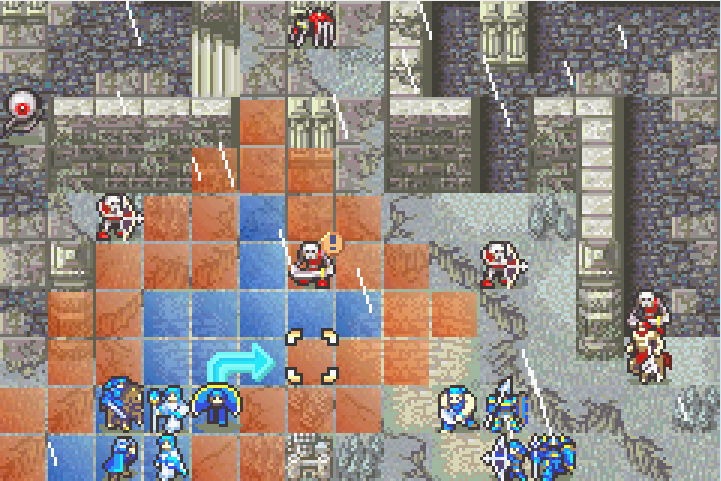
Is it intentional that units can’t move there? (I guess you’d have to make the forest tile below impassible terrain instead)
Lots of rambling about this cliff tile and current vs potential turn 1 & 2 actions
With the extra space from removing the cliff I would be able to use two 2-range chippers and a Melee to finish the skeleton off without retaliation or one chipper + one Melee + potential healing (keep in mind the skeleton can crit, so Agnessa barely survive if she get a Def level up or use Guard Lance) or Agnessa attacking from 2 Range (diagonally from the down-left outside of Strigoi range) + 1-2 Chippers (If I use Agnessa with Short lance + Francis with Thunder then they can kill the skeleton without a 2nd chipper, but my Francis has 3 overkill damage with thunder, and he’s got +2 Mag compared to his base stats.
Now I’m not sure how lucky/unlucky I was with the enemy auto level RNG when I checked this, but I imagine it’s pretty close.
And ofc this is under the assumption that the player has Short Lance and Thunder uses left, I bought a Javelin and mostly used Fire to conserve uses, so I had no problem (other than remembering that I had a short lance in supply  )
)
And in melee range, like I said, if you get critted by the skeleton then Agnessa will be in danger of dying to the Strigoi, and she can’t kill the skeleton if she uses Guard Lance, so you have to have a chipper. And if she did get critted then you need to heal her, which means you have to use Avani to kill from 3 range.
My Old & New Turn 1 Strat
Chip with Francis then finish off the skeleton with Agnessa, and pull the Maelduin with Camian.
After checking more thoroughly, while making this post, the Strigoi moves even if there’s no player unit it can attack.
Since I originally wasn’t aware of that, I gave a speed booster to Camian so he doesn’t get doubled by the Maelduin, since I wanted to pull both the Strigoi and Maelduin to advance faster.
So there was no need for Agnessa to pull and tank the Strigoi as I can kill the skeleton with one chip + agnessa 2 range and could’ve used her to pull the Maelduin without having to boost Camian’s speed for him to do it.
My Old Turn 1 Strat Positioning:
New Strat:
Anyway, so it seems my original Chapter 5 “Slumber Disturbed” turn 1 strat I used wasn’t necessary and sorry that this post became so long since I thought that maybe I should look a bit into things.
Though it still would’ve been nice to have that extra tile of space just so it’s not as crowded and hard to reposition the units.
1 Like
Thanks for the detailed critique!
While I’m not a huge fan of fixed enemy growths, I could see the early game especially on Hard mode being an exception, if only because of how limited experience gains and level ups are at that point. At the very least I could look into (further) decreasing hard mode bonuses in order to make kill combines more consistent. By first few chapters, do you mean the first three before battle preps become a thing?
The intention with varying stats is to make players rethink their strategy, but in retrospect it might be better to decrease the variance in early game due to players having less options.
Steel Axe damage is very much intentional, so that probably won’t change.
As for Chapter 5, yes, the tile being impassable for non-fliers is intentional because it is a cliff tile. While I usually don’t make changes based on a very specific strategy, I agree there is merit in freeing that tile - the one below it is impassable already because it’s Thicket, not forest. Note that you can avoid critical hits with Hoplon Guard if you have it. I also expect Hard mode players to come well-prepared for this map - Hard mode is very brutal as is, even more so if it’s your first playthrough of the hack.
Last but not least, you’re correct on that I didn’t design this hack with Ironmanning in mind.
1 Like
Pretty much. The map I reset the most on was probably actually the prologue (well I probably had even more resets in total on the boat map because I tend to skip dialog & forgot about the hint, and I completed the map 2 times without recruiting Obelich… ![]() )
)
Fog Map was pretty consistent, biggest variable is probably Agnessa’s crit. Francis not having 100% accuracy was annoying at times since I don’t really think you can do anything if he misses in the first few turns, though that rarely happened.
The boat map for me was probably the most consistent, though I distinctly recall that depending on whether the Fighter with Sword Reaver in the beginning had 25 or 24 attack, my Francis could tank and ORKO him as well as surviving against the Monk with 1 HP (not sure if this is level up dependent though as I don’t recall if Francis got any extra HP/Def/Res. I had given him +1 speed with stat booster though).
That’s very insignificant though since all it’s really for is to just feed him some EXP instead of having Agnessa kill the sword reaver.
Before I realized how to recruit Obelich I’d also use Camian with a handaxe to chip the Mercenary on the left, which if it hits could potentially save Skylar some HP by not having to take retaliation. That didn’t really matter since I’d go right afterwards and have a turn to use a Vuln and even if it did matter there was never a need for it after getting Obelich as he has 100% hit rate against the same unit and dealt enough damage for Skylar to finish him off with one hit.
Besides the prologue I think the 4th chapter (Karkos Mountains) was my most inconsistent, despite having battle preps. I don’t really think this one had much to do with enemy stat RNG though.
I actually liked that one a lot and it could’ve been my favorite, but the enemy AI with physic and sleep staff made the Mage Knights act inconsistently/weirdly.
Well, I’d say they do act very consistently, they pretty much always Heal and Sleep whenever they can regardless of anything else, but in particular having the first Mage Knight use Physic or not changed depending on if there was a target to heal, and that would depend on RNG, Agnessa would get a crit and suddenly there’s nothing to heal cause the unit died. The unit I was gonna reduce the HP of to get her heal it wouldn’t get hit had thus have full HP, etc.
Though the first one didn’t really matter cause I just eventually decided to ignore her and go the way around, and then finish her off from behind over the snag bridge.
And after not having to deal with the Physic Shenanigans it wasn’t really inconsistent anymore, and it’s easy enough to bait her out while most of the units stand around doing nothing (well they’d be blocking and/or killing the reinforcements from the forts I guess) and a few units deal with the villages.
Also, I think rescuing the villages was pretty easy, though actually visiting them was harder, because you only need to stand within range of the Brigands for them to attack your units instead of destroying the villages.
Being able to visit the village for the Zanbato and send it directly to convoy made it super nice and easy for Skylar to get his hands on it and kill the Paladin.
The actual Boss didn’t act inconsistently, but it did act weirdly (at least for me who tbh haven’t that much experience with playing FE GBA) and became trivially easy to kill because of it.
First of all it turned out that in GBA units with an existing status condition (e.g. Poison, which there’s quite a bit of on this map) don’t get targeted by status staves, and the unit I tried to bait out Sleep Staff uses with happened to be poisoned. (Well, more experienced GBA players would’ve known this, so you might’ve as well.)
I thought that would be a bad thing but as it turned out having the boss conserve sleep staff uses was only a good thing, because later when I went for the boss I used the wrong weapon with Agnessa which meant Skyler was 1 dmg off from finishing off the boss with the Zanbato.
And Agnessa was at 1 HP from the retaliation, so I was about to reset the game, but as it turns out the Boss actually used the Sleep on Agnessa instead of killing her even though Agnessa stood right next to the boss and had 1 HP.
So in hindsight I think this chapter might be a lot easier to beat than expected.
Anyway, I don’t really suggest changing anything, the map layout and enemy placement is as usual in for this hack really good.
Well the enemy reinforcements really took their sweet time so I had plenty of time to get all objectives, I even ended up stealing the Guiding Ring with Skylar since he had 1 dmg too little to finish the boss off…
I’m assuming that the condition of “crossing the river” for the General to appear (many turns later) is because if one were to go across the snag they’d save a lot of turns, thereby making the reinforcements be turn dependent might not be great.
But maybe you could have both (and for all I know you already have that), as in if the player “cross the river” OR take too many turns the Boss will call for reinforcements. Though honestly just having the villages as is is enough, cause if the General shows up too early that might just be an even worse problem than feeling like the Reinforcements are too late.
If it’s somehow possible, I’d definitely make the Boss prioritize killing over using the sleep staff though.
p.s. also since I am resetting quite a lot, doing a lot of trial and error to get perfect/close to perfect wins I might just be brute-forcing wins so since I’m not sure exactly where I’d rank on player skill (though I’d like to think I’m pretty decent at least ![]() ) my feedback might be a bit too biased.
) my feedback might be a bit too biased.
p.p.s also I realized I never mentioned this, but I’m playing Eligor’s Spear version 1.31.
Edit: Forgot to reply to this part
Ah yeah I’ve got it. I believe the only item/secondary objective I haven’t gotten is the Red Gem from the 2nd map as I prioritized the cave instead.
Though if I replay this map I’ll try to get both by sending Avanni to the cave, haven’t tested it though.
I think I mostly didn’t think about giving Agnessa the Hoplon Guard because she’s the one that I’ve really had to struggle with inventory issues, as I’ve been trying to conserve Silver Lance uses but Steel Lance slows her down a lot, so I also gave her an Iron Lance as well (As the Guard Lance is often just too low Might).
But yes, forgetting about the hoplon guard was a complete oversight by me.
1 Like
It is possible to hit all bonus objectives at least up until the last 2-4 (depending on how you count them) missions. I am still working on the endgame portion of a run doing that on hard myself.
Unclear if it can be done with 0% cheese (there are certain places you can grind extra experience abusing forts and the like to get ahead on stats as much as possible. Even doing this doesn’t make things THAT much easier, and might honestly be necessary to continue the “all objectives” run because of how tight the timing is for certain objectives, making the extra stats very very welcome)
You also haven’t hit the mission I have the most resets on yet. Though I too had a LOT of resets on maps 2-4.
I tend to agree with your assessment on how big 1 HP/Def/Str on the stat rerolls can impact things. Most of the time it really wasn’t a question of “what is the next best plan” but just “this will not work without unacceptable losses now” and becomes essentially an RNG reset.
Personally I think keeping the randomness for combat (and your own growths) is fine, but would much prefer guaranteed enemy growths overall, or at least eliminating variance on the core stats that determine whether an enemy dies (def/res/hp). Most of your units are fast enough or slow enough that I have not seen the variance impact whether someone doubles/is doubled or not. And the differences in accuracy one extra/fewer point makes is not game breaking (ether the combat RNG is kind or it isn’t), so I think skill, speed, and luck can be left alone.
Though, as a bit of caution (I will try and couch this in the least spoilery way possible) I do not believe it is possible to obtain /everything/. There are at least certain points where obtaining some things means foregoing others, but they are for the most part obvious and/or explicit about it (and the question for maximum completion is what is the least ‘valuable’ portion to forego. Resolving this is actually where I am stuck on my completionist hard mode run as there is a particularly troublesome level for this reason. On the plus side, it is easily my favorite level of the entire route and has been a pleasure to get to spend so much time on it optimizing). There are also some things that there is little or no reason for you to know are obtainable except by accident or spoilers.
3 Likes
I’m now replaying this chapter, and for some reason I didn’t think about using Rescue.
Skylar just so happens to be unable to do anything and is on the left side where the Chipper needs to be, so even if you get unlucky level ups, ran out of short spear and thunder uses (or just want higher hit% on the skeleton or is stingy like me and do it just to conserve uses…) you can just rescue with Skylar and drop with someone else and thereby get 2 Chippers + Agnessa vs the Skeleton even without the extra tile.
I’m sure you already knew about this, so I’m feeling a bit silly now.
I still think having that tile space would be nice and convenient, but on the flipside, not being able to stand there has forced me to think more. So far I got away with minimal use of rescue, so in some ways this inconvenience might be a good thing.
1 Like
Currently replaying the game from the start, as I’m trying to record my strategies for beating the maps and provide some better feedback. (I started a new topic for this purpose so I don’t end up cluttering this thread: Astaroth records (crappy video) strategies for beating Eligor's Spear maps)
After already having completed 5 chapters on Hard, and really have to start thinking more in-depth, and then come to revisit the prologue, I’ve started to think that the it’s actually just fine in terms of enemy stat variance.
Even without perfect enemy stats it’s still very likely to win while getting all side objectives.
So in hindsight I do feel like I initially had a bit too much of a knee-jerk reaction and wasn’t actively looking for solutions hard enough when I gave my initial feedback, probably in part because in the beginning that’s just not really expected from a Fire Emblem game. ( And to be fair it’s at lot more convenient to just reset and/or use savestates than to make multiple plans and replan for several future turns ahead depending on RNG)
So rather than giving feedback with words I think simply recording how I play and letting you draw conclusions from that would be more valuable and less likely to give bad feedback.
But then there’s also this: A Level 2 Fighter that has from 11 to 13 STR and 6 to 8 DEF (50 sec youtube video recording), in the second map Chapter 1/Nightfall Ambush, I also noticed he can gain at least +1 HP and RES as well (not that RES should be relevant on this particular enemy.)
Probably not a huge deal for this one enemy, but it does make one wonder what about the other enemies?
Also, like someone else mentioned (now that I actually read through the previous posts in this topic), “having to reset” is technically not true—because if someone is willing to cut their losses then there’s definitely easier ways to beat the chapters if they don’t succumb to their inner completionist.
But then this hack isn’t exactly Ironman friendly, so the ‘cut your losses’ mindset isn’t really fitting either.
2 Likes
I’m actually still working on and off on what the routing would look like for relatively consistent ironmans. You still lose a lot of runs, but I think it should be feasible to get to level 5 more often than you brick on the way there due to bad RNG. It requires you knowingly abandoning a bunch of extra stuff, but I think otherwise works.
Map 5 is where I expect most runs to be lost. That map just has very little leeway due to when various things happen, and there’s a LOT of places you could get wrecked on RNG for no reason. However, most of those are likely just losing a non-critcal unit (hyledd or ivan in particular).
If you can get past that hurdle you can get quite a bit of safety grinding the gordon on the fort there. It is probably feasible to get both skylar and avanni to 20, promote and make it up to roughly level 8 or so (after promo) each if you buy enough extra weapons from the caravan menu before the level starts. Also likely you can get francis, olberich, and 1-2 other units up to level 20 prepromote.
Similarly, on the next map it is feasible to abuse the physic-use AI to grind a LOT of extra experience on a wide swath of units. Getting nelarca up to 20, promoting, and then grinding her to 20 summoner on that map is completely doable if you spend enough on flux tomes. That makes your life WAY easier for the rest of the entire run.
There are a couple other points in the campaign you can use to grind a bit, and doing so (I think) puts you in a position where if you overlevelled enough you SHOULD be in a solid position to not have too much trouble until the endgame.
I still need to run the math on what the optimal weapon/tome purchases are (and when) for levelling he various units, but I think on its face it feels feasible to ironman using such tactics to make it to the endgame north of 50% of the time that you make it past the cyclopses without any losses. (Though I frankly don’t know how often that map forces a reset, could be high).
4 Likes
Hey there. Can I apply the newest version patch to the older Eligors Spear ROM and everything will work and I can continue where I left off in the game? Or will I have to start over and/or repatch a clean fe8 rom?
Hi! You need to patch to a clean rom, but as long as that new rom and your save file names match, you shouldn’t lose any progress so you can continue from where you left off.
Hello,
I found a potential game-breaking bug, hopefully its fixable because I would hate to reset my run 
I completed the chapter where you recruit the female druid, in hard mode. For some reason, after i completed the chapter and saved my game in the world map, the next available map (which should have been the map where you recruit the Axe Fighter) starts with an incorrect FE8 script, which takes me to an old map, where you recruit Ivan. How can I solve this?
The only thing I remember doing is that I skipped scenes using the B button when I beat the last chapter (which made the screen look glitchy), so maybe this was the trigger?
2 Likes
Update: I found out that there IS a way to skip past this error. If I press A on the world map on the location PAST the flagged next chapter, it sends me to the correct chapter. I will post if the world map gets fixed, after beating this map
2 Likes
takes you to an old map in the sense of going there on the overworld? Or actually has you replay the map?
If the former, I think that’s just related to weird pathing on the overworld. I’ve definitely had times where I had to re-select a designation and the avatar would do weird shit on the way like go back and forth a few times before going the right way. My recollection is this actually happened in vanilla fe8 sometimes.
It actually had me replay the map. But I can confirm that after beating the next map, my world map looked normal
1 Like
Spoilers for Final chapter, I guess:
Summary
Was I not supposed to defeat Eligor in this chapter? The Item Guide mentions a Final II and I feel like the ending was missing a lot.
hmmmm curious how to do that. That could actually be useful XD.
Would that give you another Ivan and Hyledd?